Brother International ZE-856A Instruction Manual - English and Spanish - Page 39
Installing the bobbin winder, 9. Montage des Spulers, 9. Installation du bobineur de canette, 9.
 |
View all Brother International ZE-856A manuals
Add to My Manuals
Save this manual to your list of manuals |
Page 39 highlights
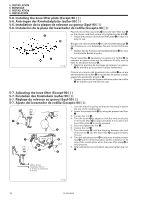
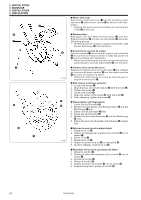
5. INSTALLATION 5. MONTAGE 5. INSTALLATION 5. INSTALACION 5-9. Installing the bobbin winder 5-9. Montage des Spulers 5-9. Installation du bobineur de canette 5-9. Instalación de la bobinadora 1281M w q e 5mm r r w 8mm e q 1. Push down the bobbin presser arm q as far as it will go. 2. Place the bobbin winder wheel w so that it pushes the belt e by approximately 5 mm, and then place the bobbin winder so that it is parallel with the belt hole in the work table. 3. Install the bobbin winder to the work table with the two screws r. 4. Pull the bobbin presser arm q back and check that there is approximately 8 mm of clearance between the bobbin winder wheel w and the belt e. 1. Drücken Sie den Spulenarm q so weit wie möglich nach unten. 2. Positionieren Sie das Spulerrad w, so daß der Riemen e um ungefähr 5 mm eingedrückt wird und richten Sie den Spuler parallel zur Riemenöffnung im Nähtisch aus. 3. Befestigen Sie den Spuler mit den beiden Schrauben r am Nähtisch. 4. Ziehen Sie den Spulenarm q zurück und kontrollieren Sie, ob der Abstand zwischen dem Spulerrad w und dem Riemen e ungefähr 8 mm beträgt. 1282M 1. Abaisser au maximum le bras q du presseur de canette. 2. Placer la roue w du bobineur de canette de manière qu'elle pousse la courroie e d'environ 5 mm, puis placer le bobineur de canette parallèlement au trou de courroie dans la table de travail. 3. Installer le bobineur de canette sur la table de travail à l'aide des deux vis r. 4. Tirer le bras q du presseur de canette vers l'arrière et vérifier qu'il y ait un écart d'environ 8 mm entre la roue w du bobineur de canette et la courroie e. 1. Empujar hacia abajo tanto como sea posible el brazo presionador de la bobina q. 2. Colocar la rueda de la bobinadora w de manera que empuje la correa e aproximadamente 5 mm, y luego colocar la bobinadora de manera que quede paralela con el orificio de la correa en la mesa de trabajo. 3. Instalar la bobinadora en la mesa de trabajo con los dos tornillos r. 4. Tirar del brazo presinador de la bobina q hacia atrás y verificar que exista una separación de aproximadamente 8 mm entre la rueda de la bobinadora w y la correa e. ZE-855A,856A 20
-
 1
1 -
2
-
3
-
4
-
5
-
6
-
7
-
8
-
9
-
10
-
11
-
12
-
13
-
14
-
15
-
16
-
17
-
18
-
19
-
20
-
21
-
22
-
23
-
24
-
25
-
26
-
27
-
28
-
29
-
30
-
31
-
32
-
33
-
 34
34 -
 35
35 -
 36
36 -
 37
37 -
 38
38 -
 39
39 -
 40
40 -
 41
41 -
 42
42 -
 43
43 -
 44
44 -
45
-
46
-
47
-
48
-
49
-
50
-
51
-
52
-
53
-
54
-
55
-
56
-
57
-
58
-
59
-
60
-
61
-
62
-
63
-
64
-
65
-
66
-
67
-
68
-
69
-
70
-
71
-
72
-
73
-
74
-
75
-
76
-
77
-
78
-
79
-
80
-
81
-
82
-
83
-
84
-
85
-
86
-
87
-
88
-
89
-
90
-
91
-
92
-
93
-
94
-
95
-
96
-
97
-
98
-
99
-
100
-
101
-
102
-
103
-
104
-
105
-
106
-
107
-
108
-
109
-
110
-
111
-
112
-
113
-
114
-
115
-
116
-
117
-
118
-
119
-
120
-
121
-
122
-
123
-
124
-
125
-
126
-
127
-
128
-
129
-
130
-
131
-
132
-
133
-
134
-
135
-
136
-
137
-
138
-
139
-
140
-
141
-
142
-
143
-
144
-
145
-
146
-
147
-
148
-
149
-
150
-
151
-
152
-
153
-
154
-
155
-
156
-
157
-
158
-
159
-
160
-
161
-
162
-
163
-
164
-
165
-
166
-
167
-
168
-
169
-
170
-
171
-
172
-
173
-
174
-
175
-
176
-
177
-
178
-
179
-
180
-
181
-
182
-
183
-
184
-
185
-
186
-
187
-
188
-
189
-
190
-
191
-
192
-
193
-
194
-
195
-
196
-
197
-
198
-
199
-
200
-
201
-
202
-
203
-
204
-
205
-
206
-
207
-
208
-
209
-
210
-
211
-
212
-
213
-
214
-
215
-
216
-
217
-
218
-
219
-
220
-
221
-
222
-
223
-
224
-
225
-
226
-
227
-
228
-
229
-
230
-
231
-
232
-
233
-
234
-
235
-
236
-
237
-
238
-
239
-
240
-
241
-
242
-
243
-
244
-
245
-
246
-
247
-
248
 |
 |
