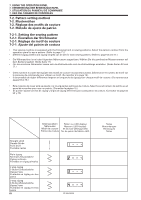
Brother International ZE-856A Instruction Manual - English and Spanish - Page 92
Muschelstichmuster, Hinweis, <N, hen spiegelbildlicher Stichmuster>, Scallop patterns, <
 |
View all Brother International ZE-856A manuals
Add to My Manuals
Save this manual to your list of manuals |
Page 92 highlights
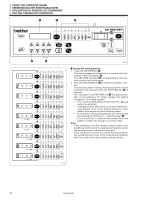
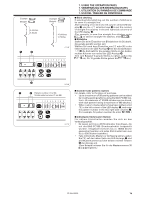
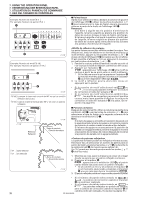
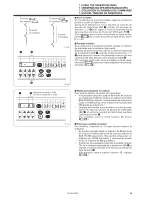
7. USING THE OPERATION PANEL 7. VERWENDUNG DER BEDIENUNGSTAFEL 7. UTILISATION DU PANNEAU DE COMMANDE 7. USO DEL TABLERO DE CONTROLES Example: Pattern number [5-2 ] Beispiel: Stichmusternummer [5-2 ] q w Example: Pattern number [5-1A] Beispiel: Stichmusternummer [5-1A] e 1435M r 1436M [5-1A] When material is rotated 90° and a reflection pattern is sewn [5-1A] wenn das Nähgut um 90° gedreht wird und das Muster spiegelbildlich genäht wird y t 1330M Reflection Spiegelbild 1331M Sewing direction Nährichtung [5-1 ] with no reflection [5-1 ] ohne Spiegelbild Sewing direction Nährichtung 1332M I Scallop patterns After selecting [5] or [6] in the left column of the LED display q, use the ĦĤ selection keys w to select the type of scallop in the second column from the right in the LED display q. Note: If the needle bar is at the needle up stop position, the needle bar will move to the sewing start position when the type of scallop is changed. If the needle bar is not at the needle up stop position, the needle bar will move to the sewing start position after it next moves to the needle up stop position. Scallop patterns can be reflected while sewing. To do this, when selecting a pattern number for a scallop pattern, press the Ħ and Ĥ selection keys r at the right of the LED display e so that [A] is displayed. (The [A] can be cleared by pressing the Ħ and Ĥ selection keys r once more.) 1. While sewing, stop the sewing machine at the point where you would like the reflection pattern to start being sewn. 2. Press the actuator t. AAAAA will appear in the LED display y and the pattern sewn from that point will be a reflection pattern. * If you make a mistake and press the actuator t at the wrong time, press the actuator t once more to clear the AAAAA display. 3. The reflection pattern can then be sewn by depressing the treadle. • If the pattern number selected is AAAAA or AAAAA, correction sewing using the actuator t will not be possible. • If the pattern number selected is AAAAA or AAAAA, reflection patterns cannot be sewn, but correction sewing using the actuator t will be possible instead. (Refer to page 91.) I Muschelstichmuster Wählen Sie nach dem Einstellen von [5] oder [6] in der linken Kolonne der LED-Anzeige q mit den Einstelltasten ĦĤ w den Muschelstich in der zweiten Kolonne von rechts auf der LED-Anzeige q. Hinweis: Falls sich die Nadelstange in der Stopposition für hochgestellte Nadel befindet, wird die Nadelstange beim Ändern des Muschelstichs in die Startposition gestellt. Falls sich die Nadelstange nicht in der Stopposition für hochgestellte Nadel befindet, wird die Nadelstange in die Startposition gestellt, sobald sich die Nadel in die Stopposition für hochgestellte Nadel bewegt. Muschelstichmuster können spiegelbildlich genäht werden. Stellen Sie dazu für das Muschelmuster mit den Tasten Ħ und Ĥ r auf der rechten Seite der LED-Anzeige e [A] ein. (Die Anzeige [A] läßt sich durch nochmaliges Drücken der Tasten Ħ und Ĥ r wieder löschen.) 1. Stoppen Sie die Nähmaschine an der Stelle, von der Sie das Muster spiegelbildlich nähen wollen. 2. Drücken Sie die Betätigungstaste t. Auf der LED-Anzeige y erscheint AAAAA und das Muster wird von dieser Stelle an spiegelbildlich genäht. * Falls Sie die Betätigungstaste t an einer falschen Stelle gedrückt haben, können Sie die Betätigungstaste t nochmals drücken, um die Anzeige AAAAA zu löschen. 3. Das Muster wird beim Drücken des Pedals von dieser Stelle an spiegelbildlich genäht. • Bei der Stichmusternummer AAAAA oder AAAAA können keine Korrekturstiche durch Drücken der Betätigungstaste t genäht werden. • Bei der Stichmusternummer AAAAA oder AAAAA können keine spiegelbildlichen Muster genäht werden. Es ist jedoch möglich Korrekturstiche durch Drücken der Betätigungstaste t zu nähen. (Siehe Seite 91.) 73 ZE-855A,856A
-
 1
1 -
2
-
3
-
4
-
5
-
6
-
7
-
8
-
9
-
10
-
11
-
12
-
13
-
14
-
15
-
16
-
17
-
18
-
19
-
20
-
21
-
22
-
23
-
24
-
25
-
26
-
27
-
28
-
29
-
30
-
31
-
32
-
33
-
34
-
35
-
36
-
37
-
38
-
39
-
40
-
41
-
42
-
43
-
44
-
45
-
46
-
47
-
48
-
49
-
50
-
51
-
52
-
53
-
54
-
55
-
56
-
57
-
58
-
59
-
60
-
61
-
62
-
63
-
64
-
65
-
66
-
67
-
68
-
69
-
70
-
71
-
72
-
73
-
74
-
75
-
76
-
77
-
78
-
79
-
80
-
81
-
82
-
83
-
84
-
85
-
86
-
 87
87 -
 88
88 -
 89
89 -
 90
90 -
 91
91 -
 92
92 -
 93
93 -
 94
94 -
 95
95 -
 96
96 -
 97
97 -
98
-
99
-
100
-
101
-
102
-
103
-
104
-
105
-
106
-
107
-
108
-
109
-
110
-
111
-
112
-
113
-
114
-
115
-
116
-
117
-
118
-
119
-
120
-
121
-
122
-
123
-
124
-
125
-
126
-
127
-
128
-
129
-
130
-
131
-
132
-
133
-
134
-
135
-
136
-
137
-
138
-
139
-
140
-
141
-
142
-
143
-
144
-
145
-
146
-
147
-
148
-
149
-
150
-
151
-
152
-
153
-
154
-
155
-
156
-
157
-
158
-
159
-
160
-
161
-
162
-
163
-
164
-
165
-
166
-
167
-
168
-
169
-
170
-
171
-
172
-
173
-
174
-
175
-
176
-
177
-
178
-
179
-
180
-
181
-
182
-
183
-
184
-
185
-
186
-
187
-
188
-
189
-
190
-
191
-
192
-
193
-
194
-
195
-
196
-
197
-
198
-
199
-
200
-
201
-
202
-
203
-
204
-
205
-
206
-
207
-
208
-
209
-
210
-
211
-
212
-
213
-
214
-
215
-
216
-
217
-
218
-
219
-
220
-
221
-
222
-
223
-
224
-
225
-
226
-
227
-
228
-
229
-
230
-
231
-
232
-
233
-
234
-
235
-
236
-
237
-
238
-
239
-
240
-
241
-
242
-
243
-
244
-
245
-
246
-
247
-
248
 |
 |
