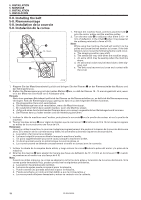
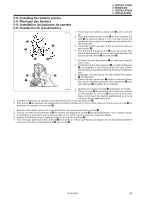
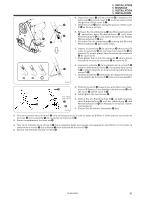
Brother International ZE-856A Instruction Manual - English and Spanish - Page 38
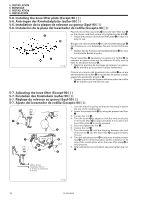
Installing the belt, 8. Riemenmontage, 8. Installation de la courroie, 8. Instalaci, n de la
 |
View all Brother International ZE-856A manuals
Add to My Manuals
Save this manual to your list of manuals |
Page 38 highlights
5. INSTALLATION 5. MONTAGE 5. INSTALLATION 5. INSTALACION 5-8. Installing the belt 5-8. Riemenmontage 5-8. Installation de la courroie 5-8. Instalación de la correa q 10 - 14mm w 1. Tilt back the machine head, and then place the belt q onto the motor pulley and the machine pulley. 2. Turn the two nuts w to adjust so that there is 10 - 14 mm of deflection in the V-belt q when it is pressed at the midway point with a force of 5 N. Note: While using the machine, the belt will conform to the pulley and cause the belt tension to loosen. If the belt tensions is too loose the following faults could occur. a. The stopping position may shift, b. The needle bar may drift when the machine stops, c. An extra stitch may be sewing when the machine stops, d. An abnormal noise may be heard due to belt slipping, and e. The belt may become too loose and contact with the cover. 1280M 1. Klappen Sie das Maschinenoberteil zurück und bringen Sie den Riemen q an der Riemenscheibe des Motors und der Nähmaschine an. 2. Stellen Sie Riemenspannung mit den beiden Muttern w ein, so daß der Riemen 10 - 14 mm eingedrückt wird, wenn er in der Mitte mit einer Kraft von 5 N belastet wird. Hinweis: Nach einer gewissen Betriebszeit paßt sich der Riemen an die Riemenscheiben an, so daß sich die Riemenspannung verringert. Falls die Riemenspannung zu gering ist, kann es zu den folgenden Fehlern kommen. a. Die stopposition Kann sich verschieben. b. Die Nadelstange kann sich verschieben, wenn die Maschine stoppt. c. Ein zusätzlicher Strich kann genäht werden, wenn die Machine stoppt. d. Aufgrund eines durchrutschenden Riemens kann es zu einem ungewöhnlichen Betriebsgeräusch kommen. e. Der Riemen kann zu locker werden und die Abdeckung berühren. 1. Incliner la tête de machine vers l'arrière, puis placer la courroie q sur la poulie de moteur et sur la poulie de machine. 2. Tourner les deux écrous w pour régler de manière que la courroie en V q s'enfonce de 10 à 14 mm lorsqu'on appuie au milieu de la courroie avec une force de 5 N. Remarque: Lorsqu'on utilise la machine, la courroie s'adaptera progressivement à la poulie et la tension de la courroie diminuera alors. Si la tension de la courroie est trop faible, les anomalies suivantes risqueront de se produire. a. La position d'arrt pourra se décaler, b. La barre à aiguille pourra se décaler lorsque la machine s'arrête, c. Un point supplémentaire pourra tre cousu lorsque la machine s'arrête, d. Un bruit anormal pourra tre émis lorsque la courroie glisse, et e. La courroie pourra se détendre excessivement et entrer en contact avec le couvercle. 1. Inclinar la cabeza de la máquina hacia aztrás, y luego colocar la correa q sobre la polea del motor y la polea de la máquina. 2. Girar las dos tuercas w para ajustar de manera que haya una deflexión de 10 - 14 mm en la correa en V q cuando se presiona en el medio con una fuerza de 5 N. Nota: Cuando se utiliza máquina, la correa se adaptará a la forma de la polea y la tensión de la correa disminuirá. Si la correa queda demasiado floja, pueden producirse los siguientes problemas. a. La posición de parada puede cambiar, b. La barra de agujas puede correrse al parar la máquina, c. Puede coserse una puntada adicional al parar la máquina, d. Puede escucharse un ruido anormal debido a que la correa patina, y e. La correa puede aflojarse demasiado y entrar en contacto con la cubierta. 19 ZE-855A,856A
-
 1
1 -
2
-
3
-
4
-
5
-
6
-
7
-
8
-
9
-
10
-
11
-
12
-
13
-
14
-
15
-
16
-
17
-
18
-
19
-
20
-
21
-
22
-
23
-
24
-
25
-
26
-
27
-
28
-
29
-
30
-
31
-
32
-
 33
33 -
 34
34 -
 35
35 -
 36
36 -
 37
37 -
 38
38 -
 39
39 -
 40
40 -
 41
41 -
 42
42 -
 43
43 -
44
-
45
-
46
-
47
-
48
-
49
-
50
-
51
-
52
-
53
-
54
-
55
-
56
-
57
-
58
-
59
-
60
-
61
-
62
-
63
-
64
-
65
-
66
-
67
-
68
-
69
-
70
-
71
-
72
-
73
-
74
-
75
-
76
-
77
-
78
-
79
-
80
-
81
-
82
-
83
-
84
-
85
-
86
-
87
-
88
-
89
-
90
-
91
-
92
-
93
-
94
-
95
-
96
-
97
-
98
-
99
-
100
-
101
-
102
-
103
-
104
-
105
-
106
-
107
-
108
-
109
-
110
-
111
-
112
-
113
-
114
-
115
-
116
-
117
-
118
-
119
-
120
-
121
-
122
-
123
-
124
-
125
-
126
-
127
-
128
-
129
-
130
-
131
-
132
-
133
-
134
-
135
-
136
-
137
-
138
-
139
-
140
-
141
-
142
-
143
-
144
-
145
-
146
-
147
-
148
-
149
-
150
-
151
-
152
-
153
-
154
-
155
-
156
-
157
-
158
-
159
-
160
-
161
-
162
-
163
-
164
-
165
-
166
-
167
-
168
-
169
-
170
-
171
-
172
-
173
-
174
-
175
-
176
-
177
-
178
-
179
-
180
-
181
-
182
-
183
-
184
-
185
-
186
-
187
-
188
-
189
-
190
-
191
-
192
-
193
-
194
-
195
-
196
-
197
-
198
-
199
-
200
-
201
-
202
-
203
-
204
-
205
-
206
-
207
-
208
-
209
-
210
-
211
-
212
-
213
-
214
-
215
-
216
-
217
-
218
-
219
-
220
-
221
-
222
-
223
-
224
-
225
-
226
-
227
-
228
-
229
-
230
-
231
-
232
-
233
-
234
-
235
-
236
-
237
-
238
-
239
-
240
-
241
-
242
-
243
-
244
-
245
-
246
-
247
-
248
 |
 |
