Brother International ZE-856A Instruction Manual - English and Spanish - Page 50
A-90 [ ] oder Sonderzubeh
 |
View all Brother International ZE-856A manuals
Add to My Manuals
Save this manual to your list of manuals |
Page 50 highlights
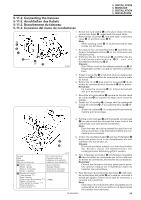
5. INSTALLATION 5. MONTAGE 5. INSTALLATION 5. INSTALACION 5-11-4. Connecting the automatic presser foot lifter harness (856A-90 [ ] or option) 5-11-4. Anschließen des Kabels für den automatischen Stoffdrückerfußhebers (856A-90 [ ] oder Sonderzubehör) 5-11-4. Branchement du faisceau de releveur de pied presseur automatique (856A-90 [ ] ou option) 5-11-4. Conexión del mazo de conductores del levantador del prensatelas automático (856A-90 [ ] u opcional) y PE t u t e r r q e w P18 1296M 1. Connect the relay harness q to the connector w coming out from P18, and secure the relay harness q with the cord clamp e as shown in the illustration. 2. Pass the relay harness q out through the upper hole in the control box. 3. Remove the screw r at the center of the place where "RE" appears, and then install the ground wire t for the relay harness q. (The green-and-yellow wire is the ground wire.) 4. Pass the automatic presser foot lifter harness y through the cord clamp u and connect it to the relay harness q. 5. Set DIP switch 1-3 to ON. (Refer to page 171.) 1. Schließen Sie das Relaiskabel q am Stecker w von P18 an und befestigen Sie das Relaiskabel q mit der Kabelklemme e, wie in der Abbildung gezeigt. 2. Führen Sie das Relaiskabel q durch das obere Loch des Schaltkastens. 3. Entfernen Sie die Schraube r bei der Markierung "RE" und bringen Sie das Erdungskabel t für den Relaiskabelbaum q an. (Das grüngelbe Kabel ist das Erdungskabel.) 4. Führen Sie das Kabel y des automatischen Stoffdrückerfußhebers durch die Kabelklemme u und schließen Sie es am Relaiskabel q an. 5. Stellen Sie die DIP-Schalter 1-3 auf "ON". (Siehe Seite 171.) 1. Brancher le faisceau de relais q au connecteur w qui sort de P18, et fixer le faisceau de relais q à l'aide du serre-fils e comme indiqué sur l'illustration. 2. Passer le faisceau de relais q en le sortant par le trou supérieur du boîtier de commande. 3. Retirer la vis r au centre de l'endroit où l'indication "RE" apparaît, puis installer le fil de masse t du faisceau de relais q. (Le fil vert et jaune est le fil de masse.) 4. Passer le faisceau de releveur de pied presseur automatique y par le serre-fils u et le brancher au faisceau de relais q. 5. Mettre l'interrupteur DIP 1-3 sur la position de marche. (Se reporter à la page 171.) 1. Conectar el mazo de conductores del relevador q al conector w que sale de P18, y asegurar el mazo de conductores del relevador q con el sujetacables e tal como se indica en la figura. 2. Pasar el mazo de conductores del relevador q hacia afuera a través del agujero superior en la caja de controles. 3. Retirar el tornillo r en el centro del lugar donde aparece "RE", y luego instalar el cable a tierra t para el mazo de conductores del relevador q. (El cable verde y amarillo es el cable a tierra.) 4. Pasar el mazo de conductores del levantador del prensatelas automático y a través del sujetacables u y conectarlo al mazo de conductores del relevador q. 5. Ajustar el interruptor 1-3 a ON. (Consultar la página 171.) 31 ZE-855A,856A
-
 1
1 -
2
-
3
-
4
-
5
-
6
-
7
-
8
-
9
-
10
-
11
-
12
-
13
-
14
-
15
-
16
-
17
-
18
-
19
-
20
-
21
-
22
-
23
-
24
-
25
-
26
-
27
-
28
-
29
-
30
-
31
-
32
-
33
-
34
-
35
-
36
-
37
-
38
-
39
-
40
-
41
-
42
-
43
-
44
-
 45
45 -
 46
46 -
 47
47 -
 48
48 -
 49
49 -
 50
50 -
 51
51 -
 52
52 -
 53
53 -
 54
54 -
 55
55 -
56
-
57
-
58
-
59
-
60
-
61
-
62
-
63
-
64
-
65
-
66
-
67
-
68
-
69
-
70
-
71
-
72
-
73
-
74
-
75
-
76
-
77
-
78
-
79
-
80
-
81
-
82
-
83
-
84
-
85
-
86
-
87
-
88
-
89
-
90
-
91
-
92
-
93
-
94
-
95
-
96
-
97
-
98
-
99
-
100
-
101
-
102
-
103
-
104
-
105
-
106
-
107
-
108
-
109
-
110
-
111
-
112
-
113
-
114
-
115
-
116
-
117
-
118
-
119
-
120
-
121
-
122
-
123
-
124
-
125
-
126
-
127
-
128
-
129
-
130
-
131
-
132
-
133
-
134
-
135
-
136
-
137
-
138
-
139
-
140
-
141
-
142
-
143
-
144
-
145
-
146
-
147
-
148
-
149
-
150
-
151
-
152
-
153
-
154
-
155
-
156
-
157
-
158
-
159
-
160
-
161
-
162
-
163
-
164
-
165
-
166
-
167
-
168
-
169
-
170
-
171
-
172
-
173
-
174
-
175
-
176
-
177
-
178
-
179
-
180
-
181
-
182
-
183
-
184
-
185
-
186
-
187
-
188
-
189
-
190
-
191
-
192
-
193
-
194
-
195
-
196
-
197
-
198
-
199
-
200
-
201
-
202
-
203
-
204
-
205
-
206
-
207
-
208
-
209
-
210
-
211
-
212
-
213
-
214
-
215
-
216
-
217
-
218
-
219
-
220
-
221
-
222
-
223
-
224
-
225
-
226
-
227
-
228
-
229
-
230
-
231
-
232
-
233
-
234
-
235
-
236
-
237
-
238
-
239
-
240
-
241
-
242
-
243
-
244
-
245
-
246
-
247
-
248
 |
 |
