Brother International PS-300B Instruction Manual - English - Page 1
Brother International PS-300B Manual
 |
View all Brother International PS-300B manuals
Add to My Manuals
Save this manual to your list of manuals |
Page 1 highlights
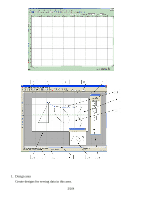
How to use this online Help This online Help consists of the following three chapters. Refer to the chapter appropriate for finding the information you need. Chapter 1: Windows and icons This chapter gives you brief descriptions about the windows, icons and other items that appear in the main window of PS-300B. Details about each icon are described in Chapter 3. For example, you can find the name of the item you want to learn about in this chapter, then you can search for a more detailed explanation by using the Help INDEX or Keyword tool. Chapter 2: Tutorial You can learn the procedure for using PS-300B by making and exporting sewing data for the four typical sewing machine's media. This chapter may be useful especially for beginners. If you are more experienced, you may need only Chapter 3. Chapter 3: Reference Refer to this chapter for details about all the functions of PS-300B. The function descriptions are basically classified according to the groups shown in the menu. Chapter 1: Windows and icons This chapter gives you brief descriptions about the windows, icons and other items that appear in the main window of PS-300B. Main window items When starting up PS-300B, the main window and a new design area appear. In the design area, you will create designs or modify existing ones. All of the tools and functions for creating designs can be selected in this window. The following gives you brief descriptions of the windows and items shown in the main window. 1/164
-
 1
1 -
 2
2 -
 3
3 -
 4
4 -
 5
5 -
 6
6 -
 7
7 -
8
-
9
-
10
-
11
-
12
-
13
-
14
-
15
-
16
-
17
-
18
-
19
-
20
-
21
-
22
-
23
-
24
-
25
-
26
-
27
-
28
-
29
-
30
-
31
-
32
-
33
-
34
-
35
-
36
-
37
-
38
-
39
-
40
-
41
-
42
-
43
-
44
-
45
-
46
-
47
-
48
-
49
-
50
-
51
-
52
-
53
-
54
-
55
-
56
-
57
-
58
-
59
-
60
-
61
-
62
-
63
-
64
-
65
-
66
-
67
-
68
-
69
-
70
-
71
-
72
-
73
-
74
-
75
-
76
-
77
-
78
-
79
-
80
-
81
-
82
-
83
-
84
-
85
-
86
-
87
-
88
-
89
-
90
-
91
-
92
-
93
-
94
-
95
-
96
-
97
-
98
-
99
-
100
-
101
-
102
-
103
-
104
-
105
-
106
-
107
-
108
-
109
-
110
-
111
-
112
-
113
-
114
-
115
-
116
-
117
-
118
-
119
-
120
-
121
-
122
-
123
-
124
-
125
-
126
-
127
-
128
-
129
-
130
-
131
-
132
-
133
-
134
-
135
-
136
-
137
-
138
-
139
-
140
-
141
-
142
-
143
-
144
-
145
-
146
-
147
-
148
-
149
-
150
-
151
-
152
-
153
-
154
-
155
-
156
-
157
-
158
-
159
-
160
-
161
-
162
-
163
-
164
 |
 |