Brother International PS-300B Instruction Manual - English - Page 44
Changing the sewing order for all the design elements, Shift, Sequence Window, Auto Sequence, Sequence
 |
View all Brother International PS-300B manuals
Add to My Manuals
Save this manual to your list of manuals |
Page 44 highlights
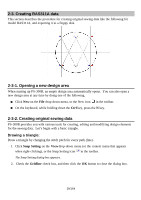
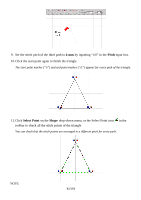
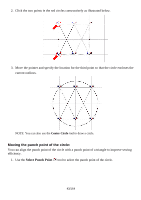
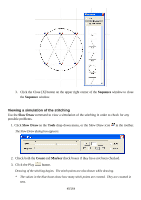
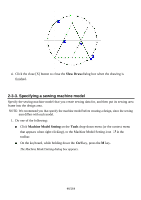
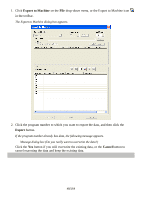
2. While holding down the keyboard's Shift key, drag the punch point of the circle and drop it on a punch point of a triangle. The punch point of the circle can only be moved along the circumference of the circle. Changing the sewing order for all the design elements You can change the sewing order for all the design elements to increase the sewing efficiency. 1. Click Sequence Window on the Viewdrop-down menu, or the Sequence window icon in the toolbar. The Sequence window appears. All the design elements are shown in separate frames, and arranged in the actual sewing order. 2. Click the Auto Sequence button in the Sequence window. The design elements are re-arranged in the order suitable for sewing. * If you check the Swap Start/End Point check box, the sewing direction (the start and end points) of each design element is also reversed automatically to increase efficiency. 44/164
-
 1
1 -
2
-
3
-
4
-
5
-
6
-
7
-
8
-
9
-
10
-
11
-
12
-
13
-
14
-
15
-
16
-
17
-
18
-
19
-
20
-
21
-
22
-
23
-
24
-
25
-
26
-
27
-
28
-
29
-
30
-
31
-
32
-
33
-
34
-
35
-
36
-
37
-
38
-
 39
39 -
 40
40 -
 41
41 -
 42
42 -
 43
43 -
 44
44 -
 45
45 -
 46
46 -
 47
47 -
 48
48 -
 49
49 -
50
-
51
-
52
-
53
-
54
-
55
-
56
-
57
-
58
-
59
-
60
-
61
-
62
-
63
-
64
-
65
-
66
-
67
-
68
-
69
-
70
-
71
-
72
-
73
-
74
-
75
-
76
-
77
-
78
-
79
-
80
-
81
-
82
-
83
-
84
-
85
-
86
-
87
-
88
-
89
-
90
-
91
-
92
-
93
-
94
-
95
-
96
-
97
-
98
-
99
-
100
-
101
-
102
-
103
-
104
-
105
-
106
-
107
-
108
-
109
-
110
-
111
-
112
-
113
-
114
-
115
-
116
-
117
-
118
-
119
-
120
-
121
-
122
-
123
-
124
-
125
-
126
-
127
-
128
-
129
-
130
-
131
-
132
-
133
-
134
-
135
-
136
-
137
-
138
-
139
-
140
-
141
-
142
-
143
-
144
-
145
-
146
-
147
-
148
-
149
-
150
-
151
-
152
-
153
-
154
-
155
-
156
-
157
-
158
-
159
-
160
-
161
-
162
-
163
-
164
 |
 |
