Brother International PS-300B Instruction Manual - English - Page 109
To select all data in the design area Edit-Select All, Ctrl+A
 |
View all Brother International PS-300B manuals
Add to My Manuals
Save this manual to your list of manuals |
Page 109 highlights
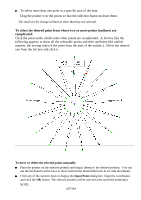
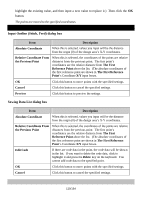
To delete the selected punch points, select Delete on the Edit drop-down menu, or click the Delete icon or the keyboard's Delete button. NOTE: The outline will be re-generated if its punch point is edited. If the outline's sewing data was already edited, a message appears asking if you really want to re-generate it. Click the Yes button to re-generate the outline. The previously-edited contents (added codes, edited points etc.) will all be cleared. Click the No button to cancel re-generation. To select all data in the design area (Edit-Select All, "Ctrl+A") Do one of the following: On the Edit drop-down menu, click Select All. On the keyboard, while holding down the Ctrl key, press the A key. A selection frame of "dashes" appears around all the data to show that they are selected. NOTE: To deselect all data, click outside of the selection frame. The design elements not displayed by the setting in Show/Hide on the View drop-down menu will not be selected. To check and edit punch points or a sewing data's needle-drop points: You can display the coordinates of all points on the selected outline or sewing data, and move the desired punch points by changing the coordinates of them. 1. Select an outline with the Select tool. 2. Click any of the numeric keys on the keyboard. The Select Data Type dialog box appears. 3. Select the data type you want to display. (a) If you want to show the outline's punch points, click the Show Punch Point of the Outline radio button. Then click the OK button. The Input Outline (Stitch, Feed) dialog box appears, and the coordinates of all punch points of the selected outline are shown in the list. (Refer to the items and their functions in the dialog box below.) (b) If you want to show the sewing data's needle-drop points, click the Show Sewing Data of the Outline radio button. Then click the OK button. The Sewing Data List dialog box appears, and the coordinates of all points are shown in the list. (Refer to the items and their functions in the dialog box below.) 4. To move the desired punch points: Change the coordinates of the points you want to move. (Click the desired cell to 109/164
-
 1
1 -
2
-
3
-
4
-
5
-
6
-
7
-
8
-
9
-
10
-
11
-
12
-
13
-
14
-
15
-
16
-
17
-
18
-
19
-
20
-
21
-
22
-
23
-
24
-
25
-
26
-
27
-
28
-
29
-
30
-
31
-
32
-
33
-
34
-
35
-
36
-
37
-
38
-
39
-
40
-
41
-
42
-
43
-
44
-
45
-
46
-
47
-
48
-
49
-
50
-
51
-
52
-
53
-
54
-
55
-
56
-
57
-
58
-
59
-
60
-
61
-
62
-
63
-
64
-
65
-
66
-
67
-
68
-
69
-
70
-
71
-
72
-
73
-
74
-
75
-
76
-
77
-
78
-
79
-
80
-
81
-
82
-
83
-
84
-
85
-
86
-
87
-
88
-
89
-
90
-
91
-
92
-
93
-
94
-
95
-
96
-
97
-
98
-
99
-
100
-
101
-
102
-
103
-
 104
104 -
 105
105 -
 106
106 -
 107
107 -
 108
108 -
 109
109 -
 110
110 -
 111
111 -
 112
112 -
 113
113 -
 114
114 -
115
-
116
-
117
-
118
-
119
-
120
-
121
-
122
-
123
-
124
-
125
-
126
-
127
-
128
-
129
-
130
-
131
-
132
-
133
-
134
-
135
-
136
-
137
-
138
-
139
-
140
-
141
-
142
-
143
-
144
-
145
-
146
-
147
-
148
-
149
-
150
-
151
-
152
-
153
-
154
-
155
-
156
-
157
-
158
-
159
-
160
-
161
-
162
-
163
-
164
 |
 |