Brother International PS-300B Instruction Manual - English - Page 3
Stitch Type, Running, Border, Pitch
 |
View all Brother International PS-300B manuals
Add to My Manuals
Save this manual to your list of manuals |
Page 3 highlights
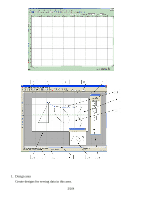
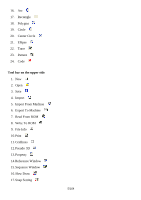
2. Gridlines Useful for drawing or moving a design element to the desired position. The gridlines can also be hidden if you do not require them. 3. Rulers Useful for specifying the coordinates of a point where you will make or move a design element. Rulers are also useful for checking the size of a design element or resizing it. 4. Scroll bars Drag and move the vertical or horizontal scroll bar to view the desired part of the design area. 5. Menu bar All functions of PS-300B can be selected from the drop-down menus in the menu bar. Refer to "Chapter 3. Reference" for details about the functions. 6. Toolbar Almost all of the functions of PS-300B can be selected simply by clicking the corresponding icon in the toolbar. Refer to "Icons in the toolbar" below for the names of all icons. 7. Stitch Type drop-down list You can select the stitch type (either Running or Border) for the outline you will draw in this selection box. 8. Pitch input box You can specify the stitch pitch for the outline you will draw by inputting a value in this input box. 9. Coordinate value display Displays the coordinates of the current position of the pointer. 10.Status bar Displays a brief explanation of the icon the pointer is pointing at. 11. Pointer This can be controlled with the mouse. Displayed when create outlines, stitch and feed data in the design area. The pointer is also used to select a command from the menu bar or toolbar. The shape of the pointer changes depending on the selected command. 3/164
-
 1
1 -
 2
2 -
 3
3 -
 4
4 -
 5
5 -
 6
6 -
 7
7 -
 8
8 -
 9
9 -
10
-
11
-
12
-
13
-
14
-
15
-
16
-
17
-
18
-
19
-
20
-
21
-
22
-
23
-
24
-
25
-
26
-
27
-
28
-
29
-
30
-
31
-
32
-
33
-
34
-
35
-
36
-
37
-
38
-
39
-
40
-
41
-
42
-
43
-
44
-
45
-
46
-
47
-
48
-
49
-
50
-
51
-
52
-
53
-
54
-
55
-
56
-
57
-
58
-
59
-
60
-
61
-
62
-
63
-
64
-
65
-
66
-
67
-
68
-
69
-
70
-
71
-
72
-
73
-
74
-
75
-
76
-
77
-
78
-
79
-
80
-
81
-
82
-
83
-
84
-
85
-
86
-
87
-
88
-
89
-
90
-
91
-
92
-
93
-
94
-
95
-
96
-
97
-
98
-
99
-
100
-
101
-
102
-
103
-
104
-
105
-
106
-
107
-
108
-
109
-
110
-
111
-
112
-
113
-
114
-
115
-
116
-
117
-
118
-
119
-
120
-
121
-
122
-
123
-
124
-
125
-
126
-
127
-
128
-
129
-
130
-
131
-
132
-
133
-
134
-
135
-
136
-
137
-
138
-
139
-
140
-
141
-
142
-
143
-
144
-
145
-
146
-
147
-
148
-
149
-
150
-
151
-
152
-
153
-
154
-
155
-
156
-
157
-
158
-
159
-
160
-
161
-
162
-
163
-
164
 |
 |
