Brother International PS-300B Instruction Manual - English - Page 113
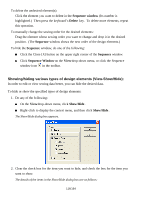
Showing/hiding design elements in the window
 |
View all Brother International PS-300B manuals
Add to My Manuals
Save this manual to your list of manuals |
Page 113 highlights
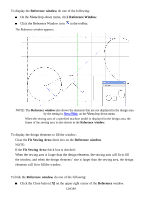
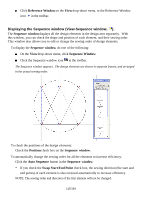
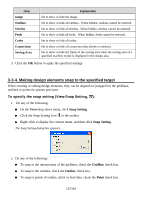
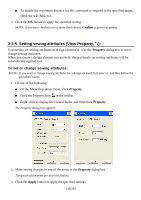
Drag the vertical scroll bar of the main window up and down. Press the keyboard's or key repeatedly or continuously. To move the design area from side to side: Do one of the following: Drag the horizontal scroll bar of the main window from side to side. Press the keyboard's or key repeatedly or continuously. 3-3-3. Showing/hiding design elements in the window Showing/hiding the gridlines (View-Gridlines, ): The gridlines are useful for aligning and measuring design element(s) in the design area. To show or hide the gridlines: l On the Viewdrop-down menu, click Gridlines. l Click the Gridline icon in the toolbar. NOTE: You can change the size and color of the gridlines in Grid Setting on the Tools dropdown menu. Displaying sewing data in a three dimensional image (View-Pseudo 3D, ): You can display the sewing data in the design area so that they are thicker, giving them a more three-dimensional feel. To switch the display mode from normal to pseudo 3D, and vice versa, do one of the following: On the Viewdrop-down menu, click Pseudo 3D. Click the Pseudo 3D icon in the toolbar. Displaying the Reference window (View-Reference window, ): The Reference window displays all the design elements. With this window, you can create elements while checking the overall image of the sewing data. 113/164
-
 1
1 -
2
-
3
-
4
-
5
-
6
-
7
-
8
-
9
-
10
-
11
-
12
-
13
-
14
-
15
-
16
-
17
-
18
-
19
-
20
-
21
-
22
-
23
-
24
-
25
-
26
-
27
-
28
-
29
-
30
-
31
-
32
-
33
-
34
-
35
-
36
-
37
-
38
-
39
-
40
-
41
-
42
-
43
-
44
-
45
-
46
-
47
-
48
-
49
-
50
-
51
-
52
-
53
-
54
-
55
-
56
-
57
-
58
-
59
-
60
-
61
-
62
-
63
-
64
-
65
-
66
-
67
-
68
-
69
-
70
-
71
-
72
-
73
-
74
-
75
-
76
-
77
-
78
-
79
-
80
-
81
-
82
-
83
-
84
-
85
-
86
-
87
-
88
-
89
-
90
-
91
-
92
-
93
-
94
-
95
-
96
-
97
-
98
-
99
-
100
-
101
-
102
-
103
-
104
-
105
-
106
-
107
-
 108
108 -
 109
109 -
 110
110 -
 111
111 -
 112
112 -
 113
113 -
 114
114 -
 115
115 -
 116
116 -
 117
117 -
 118
118 -
119
-
120
-
121
-
122
-
123
-
124
-
125
-
126
-
127
-
128
-
129
-
130
-
131
-
132
-
133
-
134
-
135
-
136
-
137
-
138
-
139
-
140
-
141
-
142
-
143
-
144
-
145
-
146
-
147
-
148
-
149
-
150
-
151
-
152
-
153
-
154
-
155
-
156
-
157
-
158
-
159
-
160
-
161
-
162
-
163
-
164
 |
 |