Brother International PS-300B Instruction Manual - English - Page 39
Creating BAS311A data, 2-3-1. Opening a new design area, 2-3-2. Creating original sewing data
 |
View all Brother International PS-300B manuals
Add to My Manuals
Save this manual to your list of manuals |
Page 39 highlights
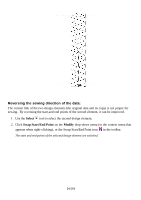
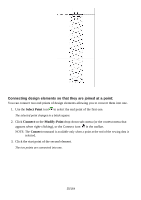
2-3. Creating BAS311A data This section describes the procedure for creating original sewing data like the following for model BAS311A, and exporting it to a floppy disk. 2-3-1. Opening a new design area When starting up PS-300B, an empty design area automatically opens. You can also open a new design area at any time by doing one of the following. Click New on the File drop-down menu, or the New icon in the toolbar. On the keyboard, while holding down the Ctrl key, press the N key. 2-3-2. Creating original sewing data PS-300B provides you with various tools for creating, editing and modifying design elements for the sewing data. Let's begin with a basic triangle. Drawing a triangle: Draw a triangle by changing the stitch pitch for every path (line). 1. Click Snap Setting on the Viewdrop-down menu (or the context menu that appears when right-clicking), or the Snap Setting icon in the toolbar. The Snap Setting dialog box appears. 2. Check the Gridline check box, and then click the OK button to close the dialog box. 39/164
-
 1
1 -
2
-
3
-
4
-
5
-
6
-
7
-
8
-
9
-
10
-
11
-
12
-
13
-
14
-
15
-
16
-
17
-
18
-
19
-
20
-
21
-
22
-
23
-
24
-
25
-
26
-
27
-
28
-
29
-
30
-
31
-
32
-
33
-
 34
34 -
 35
35 -
 36
36 -
 37
37 -
 38
38 -
 39
39 -
 40
40 -
 41
41 -
 42
42 -
 43
43 -
 44
44 -
45
-
46
-
47
-
48
-
49
-
50
-
51
-
52
-
53
-
54
-
55
-
56
-
57
-
58
-
59
-
60
-
61
-
62
-
63
-
64
-
65
-
66
-
67
-
68
-
69
-
70
-
71
-
72
-
73
-
74
-
75
-
76
-
77
-
78
-
79
-
80
-
81
-
82
-
83
-
84
-
85
-
86
-
87
-
88
-
89
-
90
-
91
-
92
-
93
-
94
-
95
-
96
-
97
-
98
-
99
-
100
-
101
-
102
-
103
-
104
-
105
-
106
-
107
-
108
-
109
-
110
-
111
-
112
-
113
-
114
-
115
-
116
-
117
-
118
-
119
-
120
-
121
-
122
-
123
-
124
-
125
-
126
-
127
-
128
-
129
-
130
-
131
-
132
-
133
-
134
-
135
-
136
-
137
-
138
-
139
-
140
-
141
-
142
-
143
-
144
-
145
-
146
-
147
-
148
-
149
-
150
-
151
-
152
-
153
-
154
-
155
-
156
-
157
-
158
-
159
-
160
-
161
-
162
-
163
-
164
 |
 |
