Brother International PS-300B Instruction Manual - English - Page 79
Previewing printing image (File-Print Preview), To preview the printing image
 |
View all Brother International PS-300B manuals
Add to My Manuals
Save this manual to your list of manuals |
Page 79 highlights
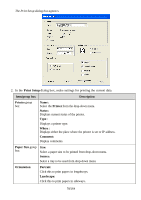
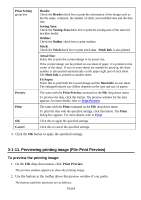
Print Setting group box Preview Print OK Cancel Header: Check the Header check box to print the information of the design such as the file name, comment, the number of stitch, last modified date and the data size. Sewing Area: Check the Sewing Area check box to print the sewing area of the selected machine model. Outline: Check the Outline check box to print outlines. Stitch: Check the Stitch check box to print stitch data. Stitch Info is also printed. Actual Size: Select this to print the current design in its actual size. If the current design can be printed on one sheet of paper, it is printed on the center of the sheet. If two or more sheets are needed for printing, the sheet number is also printed automatically on the upper right part of each sheet. The Sheet Info is printed on another sheet. Fit Paper: Select this to print both the current design and the Sheet Info on one sheet. The enlarged/reduced size differs depends on the type and size of papers. The same with the Print Preview command on the File drop-down menu. To preview the data, click this button. The preview window for the data appears. For more details, refer to Print Preview. The same with the Print command on the File drop-down menu. To print the data with the specified settings, click this button. The Print dialog box appears. For more details, refer to Print. Click this to apply the specified settings. Click this to cancel the specified settings. 3. Click the OK button to apply the specified settings. 3-1-11. Previewing printing image (File-Print Preview) To preview the printing image: 1. On the File drop-down menu, click Print Preview. The preview window appears to show the printing image. 2. Use the buttons in the toolbar above the preview window if you prefer. The buttons and their functions are as follows. 79/164
-
 1
1 -
2
-
3
-
4
-
5
-
6
-
7
-
8
-
9
-
10
-
11
-
12
-
13
-
14
-
15
-
16
-
17
-
18
-
19
-
20
-
21
-
22
-
23
-
24
-
25
-
26
-
27
-
28
-
29
-
30
-
31
-
32
-
33
-
34
-
35
-
36
-
37
-
38
-
39
-
40
-
41
-
42
-
43
-
44
-
45
-
46
-
47
-
48
-
49
-
50
-
51
-
52
-
53
-
54
-
55
-
56
-
57
-
58
-
59
-
60
-
61
-
62
-
63
-
64
-
65
-
66
-
67
-
68
-
69
-
70
-
71
-
72
-
73
-
 74
74 -
 75
75 -
 76
76 -
 77
77 -
 78
78 -
 79
79 -
 80
80 -
 81
81 -
 82
82 -
 83
83 -
 84
84 -
85
-
86
-
87
-
88
-
89
-
90
-
91
-
92
-
93
-
94
-
95
-
96
-
97
-
98
-
99
-
100
-
101
-
102
-
103
-
104
-
105
-
106
-
107
-
108
-
109
-
110
-
111
-
112
-
113
-
114
-
115
-
116
-
117
-
118
-
119
-
120
-
121
-
122
-
123
-
124
-
125
-
126
-
127
-
128
-
129
-
130
-
131
-
132
-
133
-
134
-
135
-
136
-
137
-
138
-
139
-
140
-
141
-
142
-
143
-
144
-
145
-
146
-
147
-
148
-
149
-
150
-
151
-
152
-
153
-
154
-
155
-
156
-
157
-
158
-
159
-
160
-
161
-
162
-
163
-
164
 |
 |