Brother International PS-300B Instruction Manual - English - Page 69
Import, If you import the data as a new file, follow the instructions below to place
 |
View all Brother International PS-300B manuals
Add to My Manuals
Save this manual to your list of manuals |
Page 69 highlights
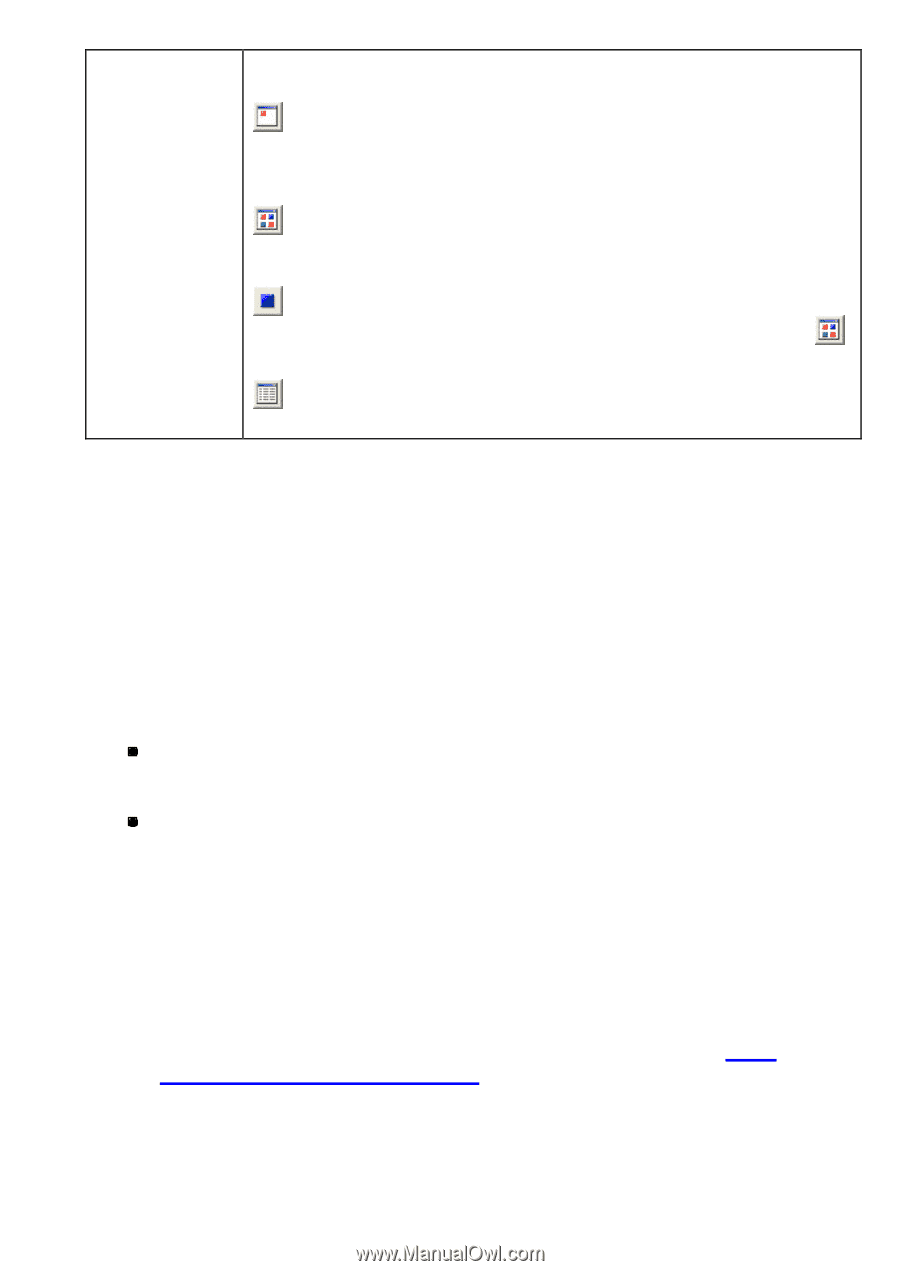
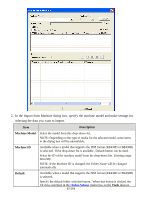
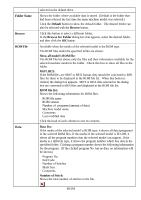
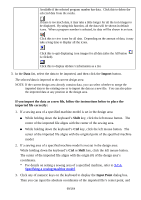
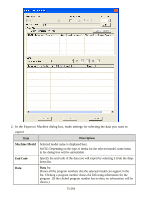
Available if the selected program number has data. Click this to delete the selected data from the media. If there is too much data, it may take a little longer for all the icon images to be displayed. By using this function, all the data will be shown in default icons. When a program number is selected, its data will be shown in an icon. Click this to view icons for all data. Depending on the amount of data, it may take a long time to display all the icons. Click this to quit displaying icon images for all data (after the All button is clicked). Click this to display all data's information as a list. 3. In the Data list, select the data to be imported, and then click the Import button. The selected data is imported to the current design area. NOTE: If the current design area already contains data, you can select whether to merge the imported data to the existing one or to import the data as a new file. You can also place the imported data at any position in the design area. If you import the data as a new file, follow the instructions below to place the imported file correctly: 1. If a sewing area of a specified machine model is set in the design area: While holding down the keyboard's Shift key, click the left mouse button. The center of the imported file aligns with the center of the sewing area. While holding down the keyboard's Ctrl key, click the left mouse button. The center of the imported file aligns with the original point of the specified machine model. 2. If a sewing area of a specified machine model is not set in the design area: While holding down the keyboard's Ctrl or Shift key, click the left mouse button. The center of the imported file aligns with the origin (0) of the design area's coordinates. * For details on setting a sewing area of a specified machine, refer to 3-7-5. Specifying a sewing machine model. 3. Click any of numeric keys on the keyboard to display the Input Point dialog box. Then you can input the absolute coordinates of the imported file's center point, and 69/164
-
 1
1 -
2
-
3
-
4
-
5
-
6
-
7
-
8
-
9
-
10
-
11
-
12
-
13
-
14
-
15
-
16
-
17
-
18
-
19
-
20
-
21
-
22
-
23
-
24
-
25
-
26
-
27
-
28
-
29
-
30
-
31
-
32
-
33
-
34
-
35
-
36
-
37
-
38
-
39
-
40
-
41
-
42
-
43
-
44
-
45
-
46
-
47
-
48
-
49
-
50
-
51
-
52
-
53
-
54
-
55
-
56
-
57
-
58
-
59
-
60
-
61
-
62
-
63
-
 64
64 -
 65
65 -
 66
66 -
 67
67 -
 68
68 -
 69
69 -
 70
70 -
 71
71 -
 72
72 -
 73
73 -
 74
74 -
75
-
76
-
77
-
78
-
79
-
80
-
81
-
82
-
83
-
84
-
85
-
86
-
87
-
88
-
89
-
90
-
91
-
92
-
93
-
94
-
95
-
96
-
97
-
98
-
99
-
100
-
101
-
102
-
103
-
104
-
105
-
106
-
107
-
108
-
109
-
110
-
111
-
112
-
113
-
114
-
115
-
116
-
117
-
118
-
119
-
120
-
121
-
122
-
123
-
124
-
125
-
126
-
127
-
128
-
129
-
130
-
131
-
132
-
133
-
134
-
135
-
136
-
137
-
138
-
139
-
140
-
141
-
142
-
143
-
144
-
145
-
146
-
147
-
148
-
149
-
150
-
151
-
152
-
153
-
154
-
155
-
156
-
157
-
158
-
159
-
160
-
161
-
162
-
163
-
164
 |
 |