Brother International PS-300B Instruction Manual - English - Page 138
How to use the Input Point dialog box, Click the Reference Line icon
 |
View all Brother International PS-300B manuals
Add to My Manuals
Save this manual to your list of manuals |
Page 138 highlights
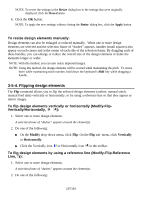
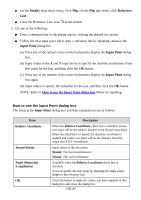
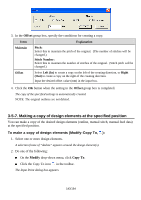
On the Modify drop-down menu, click Flip. On the Flip sub- menu, click Reference Line . Click the Reference Line icon in the toolbar. 3. Do one of the following: Draw a reference line in the design area by clicking the desired two points. Follow the next steps (a) to (d) to draw a reference line by inputting values in the Input Point dialog box. (a) Press any of the numeric keys on the keyboard to display the Input Point dialog box. (b) Input values in the X and Y input boxes to specify the absolute coordinates of the first point for the line, and then click the OK button. (c) Press any of the numeric keys on the keyboard to display the Input Point dialog box again. (d) Input value s to specify the end point for the line, and then click the OK button. NOTE: Refer to How to use the Input Point dialog box below for inputting. How to use the Input Point dialog box The items in the Input Point dialog box and their explanations are as follows. Item Relative Coordinate X(mm)/Y(mm) Angle (Degree(s)) /Length(mm) OK Description When the Relative Coordinate check box is checked, values you input will be the relative distance from the previous point. When the check box is cleared, the absolute coordinate is applied and values you input will be the distance from the origin (0) of X-Y coordinates. Input values of the next point. X(mm): The horizontal distance Y(mm): The vertical distance Available when the Relative Coordinate check box is checked. You can specify the next point by inputting the angle and/or length of the reference line. Click this button to apply the values you have inputted in this dialog box and close the dialog box. 138/164
-
 1
1 -
2
-
3
-
4
-
5
-
6
-
7
-
8
-
9
-
10
-
11
-
12
-
13
-
14
-
15
-
16
-
17
-
18
-
19
-
20
-
21
-
22
-
23
-
24
-
25
-
26
-
27
-
28
-
29
-
30
-
31
-
32
-
33
-
34
-
35
-
36
-
37
-
38
-
39
-
40
-
41
-
42
-
43
-
44
-
45
-
46
-
47
-
48
-
49
-
50
-
51
-
52
-
53
-
54
-
55
-
56
-
57
-
58
-
59
-
60
-
61
-
62
-
63
-
64
-
65
-
66
-
67
-
68
-
69
-
70
-
71
-
72
-
73
-
74
-
75
-
76
-
77
-
78
-
79
-
80
-
81
-
82
-
83
-
84
-
85
-
86
-
87
-
88
-
89
-
90
-
91
-
92
-
93
-
94
-
95
-
96
-
97
-
98
-
99
-
100
-
101
-
102
-
103
-
104
-
105
-
106
-
107
-
108
-
109
-
110
-
111
-
112
-
113
-
114
-
115
-
116
-
117
-
118
-
119
-
120
-
121
-
122
-
123
-
124
-
125
-
126
-
127
-
128
-
129
-
130
-
131
-
132
-
 133
133 -
 134
134 -
 135
135 -
 136
136 -
 137
137 -
 138
138 -
 139
139 -
 140
140 -
 141
141 -
 142
142 -
 143
143 -
144
-
145
-
146
-
147
-
148
-
149
-
150
-
151
-
152
-
153
-
154
-
155
-
156
-
157
-
158
-
159
-
160
-
161
-
162
-
163
-
164
 |
 |
