Brother International PS-300B Instruction Manual - English - Page 43
Moving the punch point of the circle, Select Punch Point
 |
View all Brother International PS-300B manuals
Add to My Manuals
Save this manual to your list of manuals |
Page 43 highlights
2. Click the two points in the red circles consecutively as illustrated below. 3. Move the pointer and specify the location for the third point so that the circle encloses the current outlines. NOTE: You can also use the Center Circle tool to draw a circle. Moving the punch point of the circle: You can align the punch point of the circle with a punch point of a triangle to improve sewing efficiency. 1. Use the Select Punch Point tool to select the punch point of the circle. 43/164
-
 1
1 -
2
-
3
-
4
-
5
-
6
-
7
-
8
-
9
-
10
-
11
-
12
-
13
-
14
-
15
-
16
-
17
-
18
-
19
-
20
-
21
-
22
-
23
-
24
-
25
-
26
-
27
-
28
-
29
-
30
-
31
-
32
-
33
-
34
-
35
-
36
-
37
-
 38
38 -
 39
39 -
 40
40 -
 41
41 -
 42
42 -
 43
43 -
 44
44 -
 45
45 -
 46
46 -
 47
47 -
 48
48 -
49
-
50
-
51
-
52
-
53
-
54
-
55
-
56
-
57
-
58
-
59
-
60
-
61
-
62
-
63
-
64
-
65
-
66
-
67
-
68
-
69
-
70
-
71
-
72
-
73
-
74
-
75
-
76
-
77
-
78
-
79
-
80
-
81
-
82
-
83
-
84
-
85
-
86
-
87
-
88
-
89
-
90
-
91
-
92
-
93
-
94
-
95
-
96
-
97
-
98
-
99
-
100
-
101
-
102
-
103
-
104
-
105
-
106
-
107
-
108
-
109
-
110
-
111
-
112
-
113
-
114
-
115
-
116
-
117
-
118
-
119
-
120
-
121
-
122
-
123
-
124
-
125
-
126
-
127
-
128
-
129
-
130
-
131
-
132
-
133
-
134
-
135
-
136
-
137
-
138
-
139
-
140
-
141
-
142
-
143
-
144
-
145
-
146
-
147
-
148
-
149
-
150
-
151
-
152
-
153
-
154
-
155
-
156
-
157
-
158
-
159
-
160
-
161
-
162
-
163
-
164
 |
 |
43/164
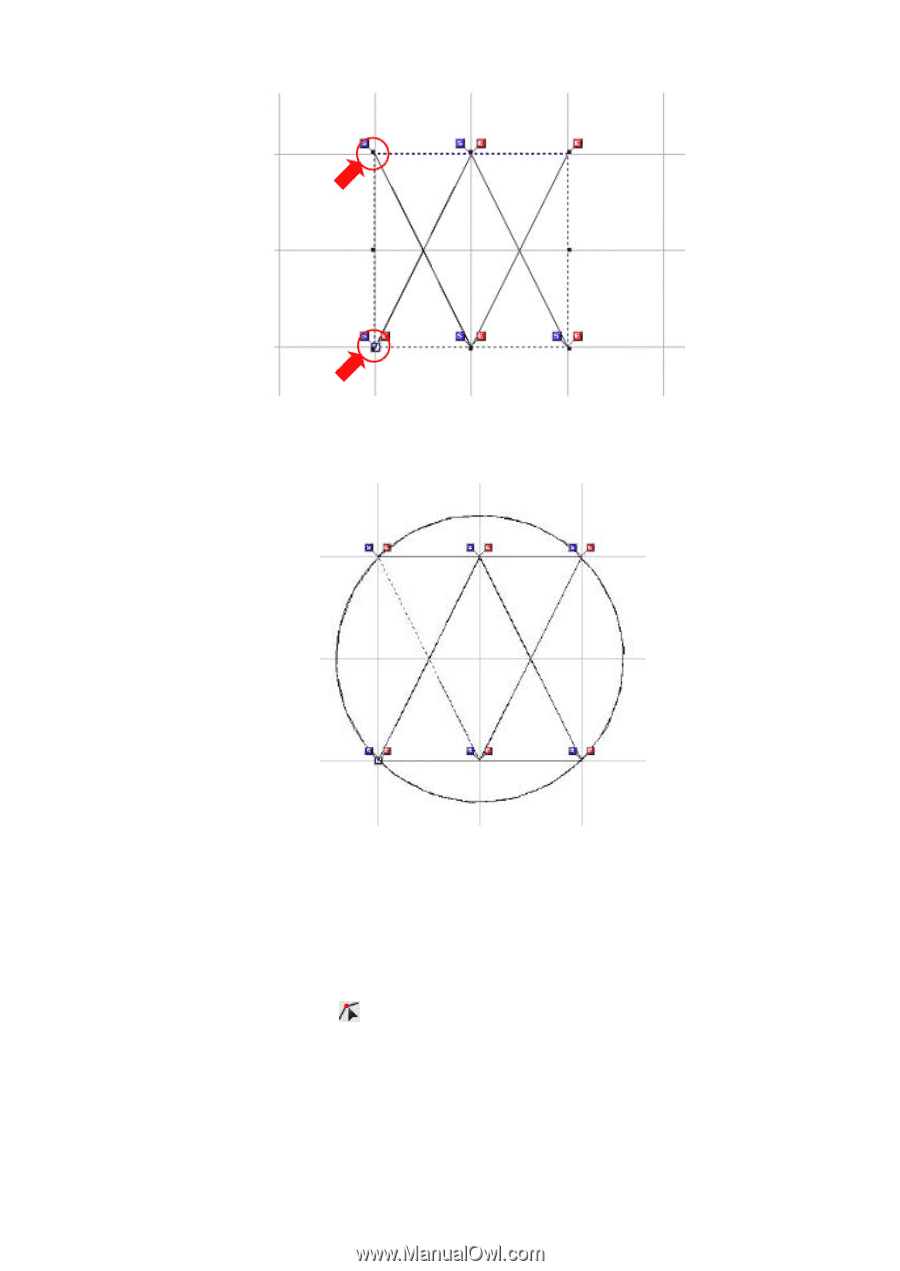
2. Click the two points in the red circles consecutively as illustrated below.
3. Move the pointer and specify the location for the third point so that the circle encloses the
current outlines.
NOTE: You can also use the
Center Circle
tool to draw a circle.
Moving the punch point of the circle:
You can align the punch point of the circle with a punch point of a triangle to improve sewing
efficiency.
1. Use the
Select Punch Point
tool to select the punch point of the circle.