Brother International PS-300B Instruction Manual - English - Page 112
Displaying the desired part in the center of the main window, Sewing Area To Window
 |
View all Brother International PS-300B manuals
Add to My Manuals
Save this manual to your list of manuals |
Page 112 highlights
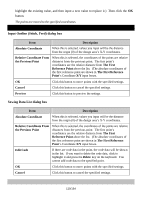
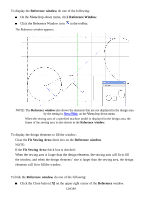
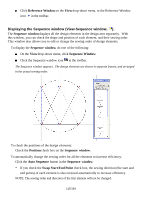
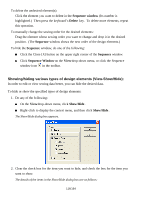
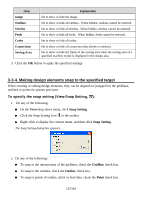
You can adjust the view of the design to its actual size. Do one of the following: On the Viewdrop-down menu, click Zoom. On the Zoom sub- menu, click Actual Size . Click the Actual Size icon in the toolbar. To enlarge design element(s) to fill the window (View-Zoom-Fit To Window, ): You can enlarge the view of the selected design element(s) to fill the window. Do one of the following: On the Viewdrop-down menu, click Zoom. On the Zoom sub- menu, click Fit To Window. Click the Fit To Window icon in the toolbar. NOTE: If no design element is selected, all the design element(s) in the design area are enlarged to fill the window. To display the sewing area in the size fit in the window (View-Zoom-Fit Sewing Area To Window, ): You can adjust the size of the sewing area of the machine model you specified so that it will fit within the window. This command is available only when the sewing area of a specified machine model is displayed. NOTE: The sewing area of a specified machine model can be displayed by the setting in Machine Model Setting on the Tools drop-down menu. Do one of the following: On the Viewdrop-down menu, click Zoom. On the Zoom sub- menu, click Fit Sewing Area To Window. Click the Fit Sewing Area To Window icon in the toolbar. 3-3-2. Displaying the desired part in the center of the main window You can move the design area up and down or from side to side to display the desired part in the center of the main window. To move the design area up and down: Do one of the following: 112/164
-
 1
1 -
2
-
3
-
4
-
5
-
6
-
7
-
8
-
9
-
10
-
11
-
12
-
13
-
14
-
15
-
16
-
17
-
18
-
19
-
20
-
21
-
22
-
23
-
24
-
25
-
26
-
27
-
28
-
29
-
30
-
31
-
32
-
33
-
34
-
35
-
36
-
37
-
38
-
39
-
40
-
41
-
42
-
43
-
44
-
45
-
46
-
47
-
48
-
49
-
50
-
51
-
52
-
53
-
54
-
55
-
56
-
57
-
58
-
59
-
60
-
61
-
62
-
63
-
64
-
65
-
66
-
67
-
68
-
69
-
70
-
71
-
72
-
73
-
74
-
75
-
76
-
77
-
78
-
79
-
80
-
81
-
82
-
83
-
84
-
85
-
86
-
87
-
88
-
89
-
90
-
91
-
92
-
93
-
94
-
95
-
96
-
97
-
98
-
99
-
100
-
101
-
102
-
103
-
104
-
105
-
106
-
 107
107 -
 108
108 -
 109
109 -
 110
110 -
 111
111 -
 112
112 -
 113
113 -
 114
114 -
 115
115 -
 116
116 -
 117
117 -
118
-
119
-
120
-
121
-
122
-
123
-
124
-
125
-
126
-
127
-
128
-
129
-
130
-
131
-
132
-
133
-
134
-
135
-
136
-
137
-
138
-
139
-
140
-
141
-
142
-
143
-
144
-
145
-
146
-
147
-
148
-
149
-
150
-
151
-
152
-
153
-
154
-
155
-
156
-
157
-
158
-
159
-
160
-
161
-
162
-
163
-
164
 |
 |