Brother International PS-300B Instruction Manual - English - Page 162
Image, To import an image from a file Image-Import From File
 |
View all Brother International PS-300B manuals
Add to My Manuals
Save this manual to your list of manuals |
Page 162 highlights
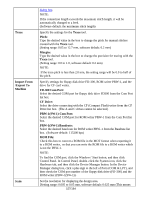
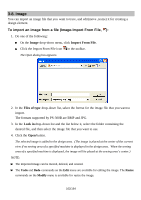
3-8. Image You can import an image file that you want to trace, and edit(move ,resize) it for creating a design element. To import an image from a file (Image-Import From File, ): 1. Do one of the following: On the Image drop-down menu, click Import From File. Click the Import From File icon in the toolbar. The Open dialog box appears. 2. In the Files of type drop-down list, select the format for the image file that you want to import. The formats supported by PS-300B are BMP and JPG. 3. In the Look in drop-down list and the list below it, select the folder containing the desired file, and then select the image file that you want to use. 4. Click the Open button. The selected image is added to the design area. (The image is placed at the center of the current view if no sewing area of a specified machine is displayed in the design area. When the sewing area of a specified machine is displayed, the image will be placed at the sewing area's center.) NOTE: The imported image can be moved, deleted, and resized. The Undo and Redo commands on the Edit menu are available for editing the image. The Resize commands on the Modify menu is available for resize the image. 162/164
-
 1
1 -
2
-
3
-
4
-
5
-
6
-
7
-
8
-
9
-
10
-
11
-
12
-
13
-
14
-
15
-
16
-
17
-
18
-
19
-
20
-
21
-
22
-
23
-
24
-
25
-
26
-
27
-
28
-
29
-
30
-
31
-
32
-
33
-
34
-
35
-
36
-
37
-
38
-
39
-
40
-
41
-
42
-
43
-
44
-
45
-
46
-
47
-
48
-
49
-
50
-
51
-
52
-
53
-
54
-
55
-
56
-
57
-
58
-
59
-
60
-
61
-
62
-
63
-
64
-
65
-
66
-
67
-
68
-
69
-
70
-
71
-
72
-
73
-
74
-
75
-
76
-
77
-
78
-
79
-
80
-
81
-
82
-
83
-
84
-
85
-
86
-
87
-
88
-
89
-
90
-
91
-
92
-
93
-
94
-
95
-
96
-
97
-
98
-
99
-
100
-
101
-
102
-
103
-
104
-
105
-
106
-
107
-
108
-
109
-
110
-
111
-
112
-
113
-
114
-
115
-
116
-
117
-
118
-
119
-
120
-
121
-
122
-
123
-
124
-
125
-
126
-
127
-
128
-
129
-
130
-
131
-
132
-
133
-
134
-
135
-
136
-
137
-
138
-
139
-
140
-
141
-
142
-
143
-
144
-
145
-
146
-
147
-
148
-
149
-
150
-
151
-
152
-
153
-
154
-
155
-
156
-
 157
157 -
 158
158 -
 159
159 -
 160
160 -
 161
161 -
 162
162 -
 163
163 -
 164
164
 |
 |