Brother International PS-300B Instruction Manual - English - Page 152
Measuring the distance between two points
 |
View all Brother International PS-300B manuals
Add to My Manuals
Save this manual to your list of manuals |
Page 152 highlights
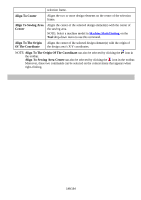
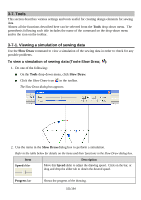
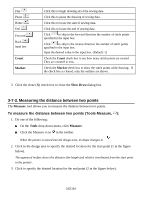
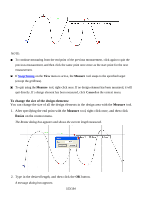
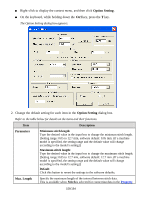
Play Pause Home End Forward Back input box Count Marker Click this to begin drawing all of the sewing data. Click this to pause the drawing of sewing data. Click this to locate the start of sewing data. Click this to locate the end of sewing data. Click to skip in the forward direction the number of stitch points specified in the input box. Click to skip in the reverse direction the number of stitch points specified in the input box. Input the desired value in the input box. (Default: 1) Check the Count check box to see how many stitch points are created. They are counted in tens. Check the Markercheck box to show the stitch points while drawing. If the check box is cleared, only the outlines are shown. 3. Click the close (X) check box to close the Slow Draw dialog box. 3-7-2. Measuring the distance between two points The Measure tool allows you to measure the distance between two points. To measure the distance between two points (Tools-Measure, ): 1. Do one of the following: On the Tools drop-down menu, click Measure . Click the Measure icon in the toolbar. When the pointer is moved into the design area, its shape changes to . 2. Click in the design area to specify the desired location for the start point (1 in the figure below). The appeared textbox shows the distance (the length and relative coordinate) from the start point to the pointer. 3. Click to specify the desired location for the end point (2 in the figure below). 152/164
-
 1
1 -
2
-
3
-
4
-
5
-
6
-
7
-
8
-
9
-
10
-
11
-
12
-
13
-
14
-
15
-
16
-
17
-
18
-
19
-
20
-
21
-
22
-
23
-
24
-
25
-
26
-
27
-
28
-
29
-
30
-
31
-
32
-
33
-
34
-
35
-
36
-
37
-
38
-
39
-
40
-
41
-
42
-
43
-
44
-
45
-
46
-
47
-
48
-
49
-
50
-
51
-
52
-
53
-
54
-
55
-
56
-
57
-
58
-
59
-
60
-
61
-
62
-
63
-
64
-
65
-
66
-
67
-
68
-
69
-
70
-
71
-
72
-
73
-
74
-
75
-
76
-
77
-
78
-
79
-
80
-
81
-
82
-
83
-
84
-
85
-
86
-
87
-
88
-
89
-
90
-
91
-
92
-
93
-
94
-
95
-
96
-
97
-
98
-
99
-
100
-
101
-
102
-
103
-
104
-
105
-
106
-
107
-
108
-
109
-
110
-
111
-
112
-
113
-
114
-
115
-
116
-
117
-
118
-
119
-
120
-
121
-
122
-
123
-
124
-
125
-
126
-
127
-
128
-
129
-
130
-
131
-
132
-
133
-
134
-
135
-
136
-
137
-
138
-
139
-
140
-
141
-
142
-
143
-
144
-
145
-
146
-
 147
147 -
 148
148 -
 149
149 -
 150
150 -
 151
151 -
 152
152 -
 153
153 -
 154
154 -
 155
155 -
 156
156 -
 157
157 -
158
-
159
-
160
-
161
-
162
-
163
-
164
 |
 |
