Brother International PS-300B Instruction Manual - English - Page 16
Editing the added pattern, Creating two cycle data
 |
View all Brother International PS-300B manuals
Add to My Manuals
Save this manual to your list of manuals |
Page 16 highlights
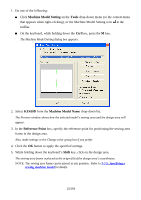
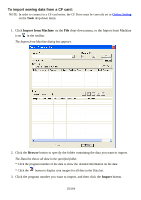
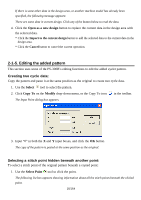
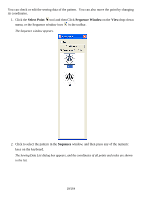
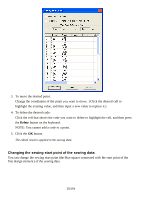
If there is some other data in the design area, or another machine model has already been specified, the following message appears: There are some data in current design. Click any of the button below to read the data. 4. Click the Open as a new design button to replace the current data in the design area with the selected data. * Click the Import to the current design button to add the selected data to the current data in the design area. * Click the Cancel button to cancel the current operation. 2-1-5. Editing the added pattern This section uses some of the PS-300B's editing functions to edit the added eyelet pattern. Creating two cycle data: Copy the pattern and paste it at the same position as the original to create two cycle data. 1. Use the Select tool to select the pattern. 2. Click Copy To on the Modify drop-down menu, or the Copy To icon in the toolbar. The Input Point dialog box appears. 3. Input "0" in both the X and Y input boxes, and click the OK button. The copy of the pattern is pasted at the same position as the original. Selecting a stitch point hidden beneath another point: To select a stitch point of the original pattern beneath a copied point: 1. Use the Select Point tool to click the point. The following list box appears showing information about all the stitch points beneath the clicked point. 16/164
-
 1
1 -
2
-
3
-
4
-
5
-
6
-
7
-
8
-
9
-
10
-
 11
11 -
 12
12 -
 13
13 -
 14
14 -
 15
15 -
 16
16 -
 17
17 -
 18
18 -
 19
19 -
 20
20 -
 21
21 -
22
-
23
-
24
-
25
-
26
-
27
-
28
-
29
-
30
-
31
-
32
-
33
-
34
-
35
-
36
-
37
-
38
-
39
-
40
-
41
-
42
-
43
-
44
-
45
-
46
-
47
-
48
-
49
-
50
-
51
-
52
-
53
-
54
-
55
-
56
-
57
-
58
-
59
-
60
-
61
-
62
-
63
-
64
-
65
-
66
-
67
-
68
-
69
-
70
-
71
-
72
-
73
-
74
-
75
-
76
-
77
-
78
-
79
-
80
-
81
-
82
-
83
-
84
-
85
-
86
-
87
-
88
-
89
-
90
-
91
-
92
-
93
-
94
-
95
-
96
-
97
-
98
-
99
-
100
-
101
-
102
-
103
-
104
-
105
-
106
-
107
-
108
-
109
-
110
-
111
-
112
-
113
-
114
-
115
-
116
-
117
-
118
-
119
-
120
-
121
-
122
-
123
-
124
-
125
-
126
-
127
-
128
-
129
-
130
-
131
-
132
-
133
-
134
-
135
-
136
-
137
-
138
-
139
-
140
-
141
-
142
-
143
-
144
-
145
-
146
-
147
-
148
-
149
-
150
-
151
-
152
-
153
-
154
-
155
-
156
-
157
-
158
-
159
-
160
-
161
-
162
-
163
-
164
 |
 |