Brother International PS-300B Instruction Manual - English - Page 88
Cancel, Confirm, Preview, Example of inputting values, When you have completed the box, click
 |
View all Brother International PS-300B manuals
Add to My Manuals
Save this manual to your list of manuals |
Page 88 highlights
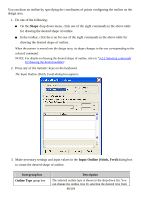
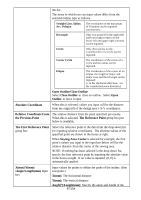
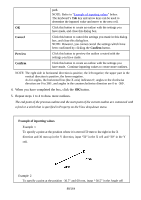
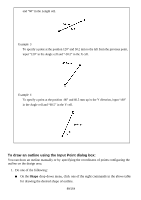
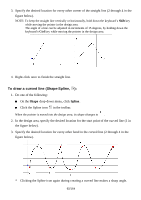
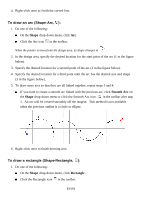
path. NOTE: Refer to "Example of inputting values" below. The keyboard's Tab key and arrow keys can be used to determine the inputted value and move to the next cell. OK Click this button to create an outline with the settings you have made, and close this dialog box. Cancel Click this button to cancel the settings you made in this dialog box, and close this dialog box. NOTE: However, you cannot cancel the settings which have been confirmed by clicking the Confirm button. Preview Click this button to preview the outline created with the settings you have made. Confirm Click this button to create an outline with the settings you have made. Continue inputting values to create more outlines. NOTE: The right side in horizontal direction is positive, the left negative; the upper part in the vertical direction is positive, the lower negative. As for angles, the horizontal line (the X axis) indicates 0°, angles in the clockwise direction are 0 to 360°, and angles in the counterclockwise direction are 0 to -360°. 4. When you have completed the box, click the OK button. 5. Repeat steps 1 to 4 to draw more outlines. The end point of the previous outline and the start point of the current outline are connected with a feed or a stitch that is specified in Property on the View drop-down menu. Example of inputting values Example 1 To specify a point at the position where it is moved 50 mm to the right in the X direction and 30 mm up in the Y direction, input "50" in the X cell and "30" in the Y cell. Example 2 To specify a point at the position -30.5° and 60 mm, input "-30.5" in the Angle cell 88/164
-
 1
1 -
2
-
3
-
4
-
5
-
6
-
7
-
8
-
9
-
10
-
11
-
12
-
13
-
14
-
15
-
16
-
17
-
18
-
19
-
20
-
21
-
22
-
23
-
24
-
25
-
26
-
27
-
28
-
29
-
30
-
31
-
32
-
33
-
34
-
35
-
36
-
37
-
38
-
39
-
40
-
41
-
42
-
43
-
44
-
45
-
46
-
47
-
48
-
49
-
50
-
51
-
52
-
53
-
54
-
55
-
56
-
57
-
58
-
59
-
60
-
61
-
62
-
63
-
64
-
65
-
66
-
67
-
68
-
69
-
70
-
71
-
72
-
73
-
74
-
75
-
76
-
77
-
78
-
79
-
80
-
81
-
82
-
 83
83 -
 84
84 -
 85
85 -
 86
86 -
 87
87 -
 88
88 -
 89
89 -
 90
90 -
 91
91 -
 92
92 -
 93
93 -
94
-
95
-
96
-
97
-
98
-
99
-
100
-
101
-
102
-
103
-
104
-
105
-
106
-
107
-
108
-
109
-
110
-
111
-
112
-
113
-
114
-
115
-
116
-
117
-
118
-
119
-
120
-
121
-
122
-
123
-
124
-
125
-
126
-
127
-
128
-
129
-
130
-
131
-
132
-
133
-
134
-
135
-
136
-
137
-
138
-
139
-
140
-
141
-
142
-
143
-
144
-
145
-
146
-
147
-
148
-
149
-
150
-
151
-
152
-
153
-
154
-
155
-
156
-
157
-
158
-
159
-
160
-
161
-
162
-
163
-
164
 |
 |