Brother International PS-300B Instruction Manual - English - Page 115
Reference Window, Sequence, window, Position, Auto Sequence, Swap Start/End Point
 |
View all Brother International PS-300B manuals
Add to My Manuals
Save this manual to your list of manuals |
Page 115 highlights
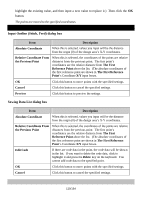
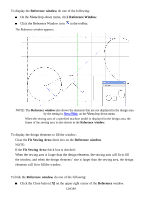
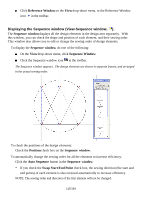
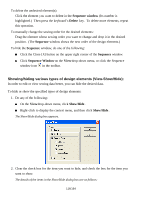
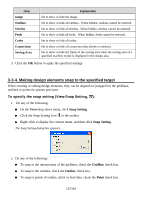
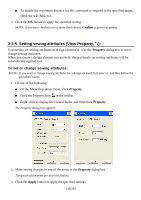
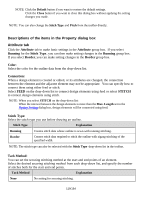
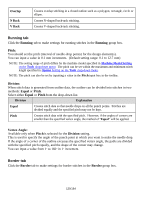
Click Reference Window on the View drop-down menu, or the Reference Window icon in the toolbar. Displaying the Sequence window (View-Sequence window, ): The Sequence window displays all the design elements in the design area separately. With this window, you can check the shape and position of each element, and their sewing order. This window also allows you to edit or change the sewing order of design elements. To display the Sequence window, do one of the following: On the Viewdrop-down menu, click Sequence Window. Click the Sequence window icon in the toolbar. The Sequence window appears. The design elements are shown in separate frames, and arranged in the actual sewing order. To check the positions of the design elements: Check the Position check box on the Sequence window. To automatically change the sewing order for all the elements to increase efficiency: Click the Auto Sequence button in the Sequence window. * If you check the Swap Start/End Point check box, the sewing direction (the start and end points) of each element is also reversed automatically to increase efficiency. NOTE: The sewing order and direction of the first element will not be changed. 115/164
-
 1
1 -
2
-
3
-
4
-
5
-
6
-
7
-
8
-
9
-
10
-
11
-
12
-
13
-
14
-
15
-
16
-
17
-
18
-
19
-
20
-
21
-
22
-
23
-
24
-
25
-
26
-
27
-
28
-
29
-
30
-
31
-
32
-
33
-
34
-
35
-
36
-
37
-
38
-
39
-
40
-
41
-
42
-
43
-
44
-
45
-
46
-
47
-
48
-
49
-
50
-
51
-
52
-
53
-
54
-
55
-
56
-
57
-
58
-
59
-
60
-
61
-
62
-
63
-
64
-
65
-
66
-
67
-
68
-
69
-
70
-
71
-
72
-
73
-
74
-
75
-
76
-
77
-
78
-
79
-
80
-
81
-
82
-
83
-
84
-
85
-
86
-
87
-
88
-
89
-
90
-
91
-
92
-
93
-
94
-
95
-
96
-
97
-
98
-
99
-
100
-
101
-
102
-
103
-
104
-
105
-
106
-
107
-
108
-
109
-
 110
110 -
 111
111 -
 112
112 -
 113
113 -
 114
114 -
 115
115 -
 116
116 -
 117
117 -
 118
118 -
 119
119 -
 120
120 -
121
-
122
-
123
-
124
-
125
-
126
-
127
-
128
-
129
-
130
-
131
-
132
-
133
-
134
-
135
-
136
-
137
-
138
-
139
-
140
-
141
-
142
-
143
-
144
-
145
-
146
-
147
-
148
-
149
-
150
-
151
-
152
-
153
-
154
-
155
-
156
-
157
-
158
-
159
-
160
-
161
-
162
-
163
-
164
 |
 |
