Brother International PS-300B Instruction Manual - English - Page 120
Running tab, Border tab, Running, Pitch, Division, Equal, Vertex Angle, Border
 |
View all Brother International PS-300B manuals
Add to My Manuals
Save this manual to your list of manuals |
Page 120 highlights
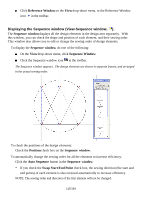
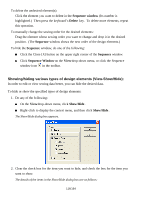
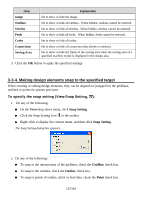
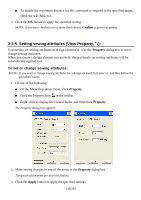
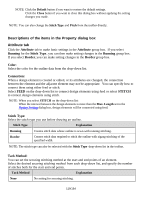
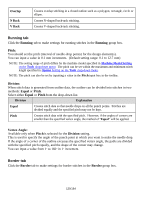
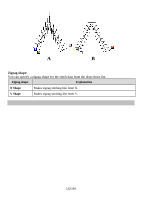
Overlap N Back V Back Creates overlap stitching in a closed outline such as a polygon, rectangle, circle or ellipse. Creates N-shaped back-tack stitching. Creates V-shaped back-tack stitching. Running tab Click the Running tab to make settings for running stitches in the Running group box. Pitch: You should set the pitch (interval of needle-drop points) for the design element(s). You can input a value in 0.1 mm increments. (Default setting range: 0.1 to 12.7 mm) NOTE: The setting range of pitch differs by the machine model specified in Machine Model Setting on the Tools drop-down menu. The pitch can be set within the maximum and minimum stitch length specified in Option Setting on the Tools drop-down menu. NOTE: The pitch can also be set by inputting a value in the Pitch input box in the toolbar. Division: When stitch data is generated from outline data, the outline can be divided into stitches in two methods: Equal or Pitch. Select either Equal or Pitch from the drop-down list. Division Explanation Equal Creates stitch data so that needle drops on all the punch points. Stitches are divided equally and the specified pitch may not be kept. Pitch Creates stitch data with the specified pitch. However, if the angles of corners are smaller than the specified vertex angle, the method of "Equal" will be applied. Vertex Angle: Available only when Pitch is selected for the Division setting. This is used to specify the angle of the punch point at which you want to make the needle drop. If the angle of a corner of the outline excesses the specified vertex angle, the paths are divided with the specified pitch equally, and the shape of the corner may change. You can input a value from 1° to 160° in 1° increment. Border tab Click the Border tab to make settings for border stitches in the Border group box. 120/164
-
 1
1 -
2
-
3
-
4
-
5
-
6
-
7
-
8
-
9
-
10
-
11
-
12
-
13
-
14
-
15
-
16
-
17
-
18
-
19
-
20
-
21
-
22
-
23
-
24
-
25
-
26
-
27
-
28
-
29
-
30
-
31
-
32
-
33
-
34
-
35
-
36
-
37
-
38
-
39
-
40
-
41
-
42
-
43
-
44
-
45
-
46
-
47
-
48
-
49
-
50
-
51
-
52
-
53
-
54
-
55
-
56
-
57
-
58
-
59
-
60
-
61
-
62
-
63
-
64
-
65
-
66
-
67
-
68
-
69
-
70
-
71
-
72
-
73
-
74
-
75
-
76
-
77
-
78
-
79
-
80
-
81
-
82
-
83
-
84
-
85
-
86
-
87
-
88
-
89
-
90
-
91
-
92
-
93
-
94
-
95
-
96
-
97
-
98
-
99
-
100
-
101
-
102
-
103
-
104
-
105
-
106
-
107
-
108
-
109
-
110
-
111
-
112
-
113
-
114
-
 115
115 -
 116
116 -
 117
117 -
 118
118 -
 119
119 -
 120
120 -
 121
121 -
 122
122 -
 123
123 -
 124
124 -
 125
125 -
126
-
127
-
128
-
129
-
130
-
131
-
132
-
133
-
134
-
135
-
136
-
137
-
138
-
139
-
140
-
141
-
142
-
143
-
144
-
145
-
146
-
147
-
148
-
149
-
150
-
151
-
152
-
153
-
154
-
155
-
156
-
157
-
158
-
159
-
160
-
161
-
162
-
163
-
164
 |
 |