Brother International PS-300B Instruction Manual - English - Page 85
To draw an outline using the Input Outline Stitch, Feed dialog box, Backspace or Space, Backspace
 |
View all Brother International PS-300B manuals
Add to My Manuals
Save this manual to your list of manuals |
Page 85 highlights
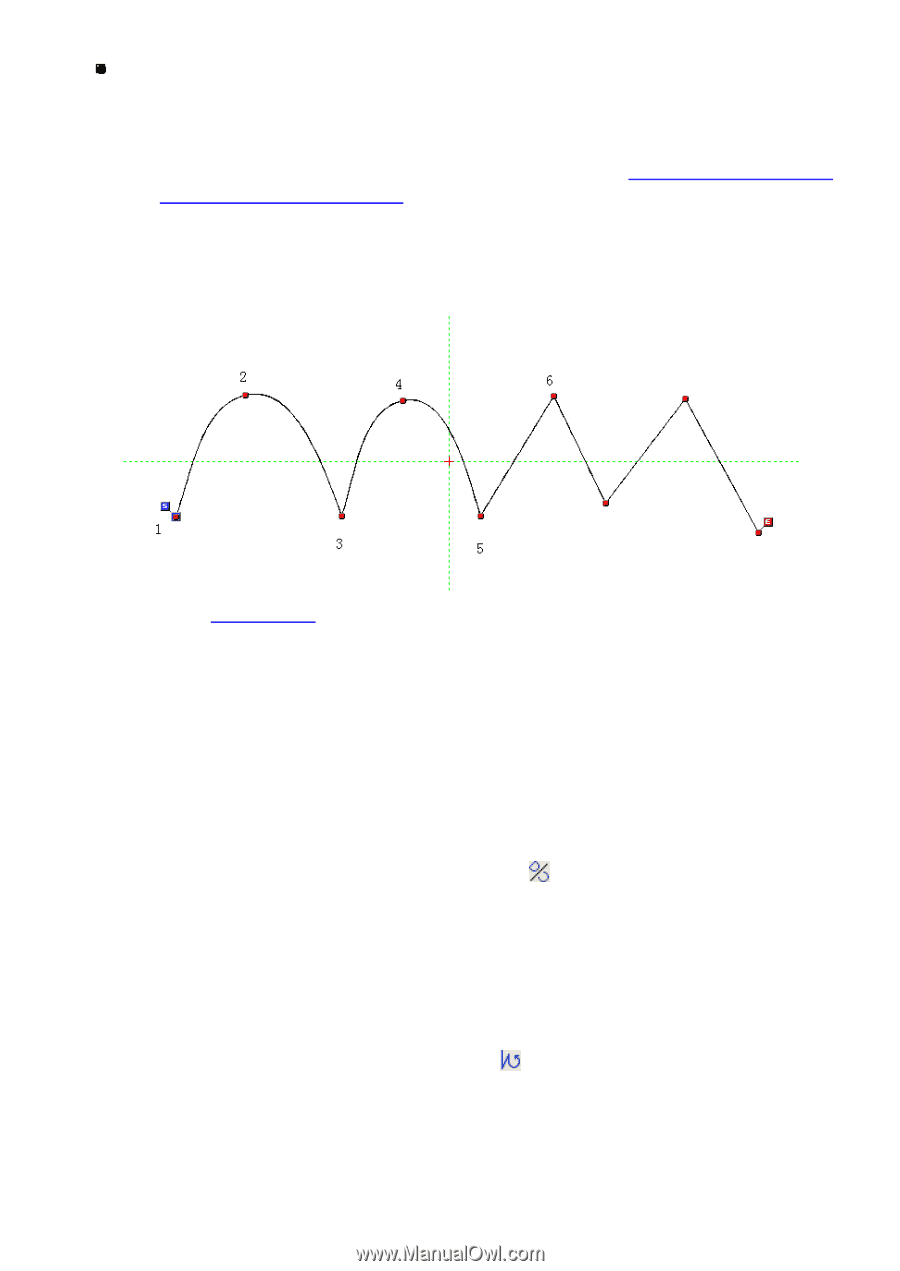
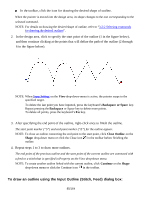
In the toolbar, click the icon for drawing the desired shape of outline. When the pointer is moved into the design area, its shape changes to the one corresponding to the selected command. NOTE: For details on drawing the desired shape of outline, refer to "3-2-2 Selecting commands for drawing the desired outlines". 2. In the design area, click to specify the start point of the outline (1 in the figure below), and then continue clicking at the points that will define the path of the outline (2 through 6 in the figure below). NOTE: When Snap Setting on the View drop-down-menu is active, the pointer snaps to the specified target. To delete the last point you have inputted, press the keyboard's Backspace or Space key. Repeat pressing the Backspace or Space key to delete more points. To delete all points, press the keyboard's Esc key. 3. After specifying the end point of the outline, right-click once to finish the outline. The start point marker ("S") and end point marker ("E") for the outline appear. NOTE: To close an outline connecting the end point to the start point, click Close Outline on the Shape drop-down menu or click the Close icon in the toolbar before finishing the outline. 4. Repeat steps 1 to 3 to draw more outlines. The end point of the previous outline and the start point of the current outline are connected with a feed or a stitch that is specified in Property on the View drop-down menu. NOTE: To create another outline linked with the current outline, click Continue on the Shape drop-down menu or click the Continue icon in the toolbar. To draw an outline using the Input Outline (Stitch, Feed) dialog box: 85/164
-
 1
1 -
2
-
3
-
4
-
5
-
6
-
7
-
8
-
9
-
10
-
11
-
12
-
13
-
14
-
15
-
16
-
17
-
18
-
19
-
20
-
21
-
22
-
23
-
24
-
25
-
26
-
27
-
28
-
29
-
30
-
31
-
32
-
33
-
34
-
35
-
36
-
37
-
38
-
39
-
40
-
41
-
42
-
43
-
44
-
45
-
46
-
47
-
48
-
49
-
50
-
51
-
52
-
53
-
54
-
55
-
56
-
57
-
58
-
59
-
60
-
61
-
62
-
63
-
64
-
65
-
66
-
67
-
68
-
69
-
70
-
71
-
72
-
73
-
74
-
75
-
76
-
77
-
78
-
79
-
 80
80 -
 81
81 -
 82
82 -
 83
83 -
 84
84 -
 85
85 -
 86
86 -
 87
87 -
 88
88 -
 89
89 -
 90
90 -
91
-
92
-
93
-
94
-
95
-
96
-
97
-
98
-
99
-
100
-
101
-
102
-
103
-
104
-
105
-
106
-
107
-
108
-
109
-
110
-
111
-
112
-
113
-
114
-
115
-
116
-
117
-
118
-
119
-
120
-
121
-
122
-
123
-
124
-
125
-
126
-
127
-
128
-
129
-
130
-
131
-
132
-
133
-
134
-
135
-
136
-
137
-
138
-
139
-
140
-
141
-
142
-
143
-
144
-
145
-
146
-
147
-
148
-
149
-
150
-
151
-
152
-
153
-
154
-
155
-
156
-
157
-
158
-
159
-
160
-
161
-
162
-
163
-
164
 |
 |