Brother International PS-300B Instruction Manual - English - Page 92
To draw a curved line Shape-Spline, Shape, Spline
 |
View all Brother International PS-300B manuals
Add to My Manuals
Save this manual to your list of manuals |
Page 92 highlights
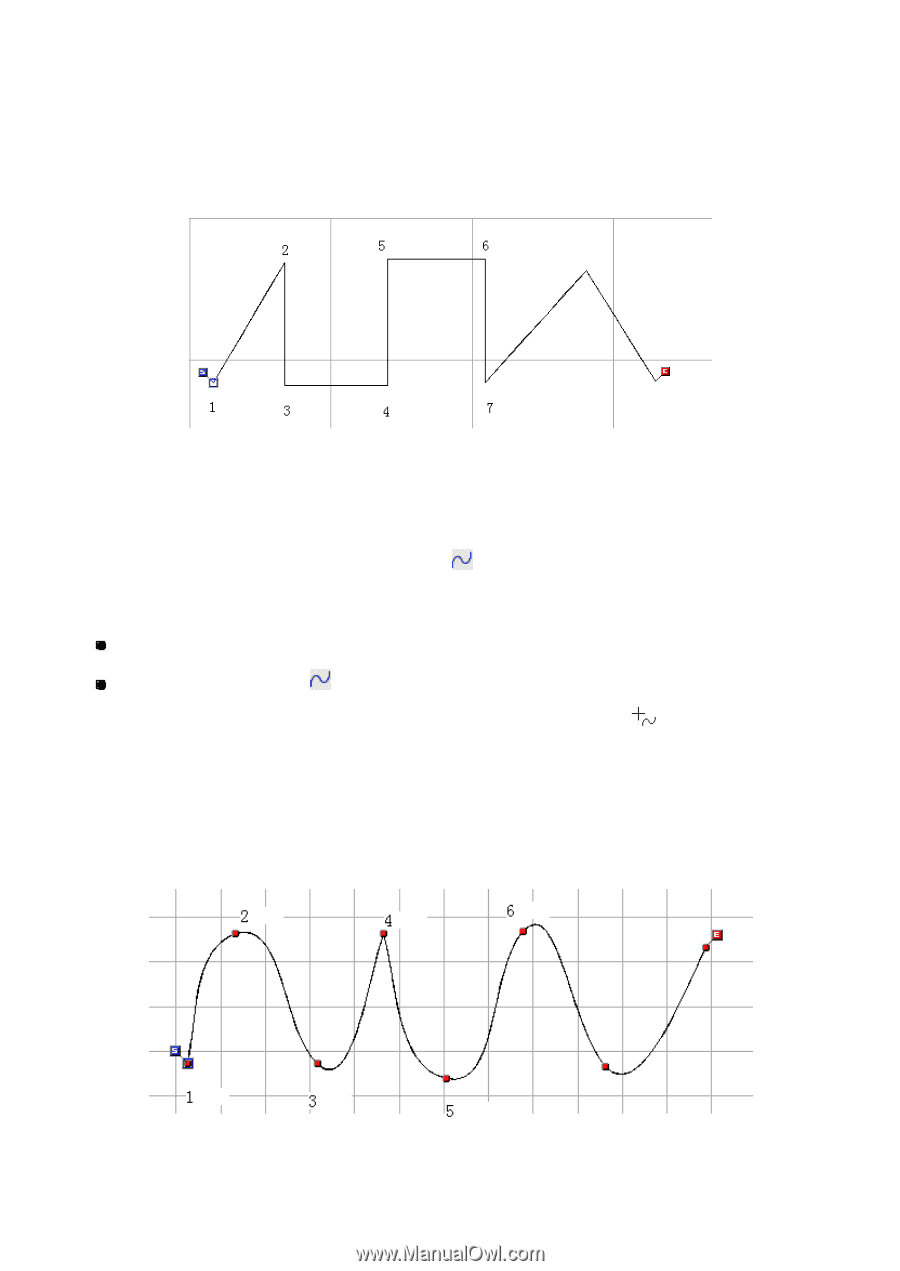
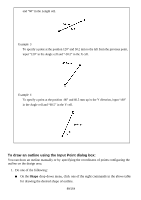
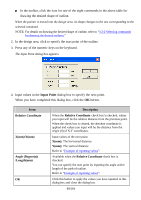
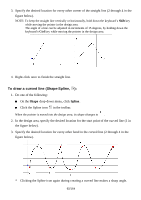
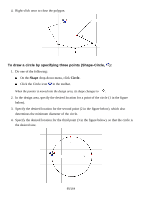
3. Specify the desired location for every other corner of the straight line (2 through 4 in the figure below). NOTE: To keep the straight line vertically or horizontally, hold down the keyboard's Shift key while moving the pointer in the design area. The angle of a line can be adjusted in increments of 15 degrees, by holding down the keyboard's Ctrl key while moving the pointer in the design area. 4. Right-click once to finish the straight line. To draw a curved line (Shape-Spline, ): 1. Do one of the following: On the Shape drop-down menu, click Spline . Click the Spline icon in the toolbar. When the pointer is moved into the design area, its shape changes to . 2. In the design area, specify the desired location for the start point of the curved line (1 in the figure below). 3. Specify the desired location for every other bend in the curved line (2 through 4 in the figure below). * Clicking the Spline icon again during creating a curved line makes a sharp angle. 92/164
-
 1
1 -
2
-
3
-
4
-
5
-
6
-
7
-
8
-
9
-
10
-
11
-
12
-
13
-
14
-
15
-
16
-
17
-
18
-
19
-
20
-
21
-
22
-
23
-
24
-
25
-
26
-
27
-
28
-
29
-
30
-
31
-
32
-
33
-
34
-
35
-
36
-
37
-
38
-
39
-
40
-
41
-
42
-
43
-
44
-
45
-
46
-
47
-
48
-
49
-
50
-
51
-
52
-
53
-
54
-
55
-
56
-
57
-
58
-
59
-
60
-
61
-
62
-
63
-
64
-
65
-
66
-
67
-
68
-
69
-
70
-
71
-
72
-
73
-
74
-
75
-
76
-
77
-
78
-
79
-
80
-
81
-
82
-
83
-
84
-
85
-
86
-
 87
87 -
 88
88 -
 89
89 -
 90
90 -
 91
91 -
 92
92 -
 93
93 -
 94
94 -
 95
95 -
 96
96 -
 97
97 -
98
-
99
-
100
-
101
-
102
-
103
-
104
-
105
-
106
-
107
-
108
-
109
-
110
-
111
-
112
-
113
-
114
-
115
-
116
-
117
-
118
-
119
-
120
-
121
-
122
-
123
-
124
-
125
-
126
-
127
-
128
-
129
-
130
-
131
-
132
-
133
-
134
-
135
-
136
-
137
-
138
-
139
-
140
-
141
-
142
-
143
-
144
-
145
-
146
-
147
-
148
-
149
-
150
-
151
-
152
-
153
-
154
-
155
-
156
-
157
-
158
-
159
-
160
-
161
-
162
-
163
-
164
 |
 |