Brother International PS-300B Instruction Manual - English - Page 108
To select a punch point Shape-Select Punch Point, Shape, Select Punch Point, Shift
 |
View all Brother International PS-300B manuals
Add to My Manuals
Save this manual to your list of manuals |
Page 108 highlights
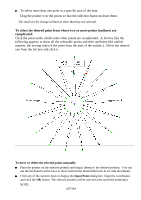
When Snap Setting on the View drop-down-menu is active, the pointer snaps to the specified target. To delete the selected points, select Delete on the Edit drop-down menu, or click the Delete icon or the keyboard's Delete button. To select a punch point (Shape-Select Punch Point, ) In order to change the shape of an outline by adding, deleting or moving individual punch points, the points must first be selected. 1. Do one of the following: On the Shape drop-down menu, click Select Punch Point. Click the Select Punch Point icon in the toolbar. The punch points in all the outline data appear as small red circles. 2. Select one or more punch points by doing any of the following: To select a punch point: Click the punch point. To select punch points those are in sequence: Hold down the keyboard's Shift key and click the first and last points in the sequence. To select punch points that are not in sequence: Hold down the keyboard's Ctrl key while clicking each additional point. To select more than one punch point in a specific area of the data: Drag the pointer over the points so that the selection frame encloses them. The small circles change to black to show that they are selected. To move or delete the selected punch points manually: Place the pointer on the selected punch point(s) and drag it (them) to the desired position. You can use the keyboard's arrow keys to move them in the desired direction in 0.1 mm increments. Click any of the numeric keys to display the Input Point dialog box. Input the coordinates and click the OK button. The selected punch point(s) will be moved to the specified position(s). NOTE: When Snap Setting on the View drop-down-menu is active, the pointer snaps to the specified target. On a circle, a punch point can be moved on the circumference freely by dragging it while holding down the keyboard's Shift key. 108/164
-
 1
1 -
2
-
3
-
4
-
5
-
6
-
7
-
8
-
9
-
10
-
11
-
12
-
13
-
14
-
15
-
16
-
17
-
18
-
19
-
20
-
21
-
22
-
23
-
24
-
25
-
26
-
27
-
28
-
29
-
30
-
31
-
32
-
33
-
34
-
35
-
36
-
37
-
38
-
39
-
40
-
41
-
42
-
43
-
44
-
45
-
46
-
47
-
48
-
49
-
50
-
51
-
52
-
53
-
54
-
55
-
56
-
57
-
58
-
59
-
60
-
61
-
62
-
63
-
64
-
65
-
66
-
67
-
68
-
69
-
70
-
71
-
72
-
73
-
74
-
75
-
76
-
77
-
78
-
79
-
80
-
81
-
82
-
83
-
84
-
85
-
86
-
87
-
88
-
89
-
90
-
91
-
92
-
93
-
94
-
95
-
96
-
97
-
98
-
99
-
100
-
101
-
102
-
 103
103 -
 104
104 -
 105
105 -
 106
106 -
 107
107 -
 108
108 -
 109
109 -
 110
110 -
 111
111 -
 112
112 -
 113
113 -
114
-
115
-
116
-
117
-
118
-
119
-
120
-
121
-
122
-
123
-
124
-
125
-
126
-
127
-
128
-
129
-
130
-
131
-
132
-
133
-
134
-
135
-
136
-
137
-
138
-
139
-
140
-
141
-
142
-
143
-
144
-
145
-
146
-
147
-
148
-
149
-
150
-
151
-
152
-
153
-
154
-
155
-
156
-
157
-
158
-
159
-
160
-
161
-
162
-
163
-
164
 |
 |