Brother International PS-300B Instruction Manual - English - Page 25
Changing the stitch type to Border with a width of 3 mm, Shift, Select, Shape, Border, Stitch Type
 |
View all Brother International PS-300B manuals
Add to My Manuals
Save this manual to your list of manuals |
Page 25 highlights
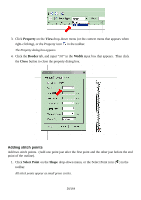
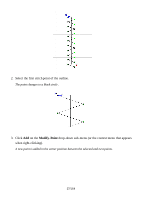
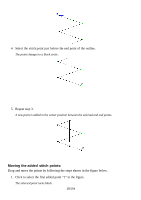
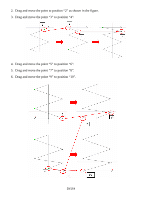
2. In the design area, click to specify the desired location for the start point of the straight outline (1 in figure below). 3. While holding down the keyboard's Shift key, click to specify the desired location for the end point of the straight outline (2 in figure below). 4. Right-click once to finish the outline. The start point marker ("S") and end point marker ("E") for the outline appear. NOTE: To keep the straight line vertically or horizontally, hold down the keyboard's Shift key while moving the pointer in the design area. Changing the stitch type to "Border" with a width of 3 mm: NOTE: The stitch type is set to Running by default. 1. Click Select on the Shape drop-down menu, or the Select icon in the toolbar. Then click on the outline to select it. A selection frame of "dashes" appears around the outline to show that it is selected. 2. Change the stitch type to Border in the Stitch Type drop-down list in the tool bar. 25/164
-
 1
1 -
2
-
3
-
4
-
5
-
6
-
7
-
8
-
9
-
10
-
11
-
12
-
13
-
14
-
15
-
16
-
17
-
18
-
19
-
 20
20 -
 21
21 -
 22
22 -
 23
23 -
 24
24 -
 25
25 -
 26
26 -
 27
27 -
 28
28 -
 29
29 -
 30
30 -
31
-
32
-
33
-
34
-
35
-
36
-
37
-
38
-
39
-
40
-
41
-
42
-
43
-
44
-
45
-
46
-
47
-
48
-
49
-
50
-
51
-
52
-
53
-
54
-
55
-
56
-
57
-
58
-
59
-
60
-
61
-
62
-
63
-
64
-
65
-
66
-
67
-
68
-
69
-
70
-
71
-
72
-
73
-
74
-
75
-
76
-
77
-
78
-
79
-
80
-
81
-
82
-
83
-
84
-
85
-
86
-
87
-
88
-
89
-
90
-
91
-
92
-
93
-
94
-
95
-
96
-
97
-
98
-
99
-
100
-
101
-
102
-
103
-
104
-
105
-
106
-
107
-
108
-
109
-
110
-
111
-
112
-
113
-
114
-
115
-
116
-
117
-
118
-
119
-
120
-
121
-
122
-
123
-
124
-
125
-
126
-
127
-
128
-
129
-
130
-
131
-
132
-
133
-
134
-
135
-
136
-
137
-
138
-
139
-
140
-
141
-
142
-
143
-
144
-
145
-
146
-
147
-
148
-
149
-
150
-
151
-
152
-
153
-
154
-
155
-
156
-
157
-
158
-
159
-
160
-
161
-
162
-
163
-
164
 |
 |
