Brother International PS-300B Instruction Manual - English - Page 93
To draw an arc Shape-Arc, To draw a rectangle Shape-Rectangle, Shape, Smooth Arc, Rectangle
 |
View all Brother International PS-300B manuals
Add to My Manuals
Save this manual to your list of manuals |
Page 93 highlights
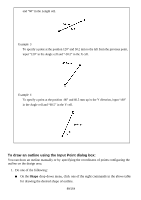
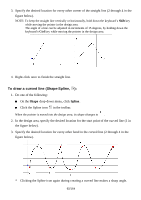
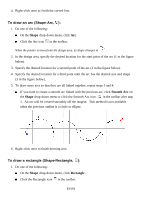
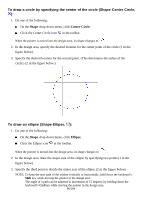
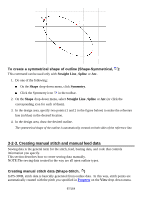
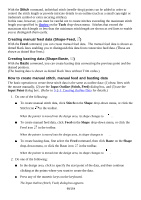
4. Right-click once to finish the curved line. To draw an arc (Shape-Arc, ): 1. Do one of the following: On the Shape drop-down menu, click Arc. Click the Arc icon in the toolbar. When the pointer is moved into the design area, its shape changes to . 2. In the design area, specify the desired location for the start point of the arc (1 in the figure below). 3. Specify the desired location for a second point of the arc (2 in the figure below). 4. Specify the desired location for a third point until the arc has the desired size and shape (3 in the figure below). 5. To draw more arcs so that they are all linked together, repeat steps 3 and 4. If you want to create a smooth arc linked with the previous arc, click Smooth Arc on the Shape drop-down menu or click the Smooth Arc icon in the toolbar after step 1. An arc will be created smoothly off the tangent. This method is not available when the previous outline is a circle or ellipse. 6. Right-click once to finish drawing arcs. To draw a rectangle (Shape-Rectangle, ): 1. Do one of the following: On the Shape drop-down menu, click Rectangle. Click the Rectangle icon in the toolbar. 93/164
-
 1
1 -
2
-
3
-
4
-
5
-
6
-
7
-
8
-
9
-
10
-
11
-
12
-
13
-
14
-
15
-
16
-
17
-
18
-
19
-
20
-
21
-
22
-
23
-
24
-
25
-
26
-
27
-
28
-
29
-
30
-
31
-
32
-
33
-
34
-
35
-
36
-
37
-
38
-
39
-
40
-
41
-
42
-
43
-
44
-
45
-
46
-
47
-
48
-
49
-
50
-
51
-
52
-
53
-
54
-
55
-
56
-
57
-
58
-
59
-
60
-
61
-
62
-
63
-
64
-
65
-
66
-
67
-
68
-
69
-
70
-
71
-
72
-
73
-
74
-
75
-
76
-
77
-
78
-
79
-
80
-
81
-
82
-
83
-
84
-
85
-
86
-
87
-
 88
88 -
 89
89 -
 90
90 -
 91
91 -
 92
92 -
 93
93 -
 94
94 -
 95
95 -
 96
96 -
 97
97 -
 98
98 -
99
-
100
-
101
-
102
-
103
-
104
-
105
-
106
-
107
-
108
-
109
-
110
-
111
-
112
-
113
-
114
-
115
-
116
-
117
-
118
-
119
-
120
-
121
-
122
-
123
-
124
-
125
-
126
-
127
-
128
-
129
-
130
-
131
-
132
-
133
-
134
-
135
-
136
-
137
-
138
-
139
-
140
-
141
-
142
-
143
-
144
-
145
-
146
-
147
-
148
-
149
-
150
-
151
-
152
-
153
-
154
-
155
-
156
-
157
-
158
-
159
-
160
-
161
-
162
-
163
-
164
 |
 |