Brother International PS-300B Instruction Manual - English - Page 97
Creating manual stitch and manual feed data
 |
View all Brother International PS-300B manuals
Add to My Manuals
Save this manual to your list of manuals |
Page 97 highlights
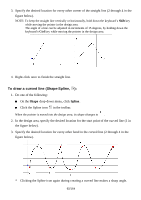
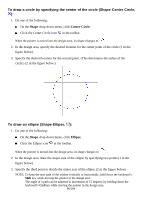
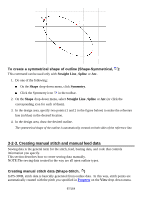
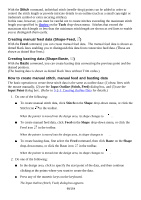
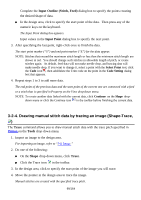
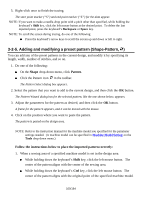
To create a symmetrical shape of outline (Shape-Symmetrical, ): This command can be used only with Straight Line , Spline or Arc. 1. Do one of the following: On the Shape drop-down menu, click Symmetry. Click the Symmetry icon in the toolbar. 2. On the Shape drop-down menu, select Straight Line , Spline or Arc (or click the corresponding icon for each of them). 3. In the design area, specify two points (1 and 2 in the figure below) to make the reference line (in blue) in the desired location. 4. In the design area, draw the desired outline. The symmetrical shape of the outline is automatically created on both sides of the reference line. 3-2-3. Creating manual stitch and manual feed data Sewing data is the general term for the stitch, feed, basting data, and code that controls information you specify. This section describes how to create sewing data manually. NOTE:The sewing data created in the way are all open outline types. Creating manual stitch data (Shape-Stitch, ) In PS-300B, stitch data is basically generated from outline data. In this way, stitch points are automatically created with the pitch you specified in Property on the View drop-down menu. 97/164
-
 1
1 -
2
-
3
-
4
-
5
-
6
-
7
-
8
-
9
-
10
-
11
-
12
-
13
-
14
-
15
-
16
-
17
-
18
-
19
-
20
-
21
-
22
-
23
-
24
-
25
-
26
-
27
-
28
-
29
-
30
-
31
-
32
-
33
-
34
-
35
-
36
-
37
-
38
-
39
-
40
-
41
-
42
-
43
-
44
-
45
-
46
-
47
-
48
-
49
-
50
-
51
-
52
-
53
-
54
-
55
-
56
-
57
-
58
-
59
-
60
-
61
-
62
-
63
-
64
-
65
-
66
-
67
-
68
-
69
-
70
-
71
-
72
-
73
-
74
-
75
-
76
-
77
-
78
-
79
-
80
-
81
-
82
-
83
-
84
-
85
-
86
-
87
-
88
-
89
-
90
-
91
-
 92
92 -
 93
93 -
 94
94 -
 95
95 -
 96
96 -
 97
97 -
 98
98 -
 99
99 -
 100
100 -
 101
101 -
 102
102 -
103
-
104
-
105
-
106
-
107
-
108
-
109
-
110
-
111
-
112
-
113
-
114
-
115
-
116
-
117
-
118
-
119
-
120
-
121
-
122
-
123
-
124
-
125
-
126
-
127
-
128
-
129
-
130
-
131
-
132
-
133
-
134
-
135
-
136
-
137
-
138
-
139
-
140
-
141
-
142
-
143
-
144
-
145
-
146
-
147
-
148
-
149
-
150
-
151
-
152
-
153
-
154
-
155
-
156
-
157
-
158
-
159
-
160
-
161
-
162
-
163
-
164
 |
 |
