Brother International PS-300B Instruction Manual - English - Page 30
Clearing the outline, Editing the sewing data making fine adjustments of the stitch points., Select
 |
View all Brother International PS-300B manuals
Add to My Manuals
Save this manual to your list of manuals |
Page 30 highlights
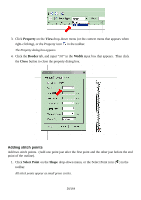
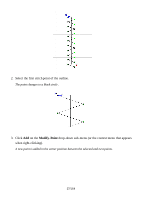
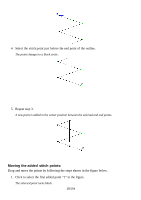
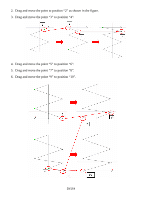
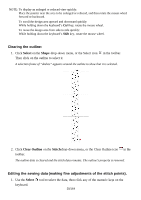
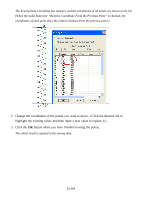
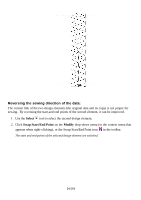
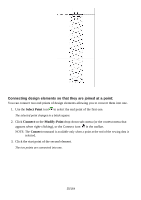
NOTE: To display an enlarged or reduced view quickly: Place the pointer near the area to be enlarged or reduced, and then rotate the mouse wheel forward or backward. To scroll the design area upward and downward quickly: While holding down the keyboard's Ctrl key, rotate the mouse wheel. To move the design area from side to side quickly: While holding down the keyboard's Shift key, rotate the mouse wheel. Clearing the outline: 1. Click Select on the Shape drop-down menu, or the Select icon in the toolbar. Then click on the outline to select it. A selection frame of "dashes" appears around the outline to show that it is selected. 2. Click Clear Outline on the Stitch drop-down menu, or the Clear Outline icon in the toolbar. The outline data is cleared and the stitch data remains. The outline's property is removed. Editing the sewing data (making fine adjustments of the stitch points). 1. Use the Select keyboard. tool to select the data, then click any of the numeric keys on the 30/164
-
 1
1 -
2
-
3
-
4
-
5
-
6
-
7
-
8
-
9
-
10
-
11
-
12
-
13
-
14
-
15
-
16
-
17
-
18
-
19
-
20
-
21
-
22
-
23
-
24
-
 25
25 -
 26
26 -
 27
27 -
 28
28 -
 29
29 -
 30
30 -
 31
31 -
 32
32 -
 33
33 -
 34
34 -
 35
35 -
36
-
37
-
38
-
39
-
40
-
41
-
42
-
43
-
44
-
45
-
46
-
47
-
48
-
49
-
50
-
51
-
52
-
53
-
54
-
55
-
56
-
57
-
58
-
59
-
60
-
61
-
62
-
63
-
64
-
65
-
66
-
67
-
68
-
69
-
70
-
71
-
72
-
73
-
74
-
75
-
76
-
77
-
78
-
79
-
80
-
81
-
82
-
83
-
84
-
85
-
86
-
87
-
88
-
89
-
90
-
91
-
92
-
93
-
94
-
95
-
96
-
97
-
98
-
99
-
100
-
101
-
102
-
103
-
104
-
105
-
106
-
107
-
108
-
109
-
110
-
111
-
112
-
113
-
114
-
115
-
116
-
117
-
118
-
119
-
120
-
121
-
122
-
123
-
124
-
125
-
126
-
127
-
128
-
129
-
130
-
131
-
132
-
133
-
134
-
135
-
136
-
137
-
138
-
139
-
140
-
141
-
142
-
143
-
144
-
145
-
146
-
147
-
148
-
149
-
150
-
151
-
152
-
153
-
154
-
155
-
156
-
157
-
158
-
159
-
160
-
161
-
162
-
163
-
164
 |
 |