Brother International PS-300B Instruction Manual - English - Page 84
Shape, 3-2-1. Creating outline data, To draw an outline manually
 |
View all Brother International PS-300B manuals
Add to My Manuals
Save this manual to your list of manuals |
Page 84 highlights
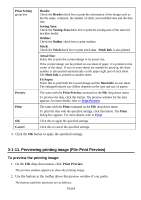
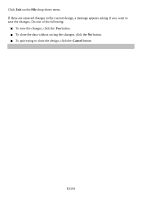
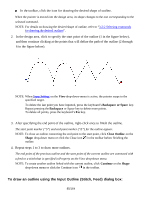
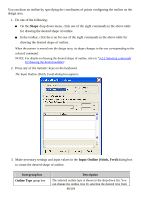
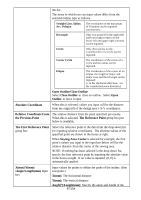
3-2. Shape This section describes how to create design elements (outline data, manual stitch data and manual feed data). Basically, you will create outline data at first. (Stitch data is automatically generated from the outline data.) You can create outline data applying necessary attributes to it, such as stitch type (running stitch or zigzag stitch), and stitch pitch. In addition, PS-300B allows you to create manual stitch data directly without creating outline data. Almost all the functions described here can be selected from the Shape drop-down menu. The parenthesis following each title includes the name of the command on the drop-down menu and/or the icon on the toolbar. 3-2-1. Creating outline data PS-300B is able to create various types of outlines: straight lines, circles, curved lines, ellipses, and arcs. The eight drawing commands in the table below are available from the Shape dropdown menu or icons in the toolbar. The basic operation to create outline data is: (1) draw lines with the mouse manually, (2) use the Input Outline (Stitch, Feed) dialog box, and (3) use the Input Point dialog box. You can change the drawing methods and the commands in the middle of an operation. Command on the Shape menu Straight Line Spline Arc Rectangle Polygon Circle Center Circle Ellipse Icon Function Draws a straight line. Draws a curved line. Draws an arc. (You can also draw an arc connected to the previous data smoothly.) Draws a rectangle or a square. Draws a polygon. Draws a circle from the specified 3 points. Draws a circle from a specified point as the center and radius. Draws an ellipse. To draw an outline manually: 1. Do one of the following: On the Shape drop-down menu, click one of the above eight commands for drawing the desired shape of outline. 84/164
-
 1
1 -
2
-
3
-
4
-
5
-
6
-
7
-
8
-
9
-
10
-
11
-
12
-
13
-
14
-
15
-
16
-
17
-
18
-
19
-
20
-
21
-
22
-
23
-
24
-
25
-
26
-
27
-
28
-
29
-
30
-
31
-
32
-
33
-
34
-
35
-
36
-
37
-
38
-
39
-
40
-
41
-
42
-
43
-
44
-
45
-
46
-
47
-
48
-
49
-
50
-
51
-
52
-
53
-
54
-
55
-
56
-
57
-
58
-
59
-
60
-
61
-
62
-
63
-
64
-
65
-
66
-
67
-
68
-
69
-
70
-
71
-
72
-
73
-
74
-
75
-
76
-
77
-
78
-
 79
79 -
 80
80 -
 81
81 -
 82
82 -
 83
83 -
 84
84 -
 85
85 -
 86
86 -
 87
87 -
 88
88 -
 89
89 -
90
-
91
-
92
-
93
-
94
-
95
-
96
-
97
-
98
-
99
-
100
-
101
-
102
-
103
-
104
-
105
-
106
-
107
-
108
-
109
-
110
-
111
-
112
-
113
-
114
-
115
-
116
-
117
-
118
-
119
-
120
-
121
-
122
-
123
-
124
-
125
-
126
-
127
-
128
-
129
-
130
-
131
-
132
-
133
-
134
-
135
-
136
-
137
-
138
-
139
-
140
-
141
-
142
-
143
-
144
-
145
-
146
-
147
-
148
-
149
-
150
-
151
-
152
-
153
-
154
-
155
-
156
-
157
-
158
-
159
-
160
-
161
-
162
-
163
-
164
 |
 |