Brother International PS-300B Instruction Manual - English - Page 70
Exporting data to a sewing machine (File-Export To Machine
 |
View all Brother International PS-300B manuals
Add to My Manuals
Save this manual to your list of manuals |
Page 70 highlights
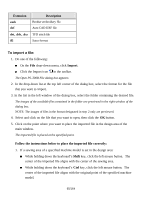
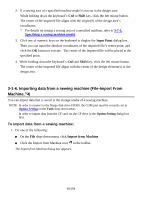
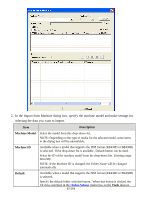
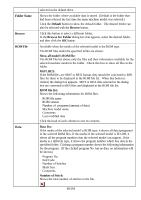
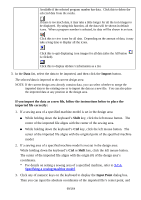
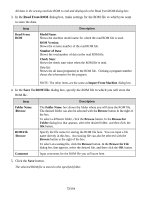
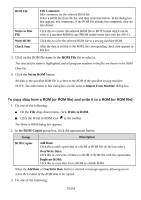
click the OK button to execute. The center of the imported file will be placed to the specified point. 4. While holding down the keyboard's Ctrl and Shift key, click the left mouse button. The center of the imported file aligns with the center of the design element(s) in the design area. 3-1-7. Exporting data to a sewing machine (File-Export To Machine, ) You can export data created in PS-300B to the storage media of a sewing machine. NOTE: In order to connect to the floppy disk drive FD300, the COM port must be correctly set in Option Setting on the Tools drop-down menu. In order to import data from the CF card, set the CF drive in the Option Setting dialog box first. To export data to a sewing machine: If you have not selected a machine model, select one first. NOTE: If you start the following operation without selecting a machine model, a dialog box appears prompting you to select a machine model. To select a machine model, refer to 3-7-5. Specifying a sewing machine model. 1. Do one of the following: On the File drop-down menu, click Export to Machine . Click the Export to Machine icon in the toolbar. The Export to Machine dialog box appears. 70/164
-
 1
1 -
2
-
3
-
4
-
5
-
6
-
7
-
8
-
9
-
10
-
11
-
12
-
13
-
14
-
15
-
16
-
17
-
18
-
19
-
20
-
21
-
22
-
23
-
24
-
25
-
26
-
27
-
28
-
29
-
30
-
31
-
32
-
33
-
34
-
35
-
36
-
37
-
38
-
39
-
40
-
41
-
42
-
43
-
44
-
45
-
46
-
47
-
48
-
49
-
50
-
51
-
52
-
53
-
54
-
55
-
56
-
57
-
58
-
59
-
60
-
61
-
62
-
63
-
64
-
 65
65 -
 66
66 -
 67
67 -
 68
68 -
 69
69 -
 70
70 -
 71
71 -
 72
72 -
 73
73 -
 74
74 -
 75
75 -
76
-
77
-
78
-
79
-
80
-
81
-
82
-
83
-
84
-
85
-
86
-
87
-
88
-
89
-
90
-
91
-
92
-
93
-
94
-
95
-
96
-
97
-
98
-
99
-
100
-
101
-
102
-
103
-
104
-
105
-
106
-
107
-
108
-
109
-
110
-
111
-
112
-
113
-
114
-
115
-
116
-
117
-
118
-
119
-
120
-
121
-
122
-
123
-
124
-
125
-
126
-
127
-
128
-
129
-
130
-
131
-
132
-
133
-
134
-
135
-
136
-
137
-
138
-
139
-
140
-
141
-
142
-
143
-
144
-
145
-
146
-
147
-
148
-
149
-
150
-
151
-
152
-
153
-
154
-
155
-
156
-
157
-
158
-
159
-
160
-
161
-
162
-
163
-
164
 |
 |