HP StorageWorks 2/16V Brocade Web Tools Administrator's Guide - Supporting Fab - Page 132
Disabling zone configurations, Displaying enabled zone configurations
 |
View all HP StorageWorks 2/16V manuals
Add to My Manuals
Save this manual to your list of manuals |
Page 132 highlights
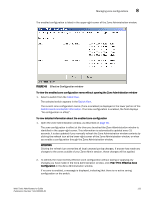
8 Managing zone configurations If the zoning database size exceeds the maximum allowed, you cannot enable the zone configuration. The zoning database summary displays the maximum zoning database size (see "Displaying zone configuration summaries" on page 112). To enable a zone configuration 1. Open the Zone Administration window as described on page 96. 2. Click Zoning Actions> Enable Config. 3. On Enable Config, select the configuration to be enabled from the menu. 4. Click OK to save and enable the selected configuration. DISABLING ZONE CONFIGURATIONS When you disable the active configuration, the Advanced Zoning feature is disabled on the fabric, and all devices within the fabric can communicate with all other devices. This does not mean that the zoning database is deleted, however, only that there is no configuration active on the fabric. When you disable a zone configuration from Web Tools, keep in mind that the entire zoning database is automatically saved, and then the selected zone configuration is disabled. To disable a zone configuration 1. Open the Zone Administration window as described on page 96. 2. Click Zoning Actions> Disable Zoning. The Disable Config warning appears. 3. Click Yes to save and disable the current configuration. DISPLAYING ENABLED ZONE CONFIGURATIONS The enabled zone configuration screen displays the actual content of the single zone configuration that is currently enabled on the fabric, whether it matches the configuration that was enabled when the current Zone Administration session was launched or last refreshed (see Figure 48 on page 111). The zones are displayed, and their contents (ports, WWNs) are displayed next to them. Aliases are not displayed in the enabled zone configuration. If there is no active zone configuration enabled on the switch, a message is displayed to that effect. 110 Web Tools Administrator's Guide Publication Number: 53-1000435-01
-
 1
1 -
2
-
3
-
4
-
5
-
6
-
7
-
8
-
9
-
10
-
11
-
12
-
13
-
14
-
15
-
16
-
17
-
18
-
19
-
20
-
21
-
22
-
23
-
24
-
25
-
26
-
27
-
28
-
29
-
30
-
31
-
32
-
33
-
34
-
35
-
36
-
37
-
38
-
39
-
40
-
41
-
42
-
43
-
44
-
45
-
46
-
47
-
48
-
49
-
50
-
51
-
52
-
53
-
54
-
55
-
56
-
57
-
58
-
59
-
60
-
61
-
62
-
63
-
64
-
65
-
66
-
67
-
68
-
69
-
70
-
71
-
72
-
73
-
74
-
75
-
76
-
77
-
78
-
79
-
80
-
81
-
82
-
83
-
84
-
85
-
86
-
87
-
88
-
89
-
90
-
91
-
92
-
93
-
94
-
95
-
96
-
97
-
98
-
99
-
100
-
101
-
102
-
103
-
104
-
105
-
106
-
107
-
108
-
109
-
110
-
111
-
112
-
113
-
114
-
115
-
116
-
117
-
118
-
119
-
120
-
121
-
122
-
123
-
124
-
125
-
126
-
 127
127 -
 128
128 -
 129
129 -
 130
130 -
 131
131 -
 132
132 -
 133
133 -
 134
134 -
 135
135 -
 136
136 -
 137
137 -
138
-
139
-
140
-
141
-
142
-
143
-
144
-
145
-
146
-
147
-
148
-
149
-
150
-
151
-
152
-
153
-
154
-
155
-
156
-
157
-
158
-
159
-
160
-
161
-
162
-
163
-
164
-
165
-
166
-
167
-
168
-
169
-
170
-
171
-
172
-
173
-
174
-
175
-
176
-
177
-
178
-
179
-
180
-
181
-
182
-
183
-
184
-
185
-
186
-
187
-
188
-
189
-
190
-
191
-
192
-
193
-
194
-
195
-
196
-
197
-
198
-
199
-
200
-
201
-
202
-
203
-
204
-
205
-
206
-
207
-
208
-
209
-
210
-
211
-
212
-
213
-
214
-
215
-
216
-
217
-
218
-
219
-
220
-
221
-
222
-
223
-
224
-
225
-
226
-
227
-
228
-
229
-
230
-
231
-
232
-
233
-
234
-
235
-
236
-
237
-
238
-
239
-
240
-
241
-
242
-
243
-
244
-
245
-
246
-
247
-
248
-
249
-
250
-
251
-
252
-
253
-
254
-
255
-
256
-
257
-
258
-
259
-
260
-
261
-
262
-
263
-
264
-
265
-
266
 |
 |
