HP StorageWorks 2/16V Brocade Web Tools Administrator's Guide - Supporting Fab - Page 238
Configuring the RADIUS Service, AAA Service, Apply, RADIUS Configuration, Modify
 |
View all HP StorageWorks 2/16V manuals
Add to My Manuals
Save this manual to your list of manuals |
Page 238 highlights
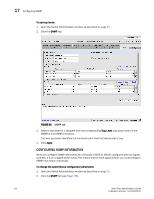
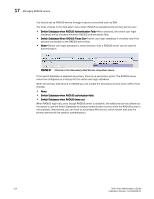
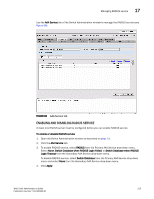
17 Managing RADIUS service CONFIGURING THE RADIUS SERVICE The configuration is chassis-based, so it applies to all logical switches (domains) on the switch and replicates itself on a standby CP, if one is present. It is saved in a configuration upload, and so it can be applied to other switches in a configuration download. You should configure at least two RADIUS servers so that if one fails, the other will assume service. You can configure the RADIUS service even if it is disabled. You can configure up to five RADIUS servers. You must be logged in as admin or switchadmin to configure the RADIUS service. To configure the RADIUS service 1. Open the Switch Administration window as described on page 31. 2. Click the AAA Service tab. 3. Click Add. You can configure up to five RADIUS servers. If five RADIUS servers are already configured, the Add button is disabled. The RADIUS Configuration dialog box displays. 4. Type the RADIUS server name, which is a valid IP address (in either IPv4 or IPv6 format) or Dynamic Name Server (DNS) string. Each RADIUS server must have a unique IP address or DNS name for the RADIUS server. 5. Type the port number. 6. Type the secret string. 7. Type the timeout time in minutes. 8. Select an authentication protocol from CHAP or PAP. The default value is CHAP, and if you do not change it, CHAP will be the authentication protocol. 9. Click OK to return to the AAA Service tab. 10. Click Apply. MODIFYING THE RADIUS SERVER Use the following procedure to change the parameters of a RADIUS Server that is already configured. To modify the RADIUS Server 1. Open the Switch Administration window as described on page 31. 2. Click the AAA Service tab. 3. Click a RADIUS server from the RADIUS Configuration list. 4. Click Modify. The RADIUS Configuration dialog box displays. 5. Type new values for the port number, secret string, and timeout time (in minutes). 6. Select an authentication protocol from CHAP or PAP. The default value is CHAP, and if you do not change it, CHAP will be the authentication protocol. 7. Click OK to return to the AAA Service tab and click Apply. 216 Web Tools Administrator's Guide Publication Number: 53-1000435-01
-
 1
1 -
2
-
3
-
4
-
5
-
6
-
7
-
8
-
9
-
10
-
11
-
12
-
13
-
14
-
15
-
16
-
17
-
18
-
19
-
20
-
21
-
22
-
23
-
24
-
25
-
26
-
27
-
28
-
29
-
30
-
31
-
32
-
33
-
34
-
35
-
36
-
37
-
38
-
39
-
40
-
41
-
42
-
43
-
44
-
45
-
46
-
47
-
48
-
49
-
50
-
51
-
52
-
53
-
54
-
55
-
56
-
57
-
58
-
59
-
60
-
61
-
62
-
63
-
64
-
65
-
66
-
67
-
68
-
69
-
70
-
71
-
72
-
73
-
74
-
75
-
76
-
77
-
78
-
79
-
80
-
81
-
82
-
83
-
84
-
85
-
86
-
87
-
88
-
89
-
90
-
91
-
92
-
93
-
94
-
95
-
96
-
97
-
98
-
99
-
100
-
101
-
102
-
103
-
104
-
105
-
106
-
107
-
108
-
109
-
110
-
111
-
112
-
113
-
114
-
115
-
116
-
117
-
118
-
119
-
120
-
121
-
122
-
123
-
124
-
125
-
126
-
127
-
128
-
129
-
130
-
131
-
132
-
133
-
134
-
135
-
136
-
137
-
138
-
139
-
140
-
141
-
142
-
143
-
144
-
145
-
146
-
147
-
148
-
149
-
150
-
151
-
152
-
153
-
154
-
155
-
156
-
157
-
158
-
159
-
160
-
161
-
162
-
163
-
164
-
165
-
166
-
167
-
168
-
169
-
170
-
171
-
172
-
173
-
174
-
175
-
176
-
177
-
178
-
179
-
180
-
181
-
182
-
183
-
184
-
185
-
186
-
187
-
188
-
189
-
190
-
191
-
192
-
193
-
194
-
195
-
196
-
197
-
198
-
199
-
200
-
201
-
202
-
203
-
204
-
205
-
206
-
207
-
208
-
209
-
210
-
211
-
212
-
213
-
214
-
215
-
216
-
217
-
218
-
219
-
220
-
221
-
222
-
223
-
224
-
225
-
226
-
227
-
228
-
229
-
230
-
231
-
232
-
 233
233 -
 234
234 -
 235
235 -
 236
236 -
 237
237 -
 238
238 -
 239
239 -
 240
240 -
 241
241 -
 242
242 -
 243
243 -
244
-
245
-
246
-
247
-
248
-
249
-
250
-
251
-
252
-
253
-
254
-
255
-
256
-
257
-
258
-
259
-
260
-
261
-
262
-
263
-
264
-
265
-
266
 |
 |