HP StorageWorks 2/16V Brocade Web Tools Administrator's Guide - Supporting Fab - Page 183
Configuring threshold alarms, Enabling or disabling threshold alarms for individual elements, Changed
 |
View all HP StorageWorks 2/16V manuals
Add to My Manuals
Save this manual to your list of manuals |
Page 183 highlights
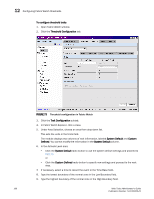
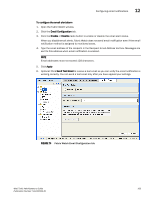
Configuring Fabric Watch thresholds 12 10. Type the size of the buffer zone in the Buffer Size field. 11. Click Apply. CONFIGURING THRESHOLD ALARMS After you update the threshold information, use the Alarm Configuration subtab to customize the notification settings for each event setting. To configure threshold alarms 1. Open the Fabric Watch window. 2. Click the Threshold Configuration tab. 3. Click the Alarm Configuration subtab. 4. In Fabric Watch Explorer, click a class. 5. Under Area Selection, choose an area from drop-down list. The module displays two tables of alarm configuration information, labeled System Default and Custom Defined. You cannot modify the information in the System Default table. 6. In the Activate Level area: - Click the System Default radio button to use the system default settings and proceed to step 11. or - Click the Custom Defined radio button to specify new settings and proceed to the next step. 7. Select the check box for the type of notification method you want to use for each event type (Changed, Below, Above, Inbetween). The available alarm actions are ERROR_LOG, SNMP_TRAP, RAPI_TRAP, and EMAIL_ALERT. 8. Click Apply. ENABLING OR DISABLING THRESHOLD ALARMS FOR INDIVIDUAL ELEMENTS Use the Element Configuration subtab to configure element-specific alarm settings. To enable or disable threshold alarms for an element 1. Open the Fabric Watch window. 2. In Fabric Watch Explorer, select a class. You can set alarms for information on a switch only if that information is monitored by Fabric Watch for that switch; not all alarm options are available for all switches. For more information, see the Fabric Watch Administrator's Guide. 3. Click the Threshold Configuration tab. 4. Under Area Selection, choose the area with the alarms that you want to enable or disable. 5. Click the Element Configuration subtab. 6. Click an element from the Element Selection menu. 7. In the Status area: Web Tools Administrator's Guide 161 Publication Number: 53-1000435-01
-
 1
1 -
2
-
3
-
4
-
5
-
6
-
7
-
8
-
9
-
10
-
11
-
12
-
13
-
14
-
15
-
16
-
17
-
18
-
19
-
20
-
21
-
22
-
23
-
24
-
25
-
26
-
27
-
28
-
29
-
30
-
31
-
32
-
33
-
34
-
35
-
36
-
37
-
38
-
39
-
40
-
41
-
42
-
43
-
44
-
45
-
46
-
47
-
48
-
49
-
50
-
51
-
52
-
53
-
54
-
55
-
56
-
57
-
58
-
59
-
60
-
61
-
62
-
63
-
64
-
65
-
66
-
67
-
68
-
69
-
70
-
71
-
72
-
73
-
74
-
75
-
76
-
77
-
78
-
79
-
80
-
81
-
82
-
83
-
84
-
85
-
86
-
87
-
88
-
89
-
90
-
91
-
92
-
93
-
94
-
95
-
96
-
97
-
98
-
99
-
100
-
101
-
102
-
103
-
104
-
105
-
106
-
107
-
108
-
109
-
110
-
111
-
112
-
113
-
114
-
115
-
116
-
117
-
118
-
119
-
120
-
121
-
122
-
123
-
124
-
125
-
126
-
127
-
128
-
129
-
130
-
131
-
132
-
133
-
134
-
135
-
136
-
137
-
138
-
139
-
140
-
141
-
142
-
143
-
144
-
145
-
146
-
147
-
148
-
149
-
150
-
151
-
152
-
153
-
154
-
155
-
156
-
157
-
158
-
159
-
160
-
161
-
162
-
163
-
164
-
165
-
166
-
167
-
168
-
169
-
170
-
171
-
172
-
173
-
174
-
175
-
176
-
177
-
 178
178 -
 179
179 -
 180
180 -
 181
181 -
 182
182 -
 183
183 -
 184
184 -
 185
185 -
 186
186 -
 187
187 -
 188
188 -
189
-
190
-
191
-
192
-
193
-
194
-
195
-
196
-
197
-
198
-
199
-
200
-
201
-
202
-
203
-
204
-
205
-
206
-
207
-
208
-
209
-
210
-
211
-
212
-
213
-
214
-
215
-
216
-
217
-
218
-
219
-
220
-
221
-
222
-
223
-
224
-
225
-
226
-
227
-
228
-
229
-
230
-
231
-
232
-
233
-
234
-
235
-
236
-
237
-
238
-
239
-
240
-
241
-
242
-
243
-
244
-
245
-
246
-
247
-
248
-
249
-
250
-
251
-
252
-
253
-
254
-
255
-
256
-
257
-
258
-
259
-
260
-
261
-
262
-
263
-
264
-
265
-
266
 |
 |