HP StorageWorks 2/16V Brocade Web Tools Administrator's Guide - Supporting Fab - Page 90
Allowed Port Types, General, Edit Configuration, Enable Port after, Port Type, L_Port
 |
View all HP StorageWorks 2/16V manuals
Add to My Manuals
Save this manual to your list of manuals |
Page 90 highlights
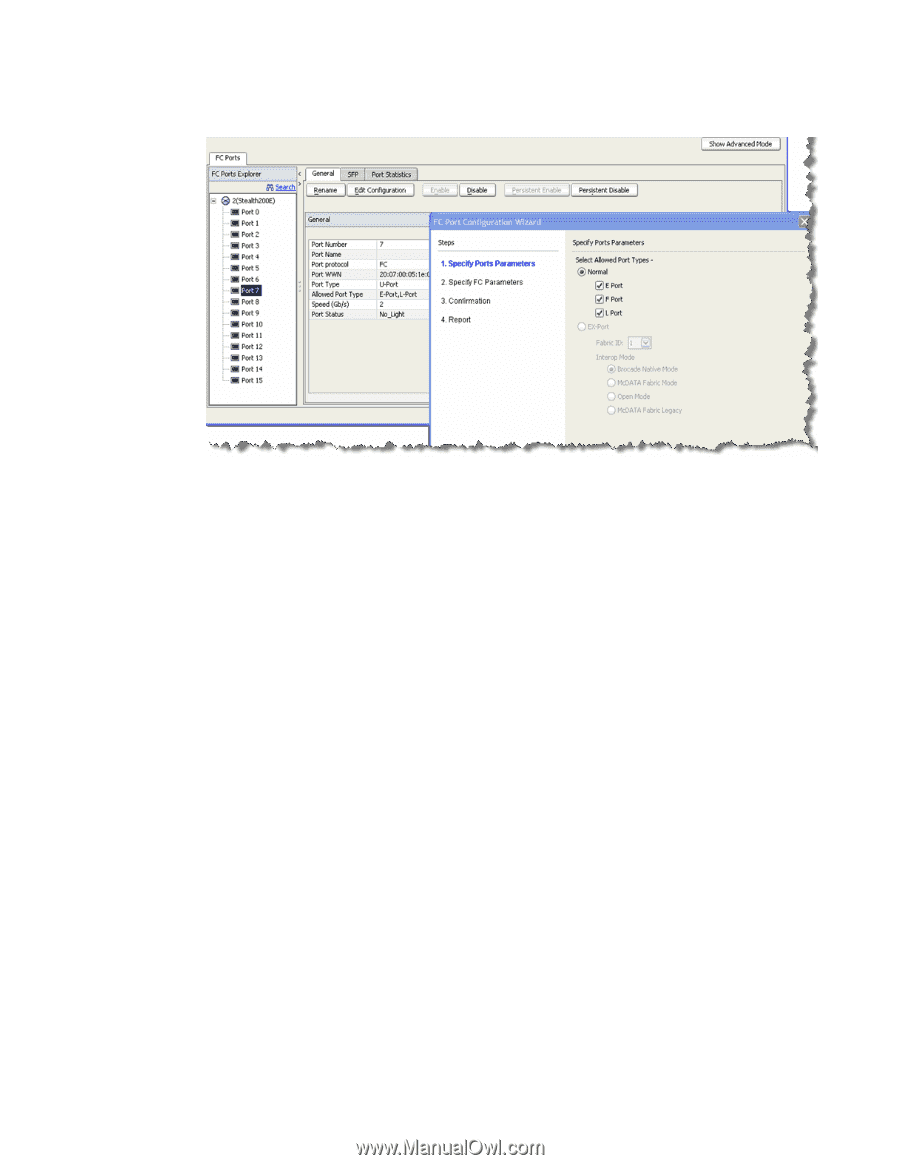
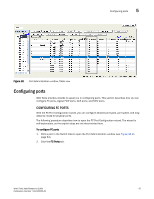
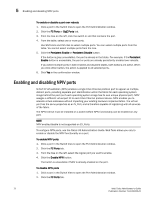
5 Configuring ports FIGURE 36 FC Port Configuration Wizard, FC ports 3. From the tree on the left, select the port you want to configure. 4. Click the General subtab. 5. Click the Edit Configuration button. The FC Port Configuration wizard opens. The fields are populated with the current configuration values. 6. Follow the steps in the wizard. If you configure a disabled port as an EX_Port, the wizard displays the Enable Port after configuration check box. If you select the check box, the disabled port is automatically enabled after configuration; otherwise, the port remains in the same state after configuration. Allowed Port Types For FC ports, the Port Administration window displays the following values relating to port type: Port Type This is the actual or current port type. If the port is offline, this value is the allowed types (or U_Port, if no type constraint has been specified). If the port is online, this value is the type the port has actually negotiated to. Allowed Port Type The allowed or configured port type. The allowed port types indicate any constraints on what types the port can negotiate to when it comes up. For normal (that is, non-EX_Port) ports, the following are the allowed port types: L_Port The port can be used to connect a loop device. F_Port The port can be used to connect a non-loop device. E_Port The port can be used to connect to another switch. U_Port For a physical FC port: the port can be any one of E_Port, F_Port, or L_Port. For a logical FC port: the port can be either VE_Port or VEX_Port. 68 Web Tools Administrator's Guide Publication Number: 53-1000435-01
-
 1
1 -
2
-
3
-
4
-
5
-
6
-
7
-
8
-
9
-
10
-
11
-
12
-
13
-
14
-
15
-
16
-
17
-
18
-
19
-
20
-
21
-
22
-
23
-
24
-
25
-
26
-
27
-
28
-
29
-
30
-
31
-
32
-
33
-
34
-
35
-
36
-
37
-
38
-
39
-
40
-
41
-
42
-
43
-
44
-
45
-
46
-
47
-
48
-
49
-
50
-
51
-
52
-
53
-
54
-
55
-
56
-
57
-
58
-
59
-
60
-
61
-
62
-
63
-
64
-
65
-
66
-
67
-
68
-
69
-
70
-
71
-
72
-
73
-
74
-
75
-
76
-
77
-
78
-
79
-
80
-
81
-
82
-
83
-
84
-
 85
85 -
 86
86 -
 87
87 -
 88
88 -
 89
89 -
 90
90 -
 91
91 -
 92
92 -
 93
93 -
 94
94 -
 95
95 -
96
-
97
-
98
-
99
-
100
-
101
-
102
-
103
-
104
-
105
-
106
-
107
-
108
-
109
-
110
-
111
-
112
-
113
-
114
-
115
-
116
-
117
-
118
-
119
-
120
-
121
-
122
-
123
-
124
-
125
-
126
-
127
-
128
-
129
-
130
-
131
-
132
-
133
-
134
-
135
-
136
-
137
-
138
-
139
-
140
-
141
-
142
-
143
-
144
-
145
-
146
-
147
-
148
-
149
-
150
-
151
-
152
-
153
-
154
-
155
-
156
-
157
-
158
-
159
-
160
-
161
-
162
-
163
-
164
-
165
-
166
-
167
-
168
-
169
-
170
-
171
-
172
-
173
-
174
-
175
-
176
-
177
-
178
-
179
-
180
-
181
-
182
-
183
-
184
-
185
-
186
-
187
-
188
-
189
-
190
-
191
-
192
-
193
-
194
-
195
-
196
-
197
-
198
-
199
-
200
-
201
-
202
-
203
-
204
-
205
-
206
-
207
-
208
-
209
-
210
-
211
-
212
-
213
-
214
-
215
-
216
-
217
-
218
-
219
-
220
-
221
-
222
-
223
-
224
-
225
-
226
-
227
-
228
-
229
-
230
-
231
-
232
-
233
-
234
-
235
-
236
-
237
-
238
-
239
-
240
-
241
-
242
-
243
-
244
-
245
-
246
-
247
-
248
-
249
-
250
-
251
-
252
-
253
-
254
-
255
-
256
-
257
-
258
-
259
-
260
-
261
-
262
-
263
-
264
-
265
-
266
 |
 |