HP StorageWorks 2/16V Brocade Web Tools Administrator's Guide - Supporting Fab - Page 60
Changing the Switch Domain ID, Viewing and printing a switch report, Name Server information
 |
View all HP StorageWorks 2/16V manuals
Add to My Manuals
Save this manual to your list of manuals |
Page 60 highlights
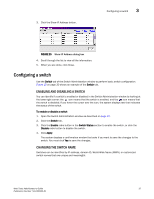
3 Configuring a switch Switch names can be a maximum of 15 characters for Fabric OS v5.3.0. Names must begin with an alphabetic character, but otherwise can consist of alphanumeric and underscore characters. NOTE It is recommended that you customize the chassis name for each switch. Some system messages identify a switch service by the chassis name, so if you assign meaningful chassis names in addition to meaningful switch names, logs will be more useful. You change the chassis name using the CLI. See the Fabric OS Administrator's Guide for instructions on changing the chassis name. To change the switch name 1. Open the Switch Administration window as described on page 31. 2. Click the Switch tab. 3. Type a new name in the Name field and click Apply. CHANGING THE SWITCH DOMAIN ID Although domain IDs are assigned dynamically when a switch is enabled, you can request a specific ID to resolve a domain ID conflict when you merge fabrics. To change the switch domain ID 1. Open the Switch Administration window as described on page 31. 2. Disable the switch, as described in "Enabling and disabling a switch" on page 37. 3. Click the Switch tab. 4. Type a new domain ID in the Domain ID field. The domain ID is an integer between 1 and 239. 5. Click Apply. 6. Enable the switch, as described in "Enabling and disabling a switch" on page 37. VIEWING AND PRINTING A SWITCH REPORT The switch report includes the following information: • A list of switches in the fabric • Switch configuration parameters • A list of ISLs and ports • Name Server information • Zoning information • SFP serial ID information To view or print a switch report 1. Open the Switch Administration window as described on page 31. 2. Click the Switch tab. 3. Click View Report. 4. In the new window that displays the report, view or print the report using your browser. 38 Web Tools Administrator's Guide Publication Number: 53-1000435-01
-
 1
1 -
2
-
3
-
4
-
5
-
6
-
7
-
8
-
9
-
10
-
11
-
12
-
13
-
14
-
15
-
16
-
17
-
18
-
19
-
20
-
21
-
22
-
23
-
24
-
25
-
26
-
27
-
28
-
29
-
30
-
31
-
32
-
33
-
34
-
35
-
36
-
37
-
38
-
39
-
40
-
41
-
42
-
43
-
44
-
45
-
46
-
47
-
48
-
49
-
50
-
51
-
52
-
53
-
54
-
 55
55 -
 56
56 -
 57
57 -
 58
58 -
 59
59 -
 60
60 -
 61
61 -
 62
62 -
 63
63 -
 64
64 -
 65
65 -
66
-
67
-
68
-
69
-
70
-
71
-
72
-
73
-
74
-
75
-
76
-
77
-
78
-
79
-
80
-
81
-
82
-
83
-
84
-
85
-
86
-
87
-
88
-
89
-
90
-
91
-
92
-
93
-
94
-
95
-
96
-
97
-
98
-
99
-
100
-
101
-
102
-
103
-
104
-
105
-
106
-
107
-
108
-
109
-
110
-
111
-
112
-
113
-
114
-
115
-
116
-
117
-
118
-
119
-
120
-
121
-
122
-
123
-
124
-
125
-
126
-
127
-
128
-
129
-
130
-
131
-
132
-
133
-
134
-
135
-
136
-
137
-
138
-
139
-
140
-
141
-
142
-
143
-
144
-
145
-
146
-
147
-
148
-
149
-
150
-
151
-
152
-
153
-
154
-
155
-
156
-
157
-
158
-
159
-
160
-
161
-
162
-
163
-
164
-
165
-
166
-
167
-
168
-
169
-
170
-
171
-
172
-
173
-
174
-
175
-
176
-
177
-
178
-
179
-
180
-
181
-
182
-
183
-
184
-
185
-
186
-
187
-
188
-
189
-
190
-
191
-
192
-
193
-
194
-
195
-
196
-
197
-
198
-
199
-
200
-
201
-
202
-
203
-
204
-
205
-
206
-
207
-
208
-
209
-
210
-
211
-
212
-
213
-
214
-
215
-
216
-
217
-
218
-
219
-
220
-
221
-
222
-
223
-
224
-
225
-
226
-
227
-
228
-
229
-
230
-
231
-
232
-
233
-
234
-
235
-
236
-
237
-
238
-
239
-
240
-
241
-
242
-
243
-
244
-
245
-
246
-
247
-
248
-
249
-
250
-
251
-
252
-
253
-
254
-
255
-
256
-
257
-
258
-
259
-
260
-
261
-
262
-
263
-
264
-
265
-
266
 |
 |