HP StorageWorks 2/16V Brocade Web Tools Administrator's Guide - Supporting Fab - Page 171
Disabling automatic trace uploads, Displaying switch information
 |
View all HP StorageWorks 2/16V manuals
Add to My Manuals
Save this manual to your list of manuals |
Page 171 highlights
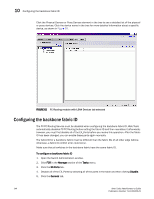
Displaying switch information 11 Setting up for automatic transfer of diagnostic files involves the following tasks: • Specify a remote server to store the files. • Enable the automatic transfer of trace dumps to the server. (Trace dumps overwrite each other by default; sending them to a server preserves information that would otherwise be lost.) You should also set up a periodic checking of the remote server so that you are alerted if the server becomes unavailable and you can correct the problem. See the Fabric OS Administrator's Guide for additional information. The following procedures describe in detail the tasks for setting up automatic transfer. To specify a remote server 1. Open the Switch Administration window. 2. Click the Trace tab. 3. Type the FTP host IP address, path of the remote directory in which to store the trace dump files, FTP user name, and FTP password in the appropriate fields. The IP address can be IPv4 or IPv6 format, or a DNS name. The password is optional if you log in as an anonymous user. 4. Click Apply. To enable automatic transfer of trace dumps 1. Open the Switch Administration window. 2. Click the Trace tab. 3. Select Enable in the Auto FTP Upload section to enable automatic uploading of the trace dump to the FTP host. 4. Click Apply. DISABLING AUTOMATIC TRACE UPLOADS If automatic uploading of a trace dump is disabled, you must manually upload the trace dump or else the information is overwritten when a subsequent trace dump is generated. To disable automatic uploading of the trace dump 1. Open the Switch Administration window. 2. Click the Trace tab. 3. Select Disable in the Auto FTP Upload section to disable automatic uploading of the trace dump to the FTP host. 4. Click Apply. Displaying switch information This section describes how to display information about the physical components of the switch (such as fan, temperature, and power supply) as well as how to display other detailed switch information (such as firmware and IP address). Web Tools Administrator's Guide 149 Publication Number: 53-1000435-01
-
 1
1 -
2
-
3
-
4
-
5
-
6
-
7
-
8
-
9
-
10
-
11
-
12
-
13
-
14
-
15
-
16
-
17
-
18
-
19
-
20
-
21
-
22
-
23
-
24
-
25
-
26
-
27
-
28
-
29
-
30
-
31
-
32
-
33
-
34
-
35
-
36
-
37
-
38
-
39
-
40
-
41
-
42
-
43
-
44
-
45
-
46
-
47
-
48
-
49
-
50
-
51
-
52
-
53
-
54
-
55
-
56
-
57
-
58
-
59
-
60
-
61
-
62
-
63
-
64
-
65
-
66
-
67
-
68
-
69
-
70
-
71
-
72
-
73
-
74
-
75
-
76
-
77
-
78
-
79
-
80
-
81
-
82
-
83
-
84
-
85
-
86
-
87
-
88
-
89
-
90
-
91
-
92
-
93
-
94
-
95
-
96
-
97
-
98
-
99
-
100
-
101
-
102
-
103
-
104
-
105
-
106
-
107
-
108
-
109
-
110
-
111
-
112
-
113
-
114
-
115
-
116
-
117
-
118
-
119
-
120
-
121
-
122
-
123
-
124
-
125
-
126
-
127
-
128
-
129
-
130
-
131
-
132
-
133
-
134
-
135
-
136
-
137
-
138
-
139
-
140
-
141
-
142
-
143
-
144
-
145
-
146
-
147
-
148
-
149
-
150
-
151
-
152
-
153
-
154
-
155
-
156
-
157
-
158
-
159
-
160
-
161
-
162
-
163
-
164
-
165
-
 166
166 -
 167
167 -
 168
168 -
 169
169 -
 170
170 -
 171
171 -
 172
172 -
 173
173 -
 174
174 -
 175
175 -
 176
176 -
177
-
178
-
179
-
180
-
181
-
182
-
183
-
184
-
185
-
186
-
187
-
188
-
189
-
190
-
191
-
192
-
193
-
194
-
195
-
196
-
197
-
198
-
199
-
200
-
201
-
202
-
203
-
204
-
205
-
206
-
207
-
208
-
209
-
210
-
211
-
212
-
213
-
214
-
215
-
216
-
217
-
218
-
219
-
220
-
221
-
222
-
223
-
224
-
225
-
226
-
227
-
228
-
229
-
230
-
231
-
232
-
233
-
234
-
235
-
236
-
237
-
238
-
239
-
240
-
241
-
242
-
243
-
244
-
245
-
246
-
247
-
248
-
249
-
250
-
251
-
252
-
253
-
254
-
255
-
256
-
257
-
258
-
259
-
260
-
261
-
262
-
263
-
264
-
265
-
266
 |
 |