HP StorageWorks 2/16V Brocade Web Tools Administrator's Guide - Supporting Fab - Page 97
Swapping port index
 |
View all HP StorageWorks 2/16V manuals
Add to My Manuals
Save this manual to your list of manuals |
Page 97 highlights
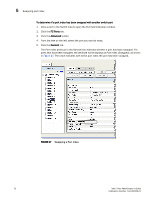
Swapping port index 5 Reserving and Releasing Licenses On a Port Basis You must be logged in as Admin to reserve and release licenses. NOTE If the Admin Domains feature is enabled, the Dynamic POD configuration is only applied to the ports if the switch is a member of the current Admin Domain. The Dynamic PODs feature is supported on the Brocade 4018, 4020, and 4024 switches only. You must disable the port or switch before reserving or releasing a license. 1. Click a port in the Switch View to open the Port Administration window. 2. Click the FC Ports or GigE Ports tab. 3. From the tree on the left, click the switch or the slot that contains the port. The License column identifies the port license status: • If the port has a license allocated, the License field contains the value Yes. • If the port does not have a license allocated and there are no free licenses that can be allocated, the License field contains the value No. • If the port does not have a license allocated and there are licenses that can be allocated to the port, the License field contains the value Possible. You can reserve or release a license on any port that has a license allocated. To reserve a license, click Reserve License in the Port Administration window. To release a license, click Release License in the Port Administration window. Swapping port index If a port malfunctions, or if you want to connect to different devices without having to re-wire your infrastructure, you can move traffic from one port to another (swap ports) without changing the I/O Configuration Data Set (IOCDS) on the mainframe computer. When you perform a port swap, Web Tools automatically disables the two ports, swaps the area IDs, and enables the ports. To swap ports 1. Click a port in the Switch View to open the Port Administration window. 2. Click the FC Ports tab. 3. Click the Advanced button. 4. From the tree on the left, select the port you want to swap. 5. Click the Port Swap button. 6. Type the number of the port with which you want to swap the current port. If the port is on a blade, you must also provide the slot number. 7. Click Swap. Web Tools Administrator's Guide 75 Publication Number: 53-1000435-01
-
 1
1 -
2
-
3
-
4
-
5
-
6
-
7
-
8
-
9
-
10
-
11
-
12
-
13
-
14
-
15
-
16
-
17
-
18
-
19
-
20
-
21
-
22
-
23
-
24
-
25
-
26
-
27
-
28
-
29
-
30
-
31
-
32
-
33
-
34
-
35
-
36
-
37
-
38
-
39
-
40
-
41
-
42
-
43
-
44
-
45
-
46
-
47
-
48
-
49
-
50
-
51
-
52
-
53
-
54
-
55
-
56
-
57
-
58
-
59
-
60
-
61
-
62
-
63
-
64
-
65
-
66
-
67
-
68
-
69
-
70
-
71
-
72
-
73
-
74
-
75
-
76
-
77
-
78
-
79
-
80
-
81
-
82
-
83
-
84
-
85
-
86
-
87
-
88
-
89
-
90
-
91
-
 92
92 -
 93
93 -
 94
94 -
 95
95 -
 96
96 -
 97
97 -
 98
98 -
 99
99 -
 100
100 -
 101
101 -
 102
102 -
103
-
104
-
105
-
106
-
107
-
108
-
109
-
110
-
111
-
112
-
113
-
114
-
115
-
116
-
117
-
118
-
119
-
120
-
121
-
122
-
123
-
124
-
125
-
126
-
127
-
128
-
129
-
130
-
131
-
132
-
133
-
134
-
135
-
136
-
137
-
138
-
139
-
140
-
141
-
142
-
143
-
144
-
145
-
146
-
147
-
148
-
149
-
150
-
151
-
152
-
153
-
154
-
155
-
156
-
157
-
158
-
159
-
160
-
161
-
162
-
163
-
164
-
165
-
166
-
167
-
168
-
169
-
170
-
171
-
172
-
173
-
174
-
175
-
176
-
177
-
178
-
179
-
180
-
181
-
182
-
183
-
184
-
185
-
186
-
187
-
188
-
189
-
190
-
191
-
192
-
193
-
194
-
195
-
196
-
197
-
198
-
199
-
200
-
201
-
202
-
203
-
204
-
205
-
206
-
207
-
208
-
209
-
210
-
211
-
212
-
213
-
214
-
215
-
216
-
217
-
218
-
219
-
220
-
221
-
222
-
223
-
224
-
225
-
226
-
227
-
228
-
229
-
230
-
231
-
232
-
233
-
234
-
235
-
236
-
237
-
238
-
239
-
240
-
241
-
242
-
243
-
244
-
245
-
246
-
247
-
248
-
249
-
250
-
251
-
252
-
253
-
254
-
255
-
256
-
257
-
258
-
259
-
260
-
261
-
262
-
263
-
264
-
265
-
266
 |
 |