HP StorageWorks 2/16V Brocade Web Tools Administrator's Guide - Supporting Fab - Page 92
Configuring GbE ports, Assigning a name to a port
 |
View all HP StorageWorks 2/16V manuals
Add to My Manuals
Save this manual to your list of manuals |
Page 92 highlights
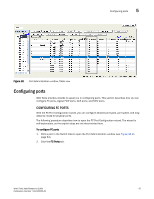
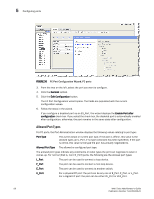
5 Assigning a name to a port If you configure a disabled port as a VEX_Port, the wizard provides the Enable Port after configuration check box. If you select this check box, the disabled port is automatically enabled after configuration. If you leave this check box cleared, the port remains in the same state after configuration. CONFIGURING GBE PORTS With the GigE Port Configuration wizard, you can configure IP interfaces, and IP routes. For setting up iSCSI Target Gateway, please see Chapter 14, "Administering the iSCSI Target Gateway". Admin Domain considerations: You can configure GbE ports only when the current Admin Domain owns the switch. The following procedure describes how to open the GigE Port Configuration wizard. The wizard is self-explanatory, so the explicit steps are not documented here. To configure GbE ports 1. Click a port in the Switch View to open the Port Administration window (see Figure 33 on page 64). 2. Click the GigE Ports tab. 3. Select the port you want to configure in the tree on the left side of the window. 4. Click Edit Configuration in the task bar. The GigE Port Configuration wizard opens. The wizard fields are populated with the current configuration values. 5. Follow the steps in the wizard. Assigning a name to a port Port names are optional. You can assign a name to an FC or FCIP port to make port grouping easier. You can rename FC and FCIP ports too. You cannot rename GbE ports. The Port Name column in the Ports tab displays the port name, if one exists. Port names can be from 1 through 32 alphanumeric characters, unless Ficon Management Server (FMS) mode is enabled; if FMS mode is enabled, port names should be limited from 1 through 24 alphanumeric characters. The comma (,), semicolon (;), and "at" symbol (@) are not allowed. Although it is not required that port names be unique, it is recommended. To rename a port 1. Click a port in the Switch View to open the Port Administration window. 2. Click the FC Ports tab. 3. From the tree on the left, click the switch or slot that contains the port you want to rename. 4. From the table, select the port you want to rename. 5. Click the Rename button. 70 Web Tools Administrator's Guide Publication Number: 53-1000435-01
-
 1
1 -
2
-
3
-
4
-
5
-
6
-
7
-
8
-
9
-
10
-
11
-
12
-
13
-
14
-
15
-
16
-
17
-
18
-
19
-
20
-
21
-
22
-
23
-
24
-
25
-
26
-
27
-
28
-
29
-
30
-
31
-
32
-
33
-
34
-
35
-
36
-
37
-
38
-
39
-
40
-
41
-
42
-
43
-
44
-
45
-
46
-
47
-
48
-
49
-
50
-
51
-
52
-
53
-
54
-
55
-
56
-
57
-
58
-
59
-
60
-
61
-
62
-
63
-
64
-
65
-
66
-
67
-
68
-
69
-
70
-
71
-
72
-
73
-
74
-
75
-
76
-
77
-
78
-
79
-
80
-
81
-
82
-
83
-
84
-
85
-
86
-
 87
87 -
 88
88 -
 89
89 -
 90
90 -
 91
91 -
 92
92 -
 93
93 -
 94
94 -
 95
95 -
 96
96 -
 97
97 -
98
-
99
-
100
-
101
-
102
-
103
-
104
-
105
-
106
-
107
-
108
-
109
-
110
-
111
-
112
-
113
-
114
-
115
-
116
-
117
-
118
-
119
-
120
-
121
-
122
-
123
-
124
-
125
-
126
-
127
-
128
-
129
-
130
-
131
-
132
-
133
-
134
-
135
-
136
-
137
-
138
-
139
-
140
-
141
-
142
-
143
-
144
-
145
-
146
-
147
-
148
-
149
-
150
-
151
-
152
-
153
-
154
-
155
-
156
-
157
-
158
-
159
-
160
-
161
-
162
-
163
-
164
-
165
-
166
-
167
-
168
-
169
-
170
-
171
-
172
-
173
-
174
-
175
-
176
-
177
-
178
-
179
-
180
-
181
-
182
-
183
-
184
-
185
-
186
-
187
-
188
-
189
-
190
-
191
-
192
-
193
-
194
-
195
-
196
-
197
-
198
-
199
-
200
-
201
-
202
-
203
-
204
-
205
-
206
-
207
-
208
-
209
-
210
-
211
-
212
-
213
-
214
-
215
-
216
-
217
-
218
-
219
-
220
-
221
-
222
-
223
-
224
-
225
-
226
-
227
-
228
-
229
-
230
-
231
-
232
-
233
-
234
-
235
-
236
-
237
-
238
-
239
-
240
-
241
-
242
-
243
-
244
-
245
-
246
-
247
-
248
-
249
-
250
-
251
-
252
-
253
-
254
-
255
-
256
-
257
-
258
-
259
-
260
-
261
-
262
-
263
-
264
-
265
-
266
 |
 |