HP StorageWorks 2/16V Brocade Web Tools Administrator's Guide - Supporting Fab - Page 55
Configuring a syslog IP address
 |
View all HP StorageWorks 2/16V manuals
Add to My Manuals
Save this manual to your list of manuals |
Page 55 highlights
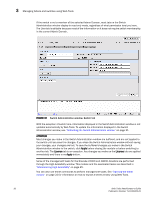
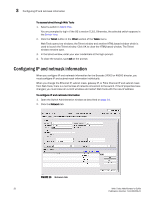
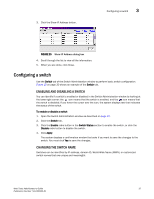
Configuring a syslog IP address 3 3. In the appropriate IP Address section, enter an IP address (for example, 10.77.77.77). Use the IPv4 Address section and/or the IPv6 Address section to specify IP addresses. 4. For the Brocade 24000 and 48000 directors only: In the Advanced Configuration area, type valid IP addresses for the Ethernet IP and subnet mask for CP0 and CP1. If the Advanced Configuration area is not visible, click the expand arrows expand the area. on the right, to 5. Click Apply. 6. Click Close to exit, and then restart Web Tools to continue working. Configuring a syslog IP address The syslog IP represents the IP address of the server that is running the syslog process. The syslog daemon reads and forwards system messages to the appropriate log files and/or users, depending on the system configuration. When one or more IP addresses are configured, the switch forwards all error log entries to the syslog on the specified servers. Up to six servers are supported. See Fabric OS Administrator's Guide for more information on configuring the syslog daemon. When you configure a syslog IP address for a Brocade 24000 configured with two logical switches, it is on a logical-switch basis. This means that for each logical switch, you must configure a syslog IP address individually. To configure the syslog IP address 1. Open the Switch Administration window as described on page 31. 2. Click the Network tab (see Figure 16). 3. In the New IP field, enter r an IP address in either IPv4 or IPv6 format, or enter a DNS name. 4. Click Add. The new IP address is displayed in the Syslog IP area. 5. Click Apply. To remove a syslog IP address 1. Open the Switch Administration window as described on page 31. 2. Click the Network tab. 3. Select a syslog IP in the table and click Remove. You can click Clear All to remove all of the syslog IP addresses from the table. 4. Click Apply. Web Tools Administrator's Guide 33 Publication Number: 53-1000435-01
-
 1
1 -
2
-
3
-
4
-
5
-
6
-
7
-
8
-
9
-
10
-
11
-
12
-
13
-
14
-
15
-
16
-
17
-
18
-
19
-
20
-
21
-
22
-
23
-
24
-
25
-
26
-
27
-
28
-
29
-
30
-
31
-
32
-
33
-
34
-
35
-
36
-
37
-
38
-
39
-
40
-
41
-
42
-
43
-
44
-
45
-
46
-
47
-
48
-
49
-
 50
50 -
 51
51 -
 52
52 -
 53
53 -
 54
54 -
 55
55 -
 56
56 -
 57
57 -
 58
58 -
 59
59 -
 60
60 -
61
-
62
-
63
-
64
-
65
-
66
-
67
-
68
-
69
-
70
-
71
-
72
-
73
-
74
-
75
-
76
-
77
-
78
-
79
-
80
-
81
-
82
-
83
-
84
-
85
-
86
-
87
-
88
-
89
-
90
-
91
-
92
-
93
-
94
-
95
-
96
-
97
-
98
-
99
-
100
-
101
-
102
-
103
-
104
-
105
-
106
-
107
-
108
-
109
-
110
-
111
-
112
-
113
-
114
-
115
-
116
-
117
-
118
-
119
-
120
-
121
-
122
-
123
-
124
-
125
-
126
-
127
-
128
-
129
-
130
-
131
-
132
-
133
-
134
-
135
-
136
-
137
-
138
-
139
-
140
-
141
-
142
-
143
-
144
-
145
-
146
-
147
-
148
-
149
-
150
-
151
-
152
-
153
-
154
-
155
-
156
-
157
-
158
-
159
-
160
-
161
-
162
-
163
-
164
-
165
-
166
-
167
-
168
-
169
-
170
-
171
-
172
-
173
-
174
-
175
-
176
-
177
-
178
-
179
-
180
-
181
-
182
-
183
-
184
-
185
-
186
-
187
-
188
-
189
-
190
-
191
-
192
-
193
-
194
-
195
-
196
-
197
-
198
-
199
-
200
-
201
-
202
-
203
-
204
-
205
-
206
-
207
-
208
-
209
-
210
-
211
-
212
-
213
-
214
-
215
-
216
-
217
-
218
-
219
-
220
-
221
-
222
-
223
-
224
-
225
-
226
-
227
-
228
-
229
-
230
-
231
-
232
-
233
-
234
-
235
-
236
-
237
-
238
-
239
-
240
-
241
-
242
-
243
-
244
-
245
-
246
-
247
-
248
-
249
-
250
-
251
-
252
-
253
-
254
-
255
-
256
-
257
-
258
-
259
-
260
-
261
-
262
-
263
-
264
-
265
-
266
 |
 |