HP StorageWorks 2/16V Brocade Web Tools Administrator's Guide - Supporting Fab - Page 226
The Add User Account dialog box opens.
 |
View all HP StorageWorks 2/16V manuals
Add to My Manuals
Save this manual to your list of manuals |
Page 226 highlights
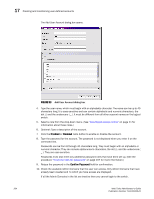
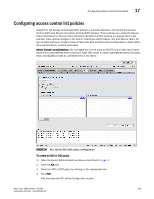
17 Creating and maintaining user-defined accounts The Add User Account dialog box opens. FIGURE 93 Add User Account dialog box 4. Type the user name, which must begin with an alphabetic character. The name can be up to 40 characters long. It is case-sensitive and can contain alphabetic and numeric characters, the dot (.) and the underscore ( _ ). It must be different from all other account names on the logical switch. 5. Select a role from the drop-down menu. (See "Role-Based access control" on page 11 for information about these roles.) 6. Optional: Type a description of the account. 7. Click the Enabled or Disabled radio button to enable or disable the account. 8. Type the password for the account. The password is not displayed when you enter it on the command line. Passwords can be from 8 through 40 characters long. They must begin with an alphabetic or numeric character. They can include alphanumeric characters, the dot (.), and the underscore ( _ ). They are case-sensitive. Passwords must also meet any additional password rules that have been set up. (See the procedure "To set the rules for passwords" on page 207 for more information.) 9. Retype the password in the Confirm Password field for confirmation. 10. Check the available Admin Domains that the user can access. Only Admin Domains that have already been created and to which you have access are displayed. If all the Admin Domains in the list are inactive then you cannot login to the switch. 204 Web Tools Administrator's Guide Publication Number: 53-1000435-01
-
 1
1 -
2
-
3
-
4
-
5
-
6
-
7
-
8
-
9
-
10
-
11
-
12
-
13
-
14
-
15
-
16
-
17
-
18
-
19
-
20
-
21
-
22
-
23
-
24
-
25
-
26
-
27
-
28
-
29
-
30
-
31
-
32
-
33
-
34
-
35
-
36
-
37
-
38
-
39
-
40
-
41
-
42
-
43
-
44
-
45
-
46
-
47
-
48
-
49
-
50
-
51
-
52
-
53
-
54
-
55
-
56
-
57
-
58
-
59
-
60
-
61
-
62
-
63
-
64
-
65
-
66
-
67
-
68
-
69
-
70
-
71
-
72
-
73
-
74
-
75
-
76
-
77
-
78
-
79
-
80
-
81
-
82
-
83
-
84
-
85
-
86
-
87
-
88
-
89
-
90
-
91
-
92
-
93
-
94
-
95
-
96
-
97
-
98
-
99
-
100
-
101
-
102
-
103
-
104
-
105
-
106
-
107
-
108
-
109
-
110
-
111
-
112
-
113
-
114
-
115
-
116
-
117
-
118
-
119
-
120
-
121
-
122
-
123
-
124
-
125
-
126
-
127
-
128
-
129
-
130
-
131
-
132
-
133
-
134
-
135
-
136
-
137
-
138
-
139
-
140
-
141
-
142
-
143
-
144
-
145
-
146
-
147
-
148
-
149
-
150
-
151
-
152
-
153
-
154
-
155
-
156
-
157
-
158
-
159
-
160
-
161
-
162
-
163
-
164
-
165
-
166
-
167
-
168
-
169
-
170
-
171
-
172
-
173
-
174
-
175
-
176
-
177
-
178
-
179
-
180
-
181
-
182
-
183
-
184
-
185
-
186
-
187
-
188
-
189
-
190
-
191
-
192
-
193
-
194
-
195
-
196
-
197
-
198
-
199
-
200
-
201
-
202
-
203
-
204
-
205
-
206
-
207
-
208
-
209
-
210
-
211
-
212
-
213
-
214
-
215
-
216
-
217
-
218
-
219
-
220
-
 221
221 -
 222
222 -
 223
223 -
 224
224 -
 225
225 -
 226
226 -
 227
227 -
 228
228 -
 229
229 -
 230
230 -
 231
231 -
232
-
233
-
234
-
235
-
236
-
237
-
238
-
239
-
240
-
241
-
242
-
243
-
244
-
245
-
246
-
247
-
248
-
249
-
250
-
251
-
252
-
253
-
254
-
255
-
256
-
257
-
258
-
259
-
260
-
261
-
262
-
263
-
264
-
265
-
266
 |
 |
