VMware VLM3-ENG-CP User Guide - Page 84
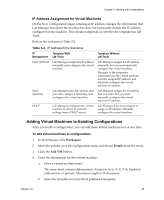
To add virtual machines to a new configuration, IP Address Assignment for Virtual Machines
 |
View all VMware VLM3-ENG-CP manuals
Add to My Manuals
Save this manual to your list of manuals |
Page 84 highlights
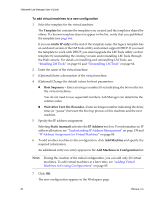
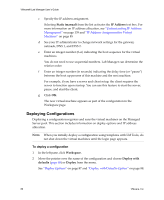
VMware® Lab Manager User's Guide To add virtual machines to a new configuration 1 Select the template for the virtual machine. The Template list contains the templates you created and the templates shared by others. If a known template does not appear in the list, verify that you published the template (see page 66). If you see (static IP only) at the end of the template name, the legacy template has an outdated version of the LM Tools utility and cannot support DHCP. If you need the template to work with DHCP, you must upgrade the LM Tools utility on that template by uninstalling the existing version and reinstalling LM Tools through the Web console. For details on installing and uninstalling LM Tools, see "Installing LM Tools" on page 61 and "Uninstalling LM Tools" on page 64. 2 Enter the name of the virtual machine. 3 (Optional) Enter a description of the virtual machine. 4 (Optional) Change the default values for boot parameters: „ Boot Sequence - Enter an integer number (0‐n) indicating the boot order for the virtual machines. You do not need to use sequential numbers. Lab Manager can determine the relative order. „ Wait After Turn On (Seconds) - Enter an integer number indicating the delay time (or "pause") between the boot up process of this machine and the next machine. 5 Specify the IP address assignment. Selecting Static (manual) activates the IP Address text box. For information on IP address allocation, see "Understanding IP Address Management" on page 139 and "IP Address Assignment for Virtual Machines" on page 85. 6 To add another machine to this configuration, click Add Machine and specify the required information. An additional entry row entry appears in the Add Machines to Configuration list. NOTE During the creation of the initial configuration, you can add only 20 virtual machines. To add virtual machines at a later time, see "Adding Virtual Machines to Existing Configurations" on page 85. 7 Click OK. The new configuration appears in the Workspace page. 84 VMware, Inc.
-
 1
1 -
2
-
3
-
4
-
5
-
6
-
7
-
8
-
9
-
10
-
11
-
12
-
13
-
14
-
15
-
16
-
17
-
18
-
19
-
20
-
21
-
22
-
23
-
24
-
25
-
26
-
27
-
28
-
29
-
30
-
31
-
32
-
33
-
34
-
35
-
36
-
37
-
38
-
39
-
40
-
41
-
42
-
43
-
44
-
45
-
46
-
47
-
48
-
49
-
50
-
51
-
52
-
53
-
54
-
55
-
56
-
57
-
58
-
59
-
60
-
61
-
62
-
63
-
64
-
65
-
66
-
67
-
68
-
69
-
70
-
71
-
72
-
73
-
74
-
75
-
76
-
77
-
78
-
 79
79 -
 80
80 -
 81
81 -
 82
82 -
 83
83 -
 84
84 -
 85
85 -
 86
86 -
 87
87 -
 88
88 -
 89
89 -
90
-
91
-
92
-
93
-
94
-
95
-
96
-
97
-
98
-
99
-
100
-
101
-
102
-
103
-
104
-
105
-
106
-
107
-
108
-
109
-
110
-
111
-
112
-
113
-
114
-
115
-
116
-
117
-
118
-
119
-
120
-
121
-
122
-
123
-
124
-
125
-
126
-
127
-
128
-
129
-
130
-
131
-
132
-
133
-
134
-
135
-
136
-
137
-
138
-
139
-
140
-
141
-
142
-
143
-
144
-
145
-
146
-
147
-
148
-
149
-
150
-
151
-
152
-
153
-
154
-
155
-
156
-
157
-
158
-
159
-
160
-
161
-
162
-
163
-
164
-
165
-
166
-
167
-
168
-
169
-
170
-
171
-
172
-
173
-
174
-
175
-
176
-
177
-
178
-
179
-
180
-
181
-
182
-
183
-
184
-
185
-
186
-
187
-
188
-
189
-
190
 |
 |