VMware VLM3-ENG-CP User Guide - Page 90
Checking Out Configurations from the Library, Capture, Status, Capturing, Deployed, Library, Checkout
 |
View all VMware VLM3-ENG-CP manuals
Add to My Manuals
Save this manual to your list of manuals |
Page 90 highlights
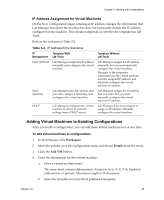
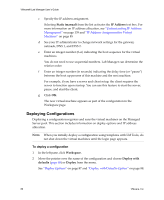
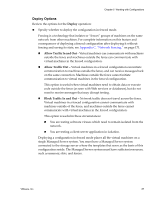
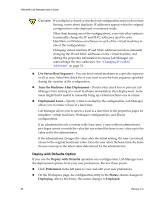
VMware® Lab Manager User's Guide 3 Complete the capture process: a Enter a name for the captured configuration. b (Optional) Enter a description. c Specify a time to delete the configuration or mark the configuration for deletion. This option for marking or permanent deletion is preset by an administrator. d Click Capture. On the Workspace page, the entry in the Status column briefly changes to Capturing. The entry changes back to Deployed or Undeployed depending on the original state of the captured configuration. 4 In the left pane, click Library to see the captured configuration. Checking Out Configurations from the Library Configurations stored in the library are read‐only. When you check out a configuration, Lab Manager creates a copy that requires a different name. To check out and copy a configuration 1 In the left pane, click Library. The Library page shows all your captured configurations and captured configurations shared by other users. 2 Move the pointer over the configuration name and choose Checkout from the menu. 3 Complete the checkout process: a Enter a unique name for the checked‐out configuration. b Specify a time to delete the configuration or mark the configuration for deletion. The default option for marking or permanent deletion is preset by an administrator. Most operations renew the storage lease because Lab Manager identifies the template as in use. See "Reviewing the Resource Cleanup Tab" on page 149. If an administrator sets a system‐wide lease time, a user without administrator privileges cannot override the value but does have the option to extend the lease to any value up to the value set by the administrator. If the administrator changes the value after the initial setting, the user can extend a lease to the original maximum value. Once the user alters the lease 90 VMware, Inc.
-
 1
1 -
2
-
3
-
4
-
5
-
6
-
7
-
8
-
9
-
10
-
11
-
12
-
13
-
14
-
15
-
16
-
17
-
18
-
19
-
20
-
21
-
22
-
23
-
24
-
25
-
26
-
27
-
28
-
29
-
30
-
31
-
32
-
33
-
34
-
35
-
36
-
37
-
38
-
39
-
40
-
41
-
42
-
43
-
44
-
45
-
46
-
47
-
48
-
49
-
50
-
51
-
52
-
53
-
54
-
55
-
56
-
57
-
58
-
59
-
60
-
61
-
62
-
63
-
64
-
65
-
66
-
67
-
68
-
69
-
70
-
71
-
72
-
73
-
74
-
75
-
76
-
77
-
78
-
79
-
80
-
81
-
82
-
83
-
84
-
 85
85 -
 86
86 -
 87
87 -
 88
88 -
 89
89 -
 90
90 -
 91
91 -
 92
92 -
 93
93 -
 94
94 -
 95
95 -
96
-
97
-
98
-
99
-
100
-
101
-
102
-
103
-
104
-
105
-
106
-
107
-
108
-
109
-
110
-
111
-
112
-
113
-
114
-
115
-
116
-
117
-
118
-
119
-
120
-
121
-
122
-
123
-
124
-
125
-
126
-
127
-
128
-
129
-
130
-
131
-
132
-
133
-
134
-
135
-
136
-
137
-
138
-
139
-
140
-
141
-
142
-
143
-
144
-
145
-
146
-
147
-
148
-
149
-
150
-
151
-
152
-
153
-
154
-
155
-
156
-
157
-
158
-
159
-
160
-
161
-
162
-
163
-
164
-
165
-
166
-
167
-
168
-
169
-
170
-
171
-
172
-
173
-
174
-
175
-
176
-
177
-
178
-
179
-
180
-
181
-
182
-
183
-
184
-
185
-
186
-
187
-
188
-
189
-
190
 |
 |