Brother International PE-DESIGN 10 Instruction Manual - Page 109
Font Filter, Creating Embroidery Patterns Containing Text
 |
View all Brother International PE-DESIGN 10 manuals
Add to My Manuals
Save this manual to your list of manuals |
Page 109 highlights
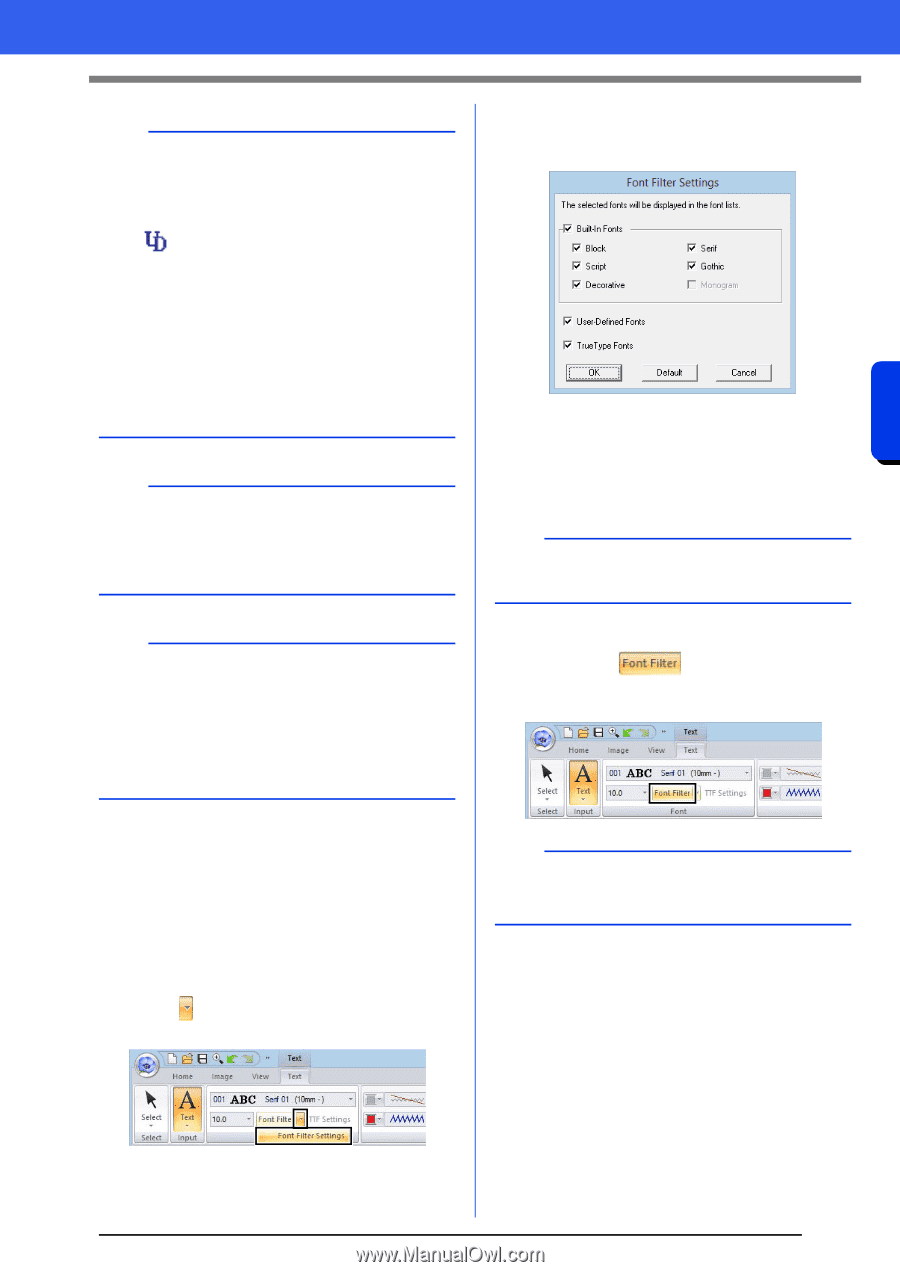
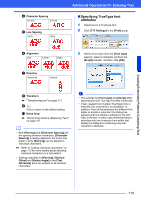
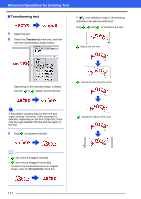
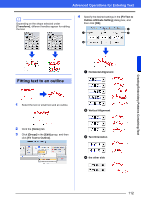
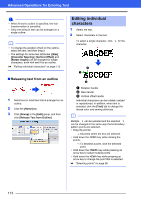
Creating Embroidery Patterns Containing Text Advanced Operations for Entering Text b • User-defined fonts PEF files created with Font Creator and saved in the [MyFont] folder where PE-DESIGN was installed appear as userdefined fonts after the fonts listed in the table above. The UD icon appears on userdefined fonts. cc "Font Creator" on page 274 • TrueType fonts The installed TrueType fonts appear after the user-defined fonts. b TrueType font settings can be changed in the [TrueType Font Attribute Setting] dialog box. cc "Specifying TrueType font attributes" on page 110 a • Text created using certain TrueType fonts may not be converted correctly into an embroidery pattern due to the shape of the character. These characters cannot be embroidered correctly. Test sew before embroidering on your project. • In addition, text created using some TrueType fonts cannot be converted at all. 4 Select the check boxes for the fonts to be displayed, and clear the check boxes for the fonts to be hidden. The [Monogram] check box is available when a pattern with a monogram font or the [Monogram] tool is selected. 5 Click [OK] to apply the filter settings. b To return the fonts to the default (all fonts displayed), click [Default]. 6 To filter the fonts, click [Font Filter] so that it appears as . Clicking the button switches between filtering and unfiltering the fonts. ■ Font Filter A font listed in the [Font] selector can be selected. 1 Click text or a monogram, or select the [Text] tool or [Monogram] tool. 2 Click the [Text] tab. 3 Click beside [Font Filter] in the [Font] group, and then click [Font Filter Settings]. b The font filter cannot be applied to small text fonts. cc "Small Text" on page 118 108
-
 1
1 -
2
-
3
-
4
-
5
-
6
-
7
-
8
-
9
-
10
-
11
-
12
-
13
-
14
-
15
-
16
-
17
-
18
-
19
-
20
-
21
-
22
-
23
-
24
-
25
-
26
-
27
-
28
-
29
-
30
-
31
-
32
-
33
-
34
-
35
-
36
-
37
-
38
-
39
-
40
-
41
-
42
-
43
-
44
-
45
-
46
-
47
-
48
-
49
-
50
-
51
-
52
-
53
-
54
-
55
-
56
-
57
-
58
-
59
-
60
-
61
-
62
-
63
-
64
-
65
-
66
-
67
-
68
-
69
-
70
-
71
-
72
-
73
-
74
-
75
-
76
-
77
-
78
-
79
-
80
-
81
-
82
-
83
-
84
-
85
-
86
-
87
-
88
-
89
-
90
-
91
-
92
-
93
-
94
-
95
-
96
-
97
-
98
-
99
-
100
-
101
-
102
-
103
-
 104
104 -
 105
105 -
 106
106 -
 107
107 -
 108
108 -
 109
109 -
 110
110 -
 111
111 -
 112
112 -
 113
113 -
 114
114 -
115
-
116
-
117
-
118
-
119
-
120
-
121
-
122
-
123
-
124
-
125
-
126
-
127
-
128
-
129
-
130
-
131
-
132
-
133
-
134
-
135
-
136
-
137
-
138
-
139
-
140
-
141
-
142
-
143
-
144
-
145
-
146
-
147
-
148
-
149
-
150
-
151
-
152
-
153
-
154
-
155
-
156
-
157
-
158
-
159
-
160
-
161
-
162
-
163
-
164
-
165
-
166
-
167
-
168
-
169
-
170
-
171
-
172
-
173
-
174
-
175
-
176
-
177
-
178
-
179
-
180
-
181
-
182
-
183
-
184
-
185
-
186
-
187
-
188
-
189
-
190
-
191
-
192
-
193
-
194
-
195
-
196
-
197
-
198
-
199
-
200
-
201
-
202
-
203
-
204
-
205
-
206
-
207
-
208
-
209
-
210
-
211
-
212
-
213
-
214
-
215
-
216
-
217
-
218
-
219
-
220
-
221
-
222
-
223
-
224
-
225
-
226
-
227
-
228
-
229
-
230
-
231
-
232
-
233
-
234
-
235
-
236
-
237
-
238
-
239
-
240
-
241
-
242
-
243
-
244
-
245
-
246
-
247
-
248
-
249
-
250
-
251
-
252
-
253
-
254
-
255
-
256
-
257
-
258
-
259
-
260
-
261
-
262
-
263
-
264
-
265
-
266
-
267
-
268
-
269
-
270
-
271
-
272
-
273
-
274
-
275
-
276
-
277
-
278
-
279
-
280
-
281
-
282
-
283
-
284
-
285
-
286
-
287
-
288
-
289
-
290
-
291
-
292
-
293
-
294
-
295
-
296
-
297
-
298
-
299
-
300
-
301
-
302
-
303
-
304
-
305
-
306
-
307
-
308
-
309
-
310
-
311
-
312
-
313
-
314
-
315
-
316
-
317
-
318
-
319
-
320
-
321
-
322
-
323
-
324
-
325
-
326
-
327
-
328
-
329
-
330
-
331
-
332
-
333
-
334
-
335
-
336
-
337
-
338
-
339
-
340
-
341
-
342
-
343
-
344
-
345
-
346
-
347
-
348
-
349
-
350
-
351
-
352
-
353
 |
 |