Brother International PE-DESIGN 10 Instruction Manual - Page 205
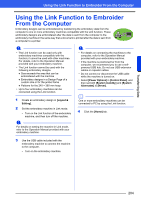
Using the Link Function to Embroider From the Computer
 |
View all Brother International PE-DESIGN 10 manuals
Add to My Manuals
Save this manual to your list of manuals |
Page 205 highlights
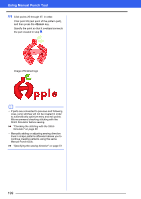
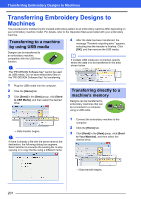
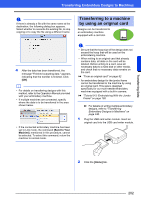
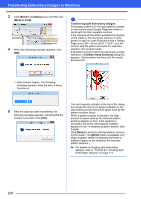
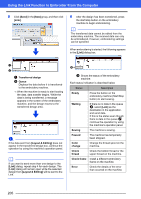
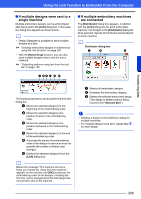
Transferring Data Using the Link Function to Embroider From the Computer Using the Link Function to Embroider From the Computer Embroidery designs can be embroidered by transferring the embroidery data from the computer to one or more embroidery machines compatible with the Link function. These embroidery designs are embroidered after the data is sent from the computer to the embroidery machine in the same way that a document is printed after the data is sent from a computer to a printer. a • The Link function can be used only with embroidery machines compatible with the function; it cannot be used with other machines. For details, refer to the Operation Manual provided with your embroidery machine. • The Link function cannot be used with the following embroidery designs. Size exceeds the area that can be embroidered with the machine Embroidery designs in a Design Page of a custom size or for the jumbo frame Patterns for the 240 × 360 mm hoop • Up to four embroidery machines can be connected using the Link function. 1 Create an embroidery design in [Layout & Editing]. 2 Set the embroidery machine in Link mode. • Turn on the Link function of the embroidery machine, and then turn off the machine. a For details on setting the machine in Link mode, refer to the Operation Manual provided with your embroidery machine. a • For details on connecting the machines to the computer, refer to the Operation Manual provided with your embroidery machine. • If the machine is positioned far from the computer, we recommend you to use a selfpowered USB hub. Do not use USB extension cables or repeater cables. • Do not connect or disconnect the USB cable while the machine is turned on. • Select [Power Options] in [Control Panel], and then set both [System standby] and [System hibernates] to [Never]. b One or more embroidery machines can be connected to PC by using the Link function. 4 Click the [Home] tab. 3 Use the USB cable included with the embroidery machine to connect the machine to the computer. • Turn on the embroidery machine. 204
-
 1
1 -
2
-
3
-
4
-
5
-
6
-
7
-
8
-
9
-
10
-
11
-
12
-
13
-
14
-
15
-
16
-
17
-
18
-
19
-
20
-
21
-
22
-
23
-
24
-
25
-
26
-
27
-
28
-
29
-
30
-
31
-
32
-
33
-
34
-
35
-
36
-
37
-
38
-
39
-
40
-
41
-
42
-
43
-
44
-
45
-
46
-
47
-
48
-
49
-
50
-
51
-
52
-
53
-
54
-
55
-
56
-
57
-
58
-
59
-
60
-
61
-
62
-
63
-
64
-
65
-
66
-
67
-
68
-
69
-
70
-
71
-
72
-
73
-
74
-
75
-
76
-
77
-
78
-
79
-
80
-
81
-
82
-
83
-
84
-
85
-
86
-
87
-
88
-
89
-
90
-
91
-
92
-
93
-
94
-
95
-
96
-
97
-
98
-
99
-
100
-
101
-
102
-
103
-
104
-
105
-
106
-
107
-
108
-
109
-
110
-
111
-
112
-
113
-
114
-
115
-
116
-
117
-
118
-
119
-
120
-
121
-
122
-
123
-
124
-
125
-
126
-
127
-
128
-
129
-
130
-
131
-
132
-
133
-
134
-
135
-
136
-
137
-
138
-
139
-
140
-
141
-
142
-
143
-
144
-
145
-
146
-
147
-
148
-
149
-
150
-
151
-
152
-
153
-
154
-
155
-
156
-
157
-
158
-
159
-
160
-
161
-
162
-
163
-
164
-
165
-
166
-
167
-
168
-
169
-
170
-
171
-
172
-
173
-
174
-
175
-
176
-
177
-
178
-
179
-
180
-
181
-
182
-
183
-
184
-
185
-
186
-
187
-
188
-
189
-
190
-
191
-
192
-
193
-
194
-
195
-
196
-
197
-
198
-
199
-
 200
200 -
 201
201 -
 202
202 -
 203
203 -
 204
204 -
 205
205 -
 206
206 -
 207
207 -
 208
208 -
 209
209 -
 210
210 -
211
-
212
-
213
-
214
-
215
-
216
-
217
-
218
-
219
-
220
-
221
-
222
-
223
-
224
-
225
-
226
-
227
-
228
-
229
-
230
-
231
-
232
-
233
-
234
-
235
-
236
-
237
-
238
-
239
-
240
-
241
-
242
-
243
-
244
-
245
-
246
-
247
-
248
-
249
-
250
-
251
-
252
-
253
-
254
-
255
-
256
-
257
-
258
-
259
-
260
-
261
-
262
-
263
-
264
-
265
-
266
-
267
-
268
-
269
-
270
-
271
-
272
-
273
-
274
-
275
-
276
-
277
-
278
-
279
-
280
-
281
-
282
-
283
-
284
-
285
-
286
-
287
-
288
-
289
-
290
-
291
-
292
-
293
-
294
-
295
-
296
-
297
-
298
-
299
-
300
-
301
-
302
-
303
-
304
-
305
-
306
-
307
-
308
-
309
-
310
-
311
-
312
-
313
-
314
-
315
-
316
-
317
-
318
-
319
-
320
-
321
-
322
-
323
-
324
-
325
-
326
-
327
-
328
-
329
-
330
-
331
-
332
-
333
-
334
-
335
-
336
-
337
-
338
-
339
-
340
-
341
-
342
-
343
-
344
-
345
-
346
-
347
-
348
-
349
-
350
-
351
-
352
-
353
 |
 |