Brother International PE-DESIGN 10 Instruction Manual - Page 97
Printing, Specifying print settings
 |
View all Brother International PE-DESIGN 10 manuals
Add to My Manuals
Save this manual to your list of manuals |
Page 97 highlights
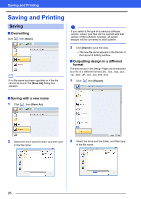
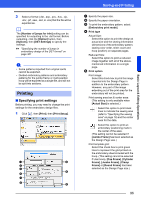
3 Select a format (.dst, .exp, .pcs, .hus, .vip, .shv, .jef, .sew, .csd, or .xxx) that the file will be exported as. b The [Number of jumps for trim] setting can be specified for outputting to the .dst format. Before outputting, click the [Option] button, then [Options], then [DST Settings] to specify the settings. cc "Specifying the number of jumps in embroidery design of the DST format" on page 301 a • Some patterns imported from original cards cannot be exported. • Divided embroidery patterns and embroidery patterns for the jumbo frame or multi-position hoop will be exported as a single file, and will not be split into sections. Printing ■ Specifying print settings Before printing, you may need to change the print settings for the embroidery design files. 1 Click , then [Print], then [Print Setup]. a c d f g h b e i Saving and Printing a Specify the paper size. b Specify the paper orientation. c To print the embroidery pattern, select [Embroidery print mode]. d Print type Actual Size: Select this option to print the design at actual size and the sewing information (dimensions of the embroidery pattern, sewing color order, stitch count and hoop position) on separate pages. Reduced Size: Select this option to print a reduced image together with all of the abovementioned information on a single page. e Print option Print image: Select this check box to print the image imported into the Design Page in addition to the embroidery pattern. However, any part of the image extending out of the print area for the embroidery will not be printed. Print sewing area box & center axes: (This setting is only available when [Actual Size] is selected.) : Select this option to print black lines to indicate the sewing area (refer to "Specifying the sewing area" on page 16) and the center axes for the data. : Select this option to print an embroidery positioning mark in the center of the axes. (This setting cannot be selected if [Jumbo Frame] has been selected as the Design Page size.) Print template grid: Select this check box to print green lines to represent the grid printed on the embroidery sheet included with the hoop. (This setting cannot be selected if User Hoop, [Cap Frame], [Cylinder Frame], [Jumbo Frame], [Clamp Frame] or [Round Frame] has been selected as the Design Page size.) 96 Basic Layout & Editing Operations
-
 1
1 -
2
-
3
-
4
-
5
-
6
-
7
-
8
-
9
-
10
-
11
-
12
-
13
-
14
-
15
-
16
-
17
-
18
-
19
-
20
-
21
-
22
-
23
-
24
-
25
-
26
-
27
-
28
-
29
-
30
-
31
-
32
-
33
-
34
-
35
-
36
-
37
-
38
-
39
-
40
-
41
-
42
-
43
-
44
-
45
-
46
-
47
-
48
-
49
-
50
-
51
-
52
-
53
-
54
-
55
-
56
-
57
-
58
-
59
-
60
-
61
-
62
-
63
-
64
-
65
-
66
-
67
-
68
-
69
-
70
-
71
-
72
-
73
-
74
-
75
-
76
-
77
-
78
-
79
-
80
-
81
-
82
-
83
-
84
-
85
-
86
-
87
-
88
-
89
-
90
-
91
-
 92
92 -
 93
93 -
 94
94 -
 95
95 -
 96
96 -
 97
97 -
 98
98 -
 99
99 -
 100
100 -
 101
101 -
 102
102 -
103
-
104
-
105
-
106
-
107
-
108
-
109
-
110
-
111
-
112
-
113
-
114
-
115
-
116
-
117
-
118
-
119
-
120
-
121
-
122
-
123
-
124
-
125
-
126
-
127
-
128
-
129
-
130
-
131
-
132
-
133
-
134
-
135
-
136
-
137
-
138
-
139
-
140
-
141
-
142
-
143
-
144
-
145
-
146
-
147
-
148
-
149
-
150
-
151
-
152
-
153
-
154
-
155
-
156
-
157
-
158
-
159
-
160
-
161
-
162
-
163
-
164
-
165
-
166
-
167
-
168
-
169
-
170
-
171
-
172
-
173
-
174
-
175
-
176
-
177
-
178
-
179
-
180
-
181
-
182
-
183
-
184
-
185
-
186
-
187
-
188
-
189
-
190
-
191
-
192
-
193
-
194
-
195
-
196
-
197
-
198
-
199
-
200
-
201
-
202
-
203
-
204
-
205
-
206
-
207
-
208
-
209
-
210
-
211
-
212
-
213
-
214
-
215
-
216
-
217
-
218
-
219
-
220
-
221
-
222
-
223
-
224
-
225
-
226
-
227
-
228
-
229
-
230
-
231
-
232
-
233
-
234
-
235
-
236
-
237
-
238
-
239
-
240
-
241
-
242
-
243
-
244
-
245
-
246
-
247
-
248
-
249
-
250
-
251
-
252
-
253
-
254
-
255
-
256
-
257
-
258
-
259
-
260
-
261
-
262
-
263
-
264
-
265
-
266
-
267
-
268
-
269
-
270
-
271
-
272
-
273
-
274
-
275
-
276
-
277
-
278
-
279
-
280
-
281
-
282
-
283
-
284
-
285
-
286
-
287
-
288
-
289
-
290
-
291
-
292
-
293
-
294
-
295
-
296
-
297
-
298
-
299
-
300
-
301
-
302
-
303
-
304
-
305
-
306
-
307
-
308
-
309
-
310
-
311
-
312
-
313
-
314
-
315
-
316
-
317
-
318
-
319
-
320
-
321
-
322
-
323
-
324
-
325
-
326
-
327
-
328
-
329
-
330
-
331
-
332
-
333
-
334
-
335
-
336
-
337
-
338
-
339
-
340
-
341
-
342
-
343
-
344
-
345
-
346
-
347
-
348
-
349
-
350
-
351
-
352
-
353
 |
 |