Brother International PE-DESIGN 10 Instruction Manual - Page 250
Using an original, Send To], Machine Type], Single-needle machine, Hoop Size], Add to, Writing List]
 |
View all Brother International PE-DESIGN 10 manuals
Add to My Manuals
Save this manual to your list of manuals |
Page 250 highlights
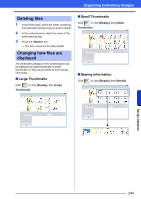
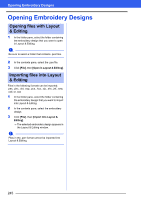
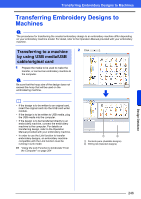
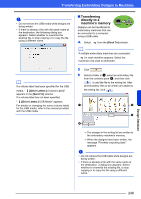
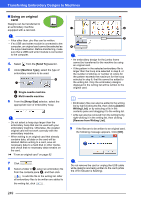
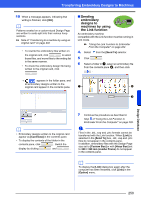
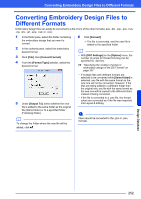
Transferring Embroidery Designs to Machines ■ Using an original card Designs can be transferred to an embroidery machine equipped with a card slot. a • Files other than .phc files can be written. • If no USB card writer module is connected to the computer, an original card cannot be selected as the output destination. Before transferring, make sure that a USB card writer module is connected to the computer. 4. Select from the [Send To] selector. 5 Under [Machine Type], select the type of embroidery machine to be used. a b a Single-needle machine b Multi-needle machine 6 From the [Hoop Size] selector, select the appropriate size of embroidery hoop. a • Do not select a hoop size larger than the embroidery hoop that can be used with your embroidery machine. Otherwise, the created original card will not work correctly with the embroidery machine. • When writing to an original card that already contains data, all data on the card will be deleted. Before writing to a card, save all necessary data to a hard disk or other media, and check that no necessary data remains on the card. cc "From an original card" on page 92 7 Click . 8 Select a folder in a, select an embroidery file from the contents pane b, and then click to add the file to the writing list. After all embroidery files to be written are added to the writing list, click . a b c d a • An embroidery design for the jumbo frame cannot be transferred to the machine by using an original card. • If the pattern in the selected embroidery file is larger than the hoop size selected in step 6, or the number of stitches or number of colors for the pattern exceeds the maximum for the hoop selected in step 6, that file cannot be added to the writing list. Only the embroidery designs displayed in the writing list will be written to the original card. b • Embroidery files can also be added to the writing list by right-clicking the file, then clicking [Add to Writing List], or by selecting a file in the contents pane and dragging it to the writing list. • A file can also be removed from the writing list by right-clicking it in the writing list, then clicking [Remove from Writing List]. 9 If the files are to be written to an original card, the following message appears. Click [OK]. a Do not remove the card or unplug the USB cable while designs are being written to the card (while the LED indicator is flashing). 249
-
 1
1 -
2
-
3
-
4
-
5
-
6
-
7
-
8
-
9
-
10
-
11
-
12
-
13
-
14
-
15
-
16
-
17
-
18
-
19
-
20
-
21
-
22
-
23
-
24
-
25
-
26
-
27
-
28
-
29
-
30
-
31
-
32
-
33
-
34
-
35
-
36
-
37
-
38
-
39
-
40
-
41
-
42
-
43
-
44
-
45
-
46
-
47
-
48
-
49
-
50
-
51
-
52
-
53
-
54
-
55
-
56
-
57
-
58
-
59
-
60
-
61
-
62
-
63
-
64
-
65
-
66
-
67
-
68
-
69
-
70
-
71
-
72
-
73
-
74
-
75
-
76
-
77
-
78
-
79
-
80
-
81
-
82
-
83
-
84
-
85
-
86
-
87
-
88
-
89
-
90
-
91
-
92
-
93
-
94
-
95
-
96
-
97
-
98
-
99
-
100
-
101
-
102
-
103
-
104
-
105
-
106
-
107
-
108
-
109
-
110
-
111
-
112
-
113
-
114
-
115
-
116
-
117
-
118
-
119
-
120
-
121
-
122
-
123
-
124
-
125
-
126
-
127
-
128
-
129
-
130
-
131
-
132
-
133
-
134
-
135
-
136
-
137
-
138
-
139
-
140
-
141
-
142
-
143
-
144
-
145
-
146
-
147
-
148
-
149
-
150
-
151
-
152
-
153
-
154
-
155
-
156
-
157
-
158
-
159
-
160
-
161
-
162
-
163
-
164
-
165
-
166
-
167
-
168
-
169
-
170
-
171
-
172
-
173
-
174
-
175
-
176
-
177
-
178
-
179
-
180
-
181
-
182
-
183
-
184
-
185
-
186
-
187
-
188
-
189
-
190
-
191
-
192
-
193
-
194
-
195
-
196
-
197
-
198
-
199
-
200
-
201
-
202
-
203
-
204
-
205
-
206
-
207
-
208
-
209
-
210
-
211
-
212
-
213
-
214
-
215
-
216
-
217
-
218
-
219
-
220
-
221
-
222
-
223
-
224
-
225
-
226
-
227
-
228
-
229
-
230
-
231
-
232
-
233
-
234
-
235
-
236
-
237
-
238
-
239
-
240
-
241
-
242
-
243
-
244
-
 245
245 -
 246
246 -
 247
247 -
 248
248 -
 249
249 -
 250
250 -
 251
251 -
 252
252 -
 253
253 -
 254
254 -
 255
255 -
256
-
257
-
258
-
259
-
260
-
261
-
262
-
263
-
264
-
265
-
266
-
267
-
268
-
269
-
270
-
271
-
272
-
273
-
274
-
275
-
276
-
277
-
278
-
279
-
280
-
281
-
282
-
283
-
284
-
285
-
286
-
287
-
288
-
289
-
290
-
291
-
292
-
293
-
294
-
295
-
296
-
297
-
298
-
299
-
300
-
301
-
302
-
303
-
304
-
305
-
306
-
307
-
308
-
309
-
310
-
311
-
312
-
313
-
314
-
315
-
316
-
317
-
318
-
319
-
320
-
321
-
322
-
323
-
324
-
325
-
326
-
327
-
328
-
329
-
330
-
331
-
332
-
333
-
334
-
335
-
336
-
337
-
338
-
339
-
340
-
341
-
342
-
343
-
344
-
345
-
346
-
347
-
348
-
349
-
350
-
351
-
352
-
353
 |
 |