Brother International PE-DESIGN 10 Instruction Manual - Page 17
Specifying the sewing area, Optimize hoop change, Jump Stitch Trimming, Output], Design, area]
 |
View all Brother International PE-DESIGN 10 manuals
Add to My Manuals
Save this manual to your list of manuals |
Page 17 highlights
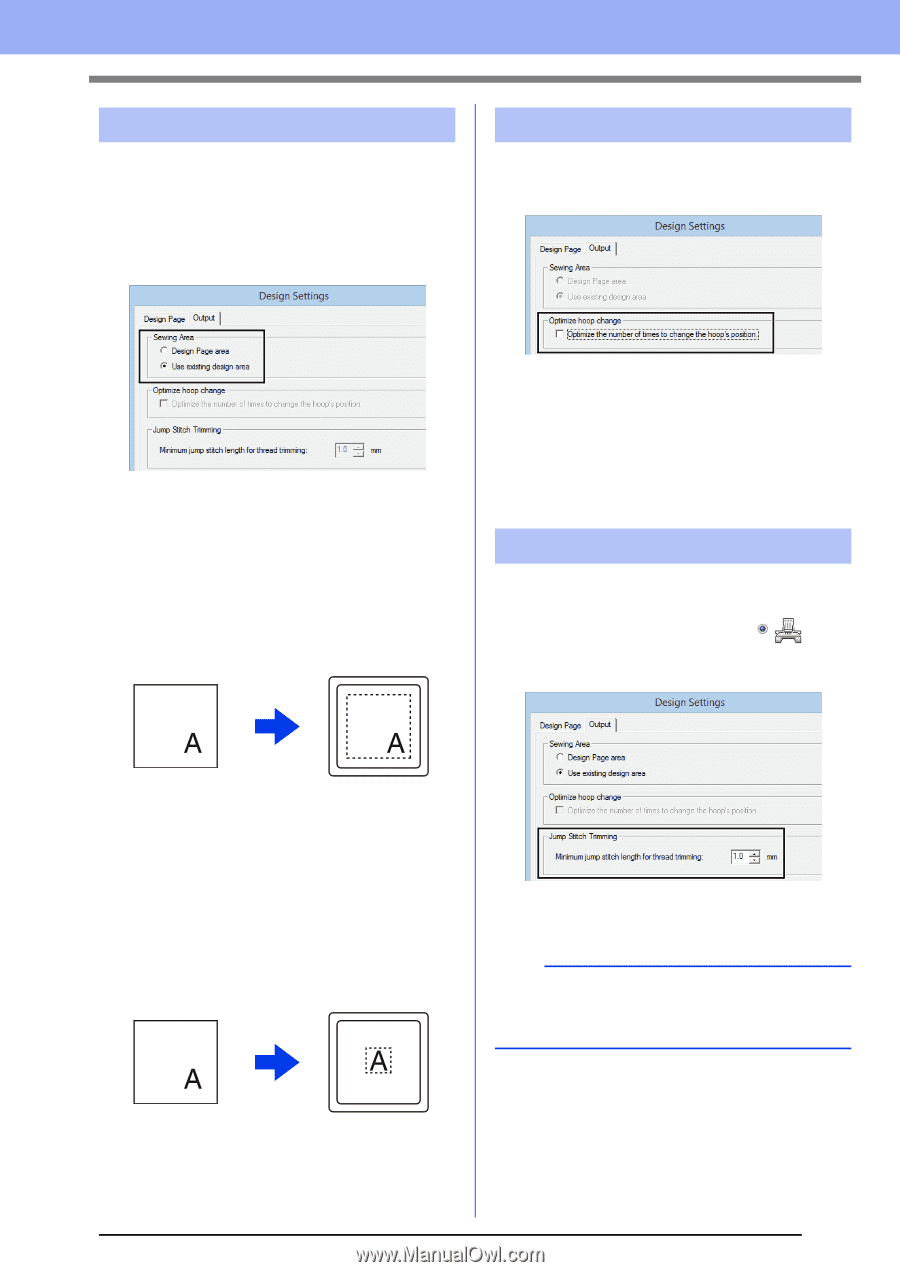
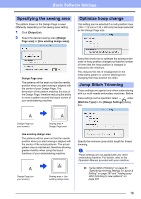
Basic Software Settings Specifying the sewing area The pattern drawn in the Design Page is sewn differently depending on the sewing area setting. 1 Click [Output] tab. 2 Select the desired sewing area ([Design Page area] or [Use existing design area]). Optimize hoop change This setting can be selected if a multi-position hoop (100 × 172 mm or 130 × 300 mm) has been selected as the Design Page size. Design Page area The patterns will be sewn so that the needle position when you start sewing is aligned with the center of your Design Page. The dimension of the pattern matches the size of the Design Page, therefore reducing the ability to move a pattern around the layout screen of your embroidering machine. Select the check box to optimize the sewing order/ order of hoop position changes so that the number of times that the hoop position is changed is reduced to the minimum. This reduces the risk of misalignment in the embroidery pattern or uneven stitching from changing the hoop position too often. Jump Stitch Trimming These settings are applied only when embroidering with our multi-needle embroidery machines. Before these settings can be specified, select under [Machine Type] in the [Design Settings] dialog box. Design Page (on your screen) Sewing area = Design Page area Use existing design area The patterns will be sewn so that the needle position when you start sewing is aligned with the center of the actual patterns. The actual pattern size is maintained, therefore allowing greater mobility when using the layout functions of your embroidering machine. Design Page (on your screen) Sewing area = Use existing design area Specify the minimum jump stitch length for thread trimming. a These settings are not applied with any other embroidery machine. For details, refer to the Operation Manual provided with your machine. cc "Jump Stitch Trimming" on page 87, "Specifying trimming settings in Layout & Editing" on page 297 and "Adding jump stitch trimming to new patterns" on page 302 16
-
 1
1 -
2
-
3
-
4
-
5
-
6
-
7
-
8
-
9
-
10
-
11
-
 12
12 -
 13
13 -
 14
14 -
 15
15 -
 16
16 -
 17
17 -
 18
18 -
 19
19 -
 20
20 -
 21
21 -
 22
22 -
23
-
24
-
25
-
26
-
27
-
28
-
29
-
30
-
31
-
32
-
33
-
34
-
35
-
36
-
37
-
38
-
39
-
40
-
41
-
42
-
43
-
44
-
45
-
46
-
47
-
48
-
49
-
50
-
51
-
52
-
53
-
54
-
55
-
56
-
57
-
58
-
59
-
60
-
61
-
62
-
63
-
64
-
65
-
66
-
67
-
68
-
69
-
70
-
71
-
72
-
73
-
74
-
75
-
76
-
77
-
78
-
79
-
80
-
81
-
82
-
83
-
84
-
85
-
86
-
87
-
88
-
89
-
90
-
91
-
92
-
93
-
94
-
95
-
96
-
97
-
98
-
99
-
100
-
101
-
102
-
103
-
104
-
105
-
106
-
107
-
108
-
109
-
110
-
111
-
112
-
113
-
114
-
115
-
116
-
117
-
118
-
119
-
120
-
121
-
122
-
123
-
124
-
125
-
126
-
127
-
128
-
129
-
130
-
131
-
132
-
133
-
134
-
135
-
136
-
137
-
138
-
139
-
140
-
141
-
142
-
143
-
144
-
145
-
146
-
147
-
148
-
149
-
150
-
151
-
152
-
153
-
154
-
155
-
156
-
157
-
158
-
159
-
160
-
161
-
162
-
163
-
164
-
165
-
166
-
167
-
168
-
169
-
170
-
171
-
172
-
173
-
174
-
175
-
176
-
177
-
178
-
179
-
180
-
181
-
182
-
183
-
184
-
185
-
186
-
187
-
188
-
189
-
190
-
191
-
192
-
193
-
194
-
195
-
196
-
197
-
198
-
199
-
200
-
201
-
202
-
203
-
204
-
205
-
206
-
207
-
208
-
209
-
210
-
211
-
212
-
213
-
214
-
215
-
216
-
217
-
218
-
219
-
220
-
221
-
222
-
223
-
224
-
225
-
226
-
227
-
228
-
229
-
230
-
231
-
232
-
233
-
234
-
235
-
236
-
237
-
238
-
239
-
240
-
241
-
242
-
243
-
244
-
245
-
246
-
247
-
248
-
249
-
250
-
251
-
252
-
253
-
254
-
255
-
256
-
257
-
258
-
259
-
260
-
261
-
262
-
263
-
264
-
265
-
266
-
267
-
268
-
269
-
270
-
271
-
272
-
273
-
274
-
275
-
276
-
277
-
278
-
279
-
280
-
281
-
282
-
283
-
284
-
285
-
286
-
287
-
288
-
289
-
290
-
291
-
292
-
293
-
294
-
295
-
296
-
297
-
298
-
299
-
300
-
301
-
302
-
303
-
304
-
305
-
306
-
307
-
308
-
309
-
310
-
311
-
312
-
313
-
314
-
315
-
316
-
317
-
318
-
319
-
320
-
321
-
322
-
323
-
324
-
325
-
326
-
327
-
328
-
329
-
330
-
331
-
332
-
333
-
334
-
335
-
336
-
337
-
338
-
339
-
340
-
341
-
342
-
343
-
344
-
345
-
346
-
347
-
348
-
349
-
350
-
351
-
352
-
353
 |
 |