Brother International PE-DESIGN 10 Instruction Manual - Page 206
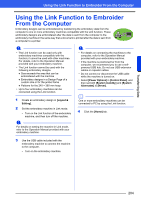
Using the Link Function to Embroider From the Computer, Send], Link], Transferred design, Queue
 |
View all Brother International PE-DESIGN 10 manuals
Add to My Manuals
Save this manual to your list of manuals |
Page 206 highlights
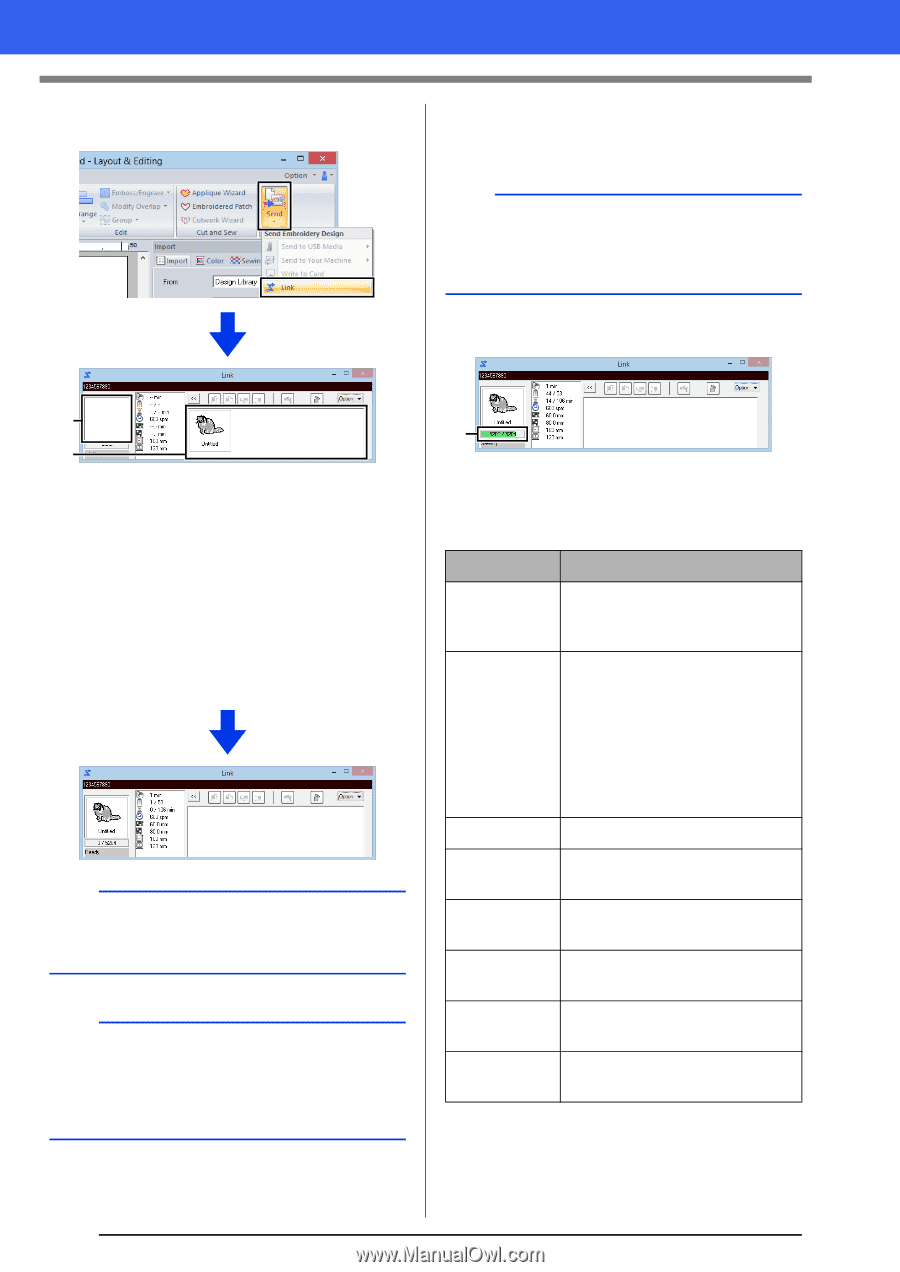
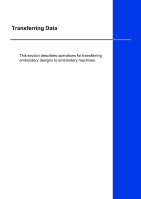
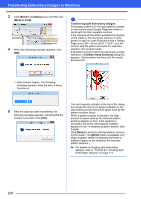
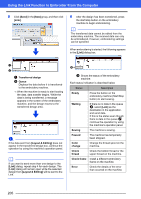
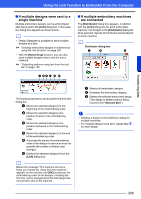
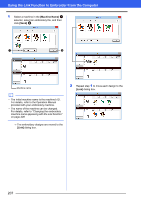
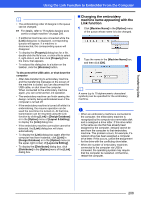
Using the Link Function to Embroider From the Computer 5 Click [Send] in the [Sew] group, and then click [Link]. 6 After the design has been transferred, press the start/stop button on the embroidery machine to begin embroidering. b The transferred data cannot be edited from the embroidery machine. The received data can only be embroidered. However, embroidering settings can be specified. When embroidering is started, the following appears in the [Link] dialog box. a b a Transferred design b Queue Displays the data before it is transferred to the embroidery machine. When the machine is ready to start loading the data, data transfer begins. While the data is being transferred, a message appears in the screen of the embroidery machine, and the design moves to the transferred design area. a If the data sent from [Layout & Editing] does not appear in the transferred design box, continue the operation by using the machine's operation panel. b If you want to send more than one design to the [Link] dialog, repeat step 4 for each design. The [Link] dialog will remain open while the selected design from [Layout & Editing] will be sent to the Link. c c Shows the status of the embroidery machine. Each status indication is described below Status Description Ready Press the button on the embroidery machine (Start/Stop button) to start sewing. Waiting If there is no data in the queue b, select [Link] as the destination in the application, and send data. If this is the status even though there is data in the queue b, continue the operation by using the machine's operation panel. Sewing The machine is sewing. Paused The machine has temporarily been stopped. Color change Change the thread spool on the machine. Check thread Check the bobbin thread or the upper thread on the machine. Check frame Install a different embroidery frame on the machine. Error Check the details of the error that occurred on the machine. 205
-
 1
1 -
2
-
3
-
4
-
5
-
6
-
7
-
8
-
9
-
10
-
11
-
12
-
13
-
14
-
15
-
16
-
17
-
18
-
19
-
20
-
21
-
22
-
23
-
24
-
25
-
26
-
27
-
28
-
29
-
30
-
31
-
32
-
33
-
34
-
35
-
36
-
37
-
38
-
39
-
40
-
41
-
42
-
43
-
44
-
45
-
46
-
47
-
48
-
49
-
50
-
51
-
52
-
53
-
54
-
55
-
56
-
57
-
58
-
59
-
60
-
61
-
62
-
63
-
64
-
65
-
66
-
67
-
68
-
69
-
70
-
71
-
72
-
73
-
74
-
75
-
76
-
77
-
78
-
79
-
80
-
81
-
82
-
83
-
84
-
85
-
86
-
87
-
88
-
89
-
90
-
91
-
92
-
93
-
94
-
95
-
96
-
97
-
98
-
99
-
100
-
101
-
102
-
103
-
104
-
105
-
106
-
107
-
108
-
109
-
110
-
111
-
112
-
113
-
114
-
115
-
116
-
117
-
118
-
119
-
120
-
121
-
122
-
123
-
124
-
125
-
126
-
127
-
128
-
129
-
130
-
131
-
132
-
133
-
134
-
135
-
136
-
137
-
138
-
139
-
140
-
141
-
142
-
143
-
144
-
145
-
146
-
147
-
148
-
149
-
150
-
151
-
152
-
153
-
154
-
155
-
156
-
157
-
158
-
159
-
160
-
161
-
162
-
163
-
164
-
165
-
166
-
167
-
168
-
169
-
170
-
171
-
172
-
173
-
174
-
175
-
176
-
177
-
178
-
179
-
180
-
181
-
182
-
183
-
184
-
185
-
186
-
187
-
188
-
189
-
190
-
191
-
192
-
193
-
194
-
195
-
196
-
197
-
198
-
199
-
200
-
 201
201 -
 202
202 -
 203
203 -
 204
204 -
 205
205 -
 206
206 -
 207
207 -
 208
208 -
 209
209 -
 210
210 -
 211
211 -
212
-
213
-
214
-
215
-
216
-
217
-
218
-
219
-
220
-
221
-
222
-
223
-
224
-
225
-
226
-
227
-
228
-
229
-
230
-
231
-
232
-
233
-
234
-
235
-
236
-
237
-
238
-
239
-
240
-
241
-
242
-
243
-
244
-
245
-
246
-
247
-
248
-
249
-
250
-
251
-
252
-
253
-
254
-
255
-
256
-
257
-
258
-
259
-
260
-
261
-
262
-
263
-
264
-
265
-
266
-
267
-
268
-
269
-
270
-
271
-
272
-
273
-
274
-
275
-
276
-
277
-
278
-
279
-
280
-
281
-
282
-
283
-
284
-
285
-
286
-
287
-
288
-
289
-
290
-
291
-
292
-
293
-
294
-
295
-
296
-
297
-
298
-
299
-
300
-
301
-
302
-
303
-
304
-
305
-
306
-
307
-
308
-
309
-
310
-
311
-
312
-
313
-
314
-
315
-
316
-
317
-
318
-
319
-
320
-
321
-
322
-
323
-
324
-
325
-
326
-
327
-
328
-
329
-
330
-
331
-
332
-
333
-
334
-
335
-
336
-
337
-
338
-
339
-
340
-
341
-
342
-
343
-
344
-
345
-
346
-
347
-
348
-
349
-
350
-
351
-
352
-
353
 |
 |