Brother International PE-DESIGN Ver.6 Users Manual - English - Page 105
Moving the center point of the, concentric circle stitch and radial stitch, Specifying hole sewing
 |
View all Brother International PE-DESIGN Ver.6 manuals
Add to My Manuals
Save this manual to your list of manuals |
Page 105 highlights
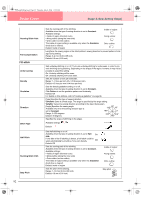
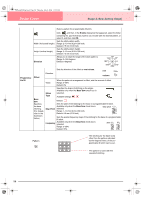
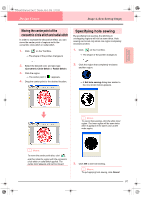
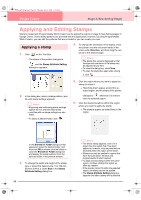
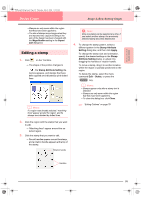
PeDesignV6Eng.book Page 97 Thursday, July 8, 2004 11:59 AM Design Center Stage 4 (Sew Setting Stage) Moving the center point of the concentric circle stitch and radial stitch In order to increase the decorative effect, you can move the center point of regions set to the concentric circle stitch or radial stitch. 1. Click on the Tool Box. → The shape of the pointer changes to . 2. Select the desired color and sew type (Concentric Circle Stitch or Radial Stitch). 3. Click the region. → The center point ( ) appears. 4. Drag the center point to the desired location. Specifying hole sewing By specifying hole sewing, the stitching in overlapping regions will not be sewn twice. Hole sewing can be set only when one region completely encloses another. 1. Click on the Tool Box. → The shape of the pointer changes to . 2. Click the region that completely encloses another region. → A Set hole sewing dialog box similar to the one shown below appears. Advanced Opreation Design Center b Memo: To cancel hole sewing, click the white inner region. The inner region will be sewn twice when it appears in the same color as the outer region. b Memo: To move the center point later, click , and then click the region with the concentric circle stitch or radial stitch applied. The center point appears and can be moved. 3. Click OK to set hole sewing. b Memo: To quit applying hole sewing, click Cancel. 97
-
 1
1 -
2
-
3
-
4
-
5
-
6
-
7
-
8
-
9
-
10
-
11
-
12
-
13
-
14
-
15
-
16
-
17
-
18
-
19
-
20
-
21
-
22
-
23
-
24
-
25
-
26
-
27
-
28
-
29
-
30
-
31
-
32
-
33
-
34
-
35
-
36
-
37
-
38
-
39
-
40
-
41
-
42
-
43
-
44
-
45
-
46
-
47
-
48
-
49
-
50
-
51
-
52
-
53
-
54
-
55
-
56
-
57
-
58
-
59
-
60
-
61
-
62
-
63
-
64
-
65
-
66
-
67
-
68
-
69
-
70
-
71
-
72
-
73
-
74
-
75
-
76
-
77
-
78
-
79
-
80
-
81
-
82
-
83
-
84
-
85
-
86
-
87
-
88
-
89
-
90
-
91
-
92
-
93
-
94
-
95
-
96
-
97
-
98
-
99
-
 100
100 -
 101
101 -
 102
102 -
 103
103 -
 104
104 -
 105
105 -
 106
106 -
 107
107 -
 108
108 -
 109
109 -
 110
110 -
111
-
112
-
113
-
114
-
115
-
116
-
117
-
118
-
119
-
120
-
121
-
122
-
123
-
124
-
125
-
126
-
127
-
128
-
129
-
130
-
131
-
132
-
133
-
134
-
135
-
136
-
137
-
138
-
139
-
140
-
141
-
142
-
143
-
144
-
145
-
146
-
147
-
148
-
149
-
150
-
151
-
152
-
153
-
154
-
155
-
156
-
157
-
158
-
159
-
160
-
161
-
162
-
163
-
164
-
165
-
166
-
167
-
168
-
169
-
170
-
171
-
172
-
173
-
174
-
175
-
176
-
177
-
178
-
179
-
180
-
181
-
182
-
183
-
184
-
185
-
186
-
187
-
188
-
189
-
190
-
191
-
192
-
193
-
194
-
195
-
196
-
197
-
198
-
199
-
200
-
201
-
202
-
203
-
204
-
205
-
206
-
207
-
208
-
209
-
210
-
211
-
212
-
213
-
214
-
215
-
216
-
217
-
218
-
219
-
220
-
221
-
222
-
223
-
224
-
225
-
226
-
227
-
228
-
229
-
230
-
231
-
232
-
233
-
234
-
235
-
236
-
237
-
238
-
239
-
240
-
241
-
242
-
243
-
244
-
245
-
246
-
247
-
248
-
249
-
250
-
251
-
252
-
253
-
254
-
255
-
256
-
257
-
258
-
259
-
260
-
261
-
262
-
263
-
264
-
265
-
266
-
267
-
268
-
269
-
270
-
271
-
272
 |
 |
