Brother International PE-DESIGN Ver.6 Users Manual - English - Page 114
Layout & Editing
 |
View all Brother International PE-DESIGN Ver.6 manuals
Add to My Manuals
Save this manual to your list of manuals |
Page 114 highlights
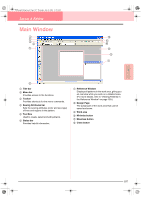
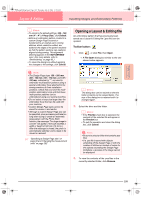
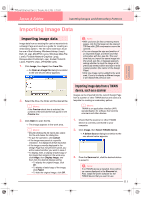
PeDesignV6Eng.book Page 106 Thursday, July 8, 2004 11:59 AM Layout & Editing Layout & Editing is used to combine different objects into an embroidery pattern. The most complex objects can be digitized in Design Center and imported into the Design Page, or created in Layout & Editing with the wizard for automatically converting an image into an embroidery pattern. Furthermore, you can add text and monograms, rectangles, circles, broken lines, curves, and manual punching patterns, and define sewing attributes (thread color and sew type, including stitch patterns created in Programmable Stitch Creator) to the different objects of the embroidery pattern. You can move all of the patterns to obtain the best layout, and cut portions of patterns and rearrange them as desired. Once the embroidery pattern is completed, you can save your work on the computer hard disk, print it, or transfer it to an original card (or whatever media your sewing machine uses) so that it can be sewn from your machine. ■ Inputting Images and Embroidery Patterns Images from existing files, such as clip art or custom-made portrait drawings, and images from TWAIN devices or the Clipboard can be imported into Layout & Editing. These images can be traced or used with the wizard to automatically create embroidery patterns. In addition, embroidery patterns created in Design Center or a pattern from an embroidery card can be imported into the Layout & Editing Design Page. ■ Editing Embroidery Patterns The embroidery patterns in the Design Page can be edited by adding text and other drawn objects to customize the embroidery pattern. ■ Checking Embroidery Patterns After designing the embroidery pattern, you can preview it. In the preview, you can view the stitches. In the realistic preview, you can see how the design will look when it is sewn. You can also view the sewing order for each object in the design. ■ Saving and Printing When the embroidery pattern is finished, it can be saved on the computer's hard disk in one of many formats (.pes, .dst, .hus, .exp, or, .pcs). In addition, the pattern can be transferred to an original card by using the USB card writer, to a floppy disk, or to other types of media used by your sewing machine, such as CompactFlash cards and USB media. In addition, the embroidery pattern can be printed. ■ Changing Software Settings Grid settings for the Design Page and measurement units can be adjusted to help create the embroidery pattern and place added objects. ■ Information for Optional Large-Size Hoop Users Combined embroidery patterns can be created specifically for multi-position hoops, including the Jumbo Hoop or Extra Large Hoop. 106
-
 1
1 -
2
-
3
-
4
-
5
-
6
-
7
-
8
-
9
-
10
-
11
-
12
-
13
-
14
-
15
-
16
-
17
-
18
-
19
-
20
-
21
-
22
-
23
-
24
-
25
-
26
-
27
-
28
-
29
-
30
-
31
-
32
-
33
-
34
-
35
-
36
-
37
-
38
-
39
-
40
-
41
-
42
-
43
-
44
-
45
-
46
-
47
-
48
-
49
-
50
-
51
-
52
-
53
-
54
-
55
-
56
-
57
-
58
-
59
-
60
-
61
-
62
-
63
-
64
-
65
-
66
-
67
-
68
-
69
-
70
-
71
-
72
-
73
-
74
-
75
-
76
-
77
-
78
-
79
-
80
-
81
-
82
-
83
-
84
-
85
-
86
-
87
-
88
-
89
-
90
-
91
-
92
-
93
-
94
-
95
-
96
-
97
-
98
-
99
-
100
-
101
-
102
-
103
-
104
-
105
-
106
-
107
-
108
-
 109
109 -
 110
110 -
 111
111 -
 112
112 -
 113
113 -
 114
114 -
 115
115 -
 116
116 -
 117
117 -
 118
118 -
 119
119 -
120
-
121
-
122
-
123
-
124
-
125
-
126
-
127
-
128
-
129
-
130
-
131
-
132
-
133
-
134
-
135
-
136
-
137
-
138
-
139
-
140
-
141
-
142
-
143
-
144
-
145
-
146
-
147
-
148
-
149
-
150
-
151
-
152
-
153
-
154
-
155
-
156
-
157
-
158
-
159
-
160
-
161
-
162
-
163
-
164
-
165
-
166
-
167
-
168
-
169
-
170
-
171
-
172
-
173
-
174
-
175
-
176
-
177
-
178
-
179
-
180
-
181
-
182
-
183
-
184
-
185
-
186
-
187
-
188
-
189
-
190
-
191
-
192
-
193
-
194
-
195
-
196
-
197
-
198
-
199
-
200
-
201
-
202
-
203
-
204
-
205
-
206
-
207
-
208
-
209
-
210
-
211
-
212
-
213
-
214
-
215
-
216
-
217
-
218
-
219
-
220
-
221
-
222
-
223
-
224
-
225
-
226
-
227
-
228
-
229
-
230
-
231
-
232
-
233
-
234
-
235
-
236
-
237
-
238
-
239
-
240
-
241
-
242
-
243
-
244
-
245
-
246
-
247
-
248
-
249
-
250
-
251
-
252
-
253
-
254
-
255
-
256
-
257
-
258
-
259
-
260
-
261
-
262
-
263
-
264
-
265
-
266
-
267
-
268
-
269
-
270
-
271
-
272
 |
 |
